Archive
How a Student takes a Moodle Video Assignment in the LRC
- On one of the LRC iMacs, in the Safari web browser (open new window with COMMAND-key+n),
- go to your Moodle course, (1) find the video Assignment, read the assignment instructions (what your teacher wants you to record). Then click underneath the (2) button: “Add video Assignment”, to open the (3) submission window:

- Note that she will also have to allow the flash player to interact with her webcam first.
 If you see no web cam video window, only a black frame, read in.
- In the submission window, choose the tab “Webcam” (1), use the dropdown to select the camera hardware (2).

- Check the headset microphone audio: The external headset microphone on the iMacs did not work., but now it does, provided you do this: control-click on Flash’s a video preview window (= the window where you see yourself like in a mirror) for the web camera, and click on “settings”.
-

- Click on the microphone icon :

- Make sure the USB PnP device is selected.

- You can bring up the settings dialogue, make sure the USB PnP device is chosen for audio and CRANK up the microphone input sensitivity! Then, by tabbing (don’t speak yet) on the headset microphone, test the volume levels with the built-in volume meter (should show lots of green bars when you tab). Unlike in the picture, do not choose “reduce echo ”.

-
- Start (3) the video recording.
- Afterwards, the student can review (4) her submission.
- If you don’t like your first recording, (3) “record” over it and review again with (4) “Play”. If you do this and the video appears frozen, drag the timeline cursor forward to get the re-recorded video to play. If this does not seem to work, you are likely still able to submit your 2nd attempt, just not review it again.

- Click through all the “Next”etc. buttons:
-


- until you get to the feedback page for the student (caveat: in IE9, the video does not fit into the frame provided on the page).

- Note, it warns you to be patient now:

-
- LRC support:
- Depending on your hardware (webcam), software and network support, you can record your language speaking video assignments on any device that has a webcam and a browser that supports flash – and even more devices, if you are willing to post process and upload the video clip.
- If you run into problems or want to use a tested setup, we recommend using the LRC. Since our PCs have no built-in or added webcam (proposed), we can currently only use our 5 8 iMacs (see LRC Layout, see Classroom Calendar and iMacs Calendar for availability). Our (limited) tests worked better in Safari than Firefox.


Successful test of the new streaming video recording assignment for language proficiency assessment in Moodle.
- Video recordings allow for a more authentic assessment of spoken language proficiency. Today, we could test a new Moodle video assignment type for Almut’s Summer II Elementary German II class: Preparing a natural sounding statement on one’s favorite holiday. This Moodle assignment type is an extension to students of the teacher video upload tool using a service Kaltura – we hinted at that earlier.
- Teachers, when editing their Moodle course, can find this assignment type in the dropdown: Activity as “Video”.

- The assignment options: Note that creating a video assignment is pretty much the same as creating other assignments in Moodle, and so is grading, except instead of reading, you view the submission, right within the web page.

- An example of guiding questions for a recording assignment is here (topic: holiday, language: German):

- Here is how the teacher sees the student submission in the gradebook.
")

- Caveat: in Safari, we were not able to close the video popup, after viewing it from the class roster, and could only back out of the entire gradebook. Instead, from the roster, first open the page with the individual student submission, and review the video there on that page:

- For the student experience, see here.
- Further reading: The CTL has a number of step-by-step instructions which we recommend for further reading: Student Video Assignment, and specifically for students: Upload a Video for a Video Assignment; for instructors: Grading Video Assignment Submissions.
- The LRC had originally prepared to record the students with our old, handheld mini-DV cameras, import the movie into iMovie or Windows Movie Maker, then find a way to get the files (with easily identifiable submitter names) to the teachers. Hitherto, our best option was compression of the video to to fit into the Moodle 64MB file upload size limit (which, even if you decide to shoot and produce your video elsewhere and bring it as an uploadable file to the assignment , does not apply to the Video assignment either).
- Preliminary testing seems to indicate that video recording of pairs/dialogues is also possible with the LRC’s webcam setup . However, because of the angle restrictions, capturing such sessions will be less natural.
- Overall, the new Moodle video assignment seems a major improvement for all parties – students, teachers and support –, and can help with more authentic assessment of


")


Speaking dictionary/pronunciation help, Part 1–the pedagogy
On the LRC PC’s, you can copy foreign language text to the clipboard (or with non-western languages to an MS-Word file) and have a wizard (right click, choose: “Read Clipboard”) pronounce for you, like so:

The following languages are supported:
| Language | Demo |
| American English | |
| French | Le Monde |
| German | |
| Italian | |
| Japanese | Japanese |
| Korean | |
| Portuguese (Brazilian) | |
| Russian | Gazetta |
| Spanish | El Pais@10:34 |
Note 1: In reality, the audio quality is smoother than in these demos which needed to be recorded over the network using MSTSC, because of Windows Media Encoder not being able to capture the special video overlay of the MS-Agent technology.
Note 2: Deskbot has problems understanding the Windows clipboard text encoding of some non-western languages. For these languages, instead of simple double-clicking the deskbot wizard to have him read out the clipboard (which would result in gibberish), paste your text into a MS-Word document and have deskbot read this document for you instead: Use the Deskbot option “Read Word document” (allowing Word to translate the character encoding into a format Deskbot can understand enough to aurally (even if not visually) display).
Listen to the Deskbot’s self-introduction when you log in to learn how to change the default language to the language you study.
You can also change other settings (in the LRC automatically limited to your current user session) by right-clicking the deskbot notification-area icon ![]()
Or if you want to configure your own Windows XP computer to support foreign language text-to-speech, the procedure and settings we recommend are documented in Part 2.
Speaking dictionary/pronunciation help, Part 2 – The technology: Installation & configuration of the free Windows XP text-to-speech wizard
- MS-Speech synthesis which comes free with Windows XP is a mature technology which gets even better if combined with free downloadable voice/language combinations and a simple interface.
- Since 2005, I have set up the following text-to-speech environment in language learning centers, wherever I could: The pleasant, speedy interface and convenient integration into the computing productivity environment (Clipboard, Internet Explorer) seems to lead to higher usage than online speaking dictionaries. And the price is hard to beat (all components are free on Windows XP).
- The Deskbot pronunciation – most of my own testing has been for German and English, but I rely on the feedback of native speaking other teachers and tutors for other supported languages – is good on a word level . The prosody of sentence pronunciation leaves a lot to be desired, but is a start nevertheless.
- If you want to install the Deskbot Text-to-speech wizard for your users, or for your own testing and language learning, here are the steps and settings we recommend:
- Use these installers:
-
Language TTS Engine Language Add-On American English tv_enua.exe already installed British English lhttseng.exe already installed Dutch lhttsdun.exe agtx0413.exe French lhttsfrf.exe agtx040C.exe German lhttsged.exe agtx0407.exe Italian lhttsiti.exe agtx0410.exe Japanese lhttsjpj.exe agtx0411.exe Korean lhttskok.exe agtx0412.exe Portuguese (Brazilian) lhttsptb.exe agtx0416.exe Russian lhttsrur.exe agtx0419.exe Spanish lhttsspe.exe agtx0C0A.exe - Move the Deskbot near the lower right corner notification bar to have it not clutter the user interface.
- Do not automatically read clipboard when changed
- Do NOT play animation sound effect: effects wear out quickly and become distracting or annoying.
- Default set to American male: or whatever in your shared environment is the language all learners understand .
- You have to click “set” to actually effect a change, and close the options dialogue.
- Set read random greeting at startup: in a shared computer setting, you can on startup.
- Have the Deskbot introduce himself with basic usage instructions: In order to have this feature self-advertise in the LRC, beyond my face-to-face-classes in the language center, I have the Deskbot read out an informational welcome message every time it starts up (you could use this feature also to have the Deskbot issue a random greeting in your target language).
- Show balloon – useful since words scroll in as spoken.
- In the Speech control panel, you can set the speed to slow – useful for language learners.
- MS Agent Options: TBA
- You can view the Deskbot install process in sequence as a screencast:
- Or you can view the configuration options screens with recommended settings in this screenshot gallery:


- For my own – and maybe your – reference, here is a raw screencast of the most recent installation and configuration of Deskbot multilingual text-to-speech engine for MS-Windows.
-
time
content
0,00
Base install begin
2,50
Deskbot – including its installer – cannot handle the character encoding of some non-western languages that it speaks (Japanese, Korean, Russian). In order to have Deskbot speak these languages, you have to use the Deskbot option “Read Word document” (allowing Word to translate the character encoding into a format Deskbot can understand enough to aurally (even if not visually) display).
4,13
fine tuning for language learning purposes in deskbot options and speech control panel after install
6,09
“advanced character options”: set the speaking speed
Returning to the base installation of some more languages
8,04
more deskbot options
10,34
test of Spanish pronunciation with elpais.com
- In a computer lab environment with Faronics Deepfreeze and Symantecs Ghost imaging, you will also want to copy these settings to the Default user, and make sure that the deskbot startup items gets added to all users or HKLM registry hive (the interface does not allow for installing for all users).
Protected: How to conduct an easy oral exam with Sanako1200 (Model imitation/Question Response) – Part II: Implementation/instruction of examined students
Foreign Language Character Input on Windows XP in the LRC
The LRC offers the following foreign language characters writing support:
| American English | us international | not needed | us-int |
| Arabic | Google;MS;MS-maren;fontboard | maybe later, now osk | demo |
| British English | us international | not needed | us-int |
| Dutch | us international | not needed | us-int |
| Farsi | Google;MS | maybe later, now osk | demo |
| French | us international | not needed | us-int |
| German | us international | not needed | us-int |
| Greek | Google;MS | maybe later, now osk | demo |
| Italian | us international | not needed | us-int |
| Japanese | MS | not needed | |
| Korean | MS | maybe later, now osk | demo |
| Mandarin | MS;pinyinput | not needed | pinyin |
| Portuguese (Brazilian) | us international | not needed | us-int |
| Russian | Google;MS | maybe later, now osk | demo |
| Spanish | us international | not needed | us-int |
The support is best accessed from the “international toolbar”, like so: 
You can also use the windows on-screen keyboard to input non-Western characters on a computer that has not the corresponding keyboard overlay stickers. In the small-group workspaces, which have writing pads, you can also use the MS-Handwriting IME for East-Asian languages.
B-languages for Relay interpreting in European Parliament Plenary Video (2009)
You can do relay interpreting from European parliament plenary videos by selecting one of the b-languages which the parliament interpreters provide.
The (3) video download control for videos older than 20080711 allows for the recording of only one language-track in the video. You can download, from a link emailed to you, either the a- (e.g. (1) Italian here) or one b-language (e.g. (2) German here), as you can see below:

Given that software tends to always get impoved, is is rather surprising that one does not seem to have a similar choice in the new video downloader – however, the improvement is just a bit hidden.
For Videos newer than 20080710, all language-tracks are automatically contained within the downloaded (how? see here) video file. To switch between a- and b-language or between b-languages, in Windows Media Player, go to menu (if the menu does not show, right-click left from the “Now playing”button””: file / play / audio and language tracks / [now choose your language].
E.g. if you do not want to listen to Ferrero-Waldner not speaking her native tongue, choose like pictured below:

And she does not really speak “Zulu” which seems to have been chosen by the European Parliament technicians as the designator of the original a-language, there being no such concept in windows media player. Çan’t have it all. Pretty close, though.
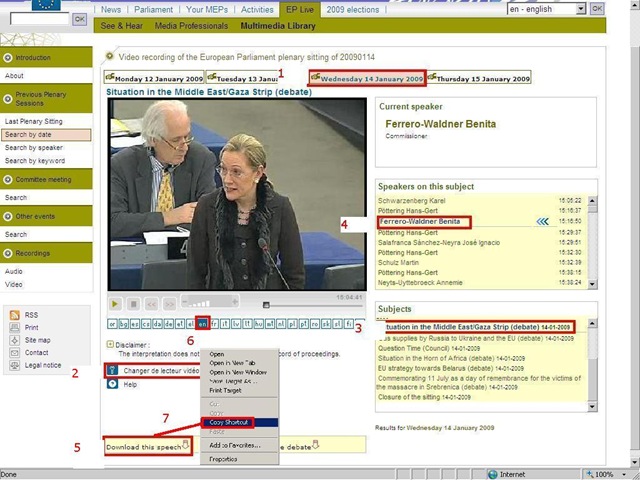
Passing around European Parliament Plenary Video Clips & Transcripts
-
European parliament video clips are quite big and it would be easier not to have to pass them around. But how to communicate to somebody else which video clip to watch if the clip selected is not reflected in the browser address bar? The flash application unfortunately forces you to provide the “bibliographic” information in pieces (start url, date, possibly video format, debate title, speaker name). But in the end you get a direct link which you can pass on to save others from having to jump through the same hoops: If you just need the direct link, skip to step 7. Otherwise: Start with the calendar interface: http://www.europarl.europa.eu/wps-europarl-internet/frd/vod/research-by-date?language=en, find your (1) date, e.g. “Wednesday 14 January 2009”,
-
The window with the recording of that date will come up; now you CAN (2) change the video format – wmv (should work on most Windows PCs, free upgrade for MACs here:http://www.microsoft.com/windows/windowsmedia/player/wmcomponents.mspx) or mp4 -, an option that will show in the browser address bar. If you must, change format this first, as it seems to rewind the video to the beginning of the session.
-
Click on your (3) debate, e.g. “Situation in the Middle East/Gaza Strip (debate) 14-01-2009”.
-
Click on your (4) speaker, e.g. “ 15:16:50 Benita Ferrero-Waldner 00:13:12 15:30:02”
-
Instead of watching online (e.g. if you find the stream quality lacking), you can (5) download the video (in the format you have chosen, either wmv or mp4). UPDATE: The web site added a disclaimer that you have to 1.read, 2.check before you can 3. download, as illustrated below:

-
Note: you can (6) change the b-language (for relay interpreting) when streaming. Plus, when you download the video, all the b-languages are downloaded together with the a-language. See here how to select the desired b-language when playing the downloaded file.

-
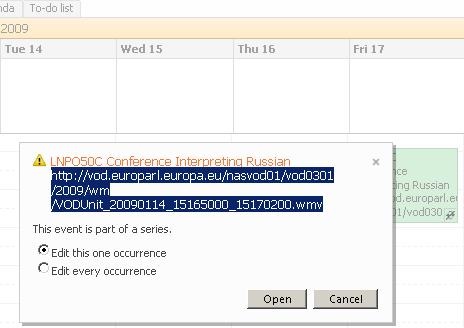
Easier than providing all bibliographical information (calendar URL, date, debate and speaker) is the direct URL of the download clip. Right click on “Download this Speech”, select (7) “Copy shortcut” from the context menu. Then paste this, e.g. http://vod.europarl.europa.eu/nasvod01/vod0301/2009/wm/VODUnit_20090114_15165000_15300200.wmv or if you chose mp4 format: http://vod.europarl.europa.eu/nasvod02/vod0301/2009/isma/VODUnit_20090114_15165000_15300200.mp4, into the calendar event for the exam – completes your checklist for the exam, and at the beginning of the exam, you can download the link from here onto the students’ computer. Or, for assigning materials to students or passing them to external examiners, email this direct link.
-
Unfortunately, it appears that the transcripts, unlike the audio channels, do not include the relay languages and have to be accessed from a different (calendar-)interface here: http://www.europarl.europa.eu/activities/plenary/cre/calendar.do?language=EN: “The verbatim report of proceedings of each sitting (often referred to by its French abbreviation, CRE) is published (Rule 173 of the Rules of Procedure) and contains the speeches made in plenary, in the original language.”

Appendix: The file size of these videos is about 10MB per minute. If you feel you need to save the videos locally, use an appropriate location (where you have sufficient space, the file will not be erased, only appropriate users have access – consider this before using a public network share, personal drive). Not really more “local” is saving the video clip on the http://hale-interpreting.groups.live.com Skydrive which can also hold clips larger than 50MB[ doubled to 100MB on June 20,2011] if you pre-process them like described in the zipping instruction.
Watch a 5-minute narrated video-clip that demonstrates the above steps.


Questions? Read the About. Or just ask me a quick Our Databases: Resources with calendars -- Language learning material Moodle Sites, multimedia files -- films


FAQs for LRC student staff or for students or for teachers. To search our FAQs, in the browser addressbar, add after "https://plagwitz.wordpress.com/feed/?tag=faqs+/" "+TAG1" (from tag cloud below) OR "https://plagwitz.wordpress.com/feed/tag=faqs
&category_name=" "CAT1" (from category hierarchy below). OR search both categories and tags, and multiple TAGs/CATs (connect with "," for OR-search, with "+" for AND-search), like so: https://plagwitz.wordpress.com/feed/?tag=TAG1+TAG2+...TAGn&category_name=CAT1
+CAT2+...CATn"
Other ways to find help
If you cannot find it here, look there: 5,500 Language-Learning Links and Programs for learning or teaching 150 languages
Shortcuts:Our Lists, Our Maps, LRC Staff Moodle Site,LRC Project Moodle Site, 49erexpress, UNCC Moodle, Student Recordings: s:claslcslrcsanakostudent
Learning usage samples: Sanako oral exam, Kaltura webcam presentation, Dictation with speech recognition, Sanako written exam, Chinese and Japanese interactive stroke-order practice
Test the Sanako Installer, Webbrowser Popup Konfigurator for XP, or Windows7, faster LRC TeacherPC Log-in Let MS facilitate diacritics writing by installing for you US-International keyboard layout
This is my personal blog (Google+). The views expressed on these pages are mine alone and not those of my employer. The information in this weblog is provided “AS IS” with no warranties, and confers no rights.
