Archive
Archive for May, 2013
How to easily view resource mailboxes calendar free/busy using Outlook calendar groups
2013/05/29
Leave a comment
- Display all items in a category with a single click on the checkbox I front of the calendar group
-
Display any portion of the time line in " scheduling view" by
-
Selecting the days in the square calendar sheet in the upper left
-
Navigate the time line with the bottom horizontal scrollbar
-
Note the additional helpful "from [start date]" indicator in a mailboxes booking that is not displayed completely
How to quickly add resource mailbox calendars as an Outlook calendar group
2013/05/29
Leave a comment
- Right-click the left calendar tree.
-
Choose context menu item: add calendar group / from address list:
-
Type " LRC" to search – or the consistent naming scheme you implemented (I hope!).
-
Select all relevant calendars to add.
-
Click on button: "calendar".
-
Click on button: "ok":
-
Done:
How to organize your email by creating an Inbox rule in OWA
2013/05/28
Leave a comment
- This step-by-step GUIDE was written for filtering emails from our langlabemailer program (they happen to have “Your UNCC-LRC” in the subject) into a separate folder so that users of the LRC keep the overview:
- students (longitudinally, for their language learner ePortfolios) ,
- but especially teachers (of classes with up to 36 students, throughout the term).
- But you can easily adapt the guide to any other email purpose.
- Including other LRC workflows based on emails: LRC resource booking also relies on OWA emails. All email sent from LRC resource mailboxes have “LRC” at the beginning of the user name and email address.
- In short: Options / Create an Inbox Rule / Click “ new” / choose a type / choose keywords / choose folder to sort the email into when it arrives. Or graphically:

-
-
-
-
-
-
-
“
How to get access to the LRC Sanako (teacher materials, student recordings) from your office or home PC
2013/05/15
1 comment
- Run the Sanako Installer (first meant for faculty offices only, but now faculty also want to have access from home, so I added that functionality).
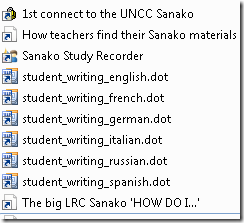
- On your office and or home PC, you get a folder “SANAKO” on your desktop. This folder will contain all you need to access student assessments from past classes or upload learning materials for future classes:
- In the office:
 : It is sufficient to click the additional “UNCC…” links at the bottom of the list .
 - At home:

- Click “1st connect…” and log into the campus.
- Click “How teachers find…”, log in with the blog password, open the PDF, click the links in the PDF to the Sanako off-campus folders, log in again with the network credentials as shown in the PDF (sigh…).
- EXAMPLE: Here you can see on a faculty home PC:
- the sanako recorder and campus connector:

- the SANAKO desktop folder shortcuts:

- You get the Word templates only if you can use them (have WORD installed – remember you can install MS-Office with your free faculty license from here).
- (No, you won’t get the “UNCC…”shortcuts at home, we simplified since.)
- the sanako recorder and campus connector:
- Both office and home:
- Drag any audio files into the Sanako study recorder window (further reading on why the Sanako study recorder is useful for teachers).
- Need to record? configure your microphone in Sanako study recorder, menu Tools.
- In the office:
Categories: audience-is-teachers, documentation, e-infrastructure, e-languages, faculty-offices, Institution-is-University-of-North-Carolina-Charlotte, service-is-configuring-learning-tools, service-is-it-managing, service-is-programming
autoit, iallt2013, MS-Word, sanako-study-1200, sanakorecorderinstall.exe, student.exe, vpn
How faculty can move their local files to the new computer during their office PC upgrade using temporary network space
2013/05/12
Leave a comment
- Go to your H: drive:

- Click on the icon: “TempMigrationStorage”:

- Here is your temporary storage which you should move your files to from your old computer, so that you can move them later to your new computer:

- In this example, I copied my “downloads”folder from my local drive to my network “TempMigrationStorage”. Even when my old computer gets removed, I will be able to access the network from the new computer and download the files from there to the new computer.
- Files on your H: drive do not need to be moved that way. Settings on your old PC cannot be moved that way. Typical candidates for files that should be moved that way include large multimedia files that you could not store on your H: drive. For finding them on your local drive, I recommend examining your C: drive with the free WinDirStat.
Make life simpler in the language lab by disabling extra audio panels
2013/05/10
Leave a comment
- Problem: Having multiple audio panels enabled can led to too many options = sources of errors and confusion.
- Software (e.g. Saba Centra) may defaults to different audio panels (front “Microphone” preferred over a “Rear Input” that can be used as a Microphone and is the preferred device in your lab (for security, safety and ergonomic reasons).
- Students may make erroneous assumptions and try to reconfigure the PC audio by plugging cables into a different outlet.
- ESP Panel software detects plugging in of devices and asks users to identify whether microphone or line-in device has been plugged into rear input which confuses our users even more.
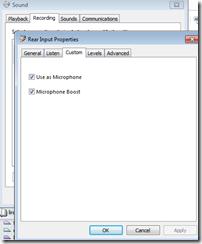
- Software configuration: On Dell Optiplex 760 under Windows 7 , you can
- run mmsys.cpl,
- go to tab:“recording” devices
- to disable the front panel input microphone:
- to configure the “rear input”:
- “Ok” out of all mmsys.cpl dialogues and (for good measure) restart computer.
- Test your software configuration to work (listening, recording) with the applications used in your lab:
- Sanako student recorder
- Saba Centra
- Audacity
- Voicethread
- Moodle: Audio and Kaltura (even though no webcam)
- Etc.?
- Hardware configuration
- Plug your headset microphone and speaker into the rear audio panel. Tie the microphone cable down with a cable tie. Students have managed to pull the cable through the cable tie, so tie the cable into a knot around the cable tie to prevent that
- Tape (plastic that student cannot push a plug through easily) over the front audio panel and put a label on top: “Do not use! Get help at desk!”. Instruct your help desk student staff.
How to comprehensively identify your software packages using the MS-Installer infrastructure
2013/05/10
Leave a comment
- Problem:
- Some packages may have built-in checks which prevent installation. The built-in error messages may be difficult to interpret (even if you speak foreign languages).
- Some built-in checks may be erroneous.
- Product name and version may be difficult to identify.
- Etc.
- Solution: Take advantage of the features of the MS Installer infrastructure.
- If necessary (setup file does not come as an MSI file), try to unpack your setup file (7zip alone will work in many cases. There are more advanced free extractors available on the web).
- with the the unpacked MSI’s
- run with the “/log” parameter and to generate and examine the log file for more speaking (an English!) installation errors.
- Open with MS-Orca to examine the software package properties:
 .
. - Right-click and “copy cell” :

- Esp. note the following:
- “Make”
- Productname (base, qualified) variants
- “Model”
- GUID for Upgradecode (e.g. {00140000-0028-0000-1000-0000000FF1CE})
- Productname
- “Year”:
- GUID for Productcode ({90140000-0028-0804-1000-0000000FF1CE})
- ProductVersion
- “Make”
- you can edit your MSI with MS-Orca (better be sure what you are doing).
- you can compare this installer package with what you already have installed in the registry
- use a registry search tool
- you have to search the registry for the compressed GUIDs, to compress, use this: https://thomasplagwitz.com/tag/guid/.
Categories: e-infrastructure, service-is-it-managing
GUID, MS-ORCA, msi


