Archive
Archive for the ‘multimedia-recording’ Category
How to add multiple clips to the timeline in Expression Encoder – at once
2017/01/31
Leave a comment
- Expression Encoder is a great screen casting tool for Windows – and it is free.
- Except that in the free version, each clip is limited to 10 minutes. This can result in many clips that you nee to combine to document one session.
- Adding clips to the media and encode them does not roll over at the end of one to the next clip (different from as things used to Work in Windows Media Encoder) – it produces as many output files.
- Using the Add Source at End
 . button seems to limit you to adding one clip after the other.
- What I had missed so far: You can simply select multiple clips at once in the file open dialogue.
- Expression Encoder will add all to the timeline in sequence, and encode all to one output file:

Bad audio quality in Moodle Kaltura recordings on iMacs under ambient sound conditions. A running log (closed)
2014/08/22
Leave a comment
- Symptom: See title.
- Cause: While speakers of the 3.5 mm headset take over from the iMac speakers, when plugged in, the 3.5 mm headset micro does not disable the webcam micro. The webcam micro remains the recording source for Moodle Kaltura (mac os x.6, safari 6, flash 10).
- Possible solutions:
1st choice: is there a way for the admin to override this permanently?2nd choice: is there a way for the end user to override this on a case-by-case basis?- "The Califone 3066AV is compatible with both Windows and Mac audio outputs (but is not compatible with iMacs)." ("The Wow starts now!").. Do we have to tie up our boom and lavalier microphones for this?
- Try the flash settings by right clicking in the video window, selecting the microphone icon, then choosing the external (= non-webcam) microphone for input.


- Fail. The real culprit is the iMacs line-in audio-in for which you need a preamp to get it to work with analog microphones. Preamps seem to start at $40, but for that I can get a PC webcam (Microphone included).
How to fix Expression Encoder not outputting to a Silverlight template
2014/07/28
Leave a comment
- This glitch has bugged me once too often, so now I am writing myself a mental note:
- Problem:
- Root cause : Something turns the display of the Template Tab off.
- Solution:
ScreenToGif Debugging: Object reference not set to an instance of an object (#7)
2014/07/03
Leave a comment
- Trying to contribute a tiny bit to the development of this great utility ScreenToGif:
- 1st version:

- crashes on pressing “stop”:

- the Log
- Title: NullPointer in the Stop function 7
Message: Object reference not set to an instance of an object.
Source: ScreenToGif
TargetSite: Void Stop()
StackTrace: at ScreenToGif.Legacy.Stop()
Date/Time: 7/3/2014 12:55:16 PM
============================== - Newer version:

- does not hang on “stop”
- after adding overlay text (great new feature!),

- seems to hang on pressing “Done” with “Analizing [sic] Unchanged Pixels”
- crashes on pressing window close:

- Maybe I was just not patient enough? for:
- without adding overlay pixels:
- seems to also take a long time (2-3minutes analyzing, without a progress bar, or any other indication that the program is still working and has not crashed – the couple of minutes “Processing” seem to go by faster, thanks to the progress bar and frame counter) for a 5fps 1073*810, about 300frames, but hey! It works:

- Plus you can now open the resulting GIF file directly from the creator.
- Actually, when I click “Stop” (I realize I am supposed to click “Close”), I still get a NullReferenceException (#9), probably should not:

- No log has been outputted with the new version .
How students need to work around Sanako startup issues at start of 2014
2014/01/31
Leave a comment
Categories: animated-GIFs, audience-is-students, audience-is-teachers, digital-audio-lab, e-languages, Glitches&Errors, Institution-is-University-of-North-Carolina-Charlotte, Listening, multimedia-recording, service-is-testing-troubleshooting-debugging, Speaking, Student-Computers
image2014spring, sanako-study-1200, student.exe
Sanakoaudioconfigonthefly software utilities updated for Vista/Windows7
2013/12/09
Leave a comment
- (Shortcut to download – now fixed) The reason why a colleague’s signature reads: “Worrying about a large institution, especially when it has computers, is like worrying about a large gorilla, especially when it’s on fire" (Bruce Sterling) might just be that a multimedia-capable fully computerized classroom – think 30 PCs and 30 students trying not only to listen to, but record responses to exam audio – is a notoriously difficult beast to control, and all too easily spins out of the same (a classroom humming in an endless audio feedback loop is neither a pleasant nor an unfamiliar sight).
- The Sanako Study 1200 is a digital audio lab software that facilitates the use of personal computers in face-to-face class settings. However, while the Sanako Study 1200 features many ways for the teacher to control and manage the student PCs, the students’ audio settings cannot be controlled on the fly.
- Enter these little sanakoaudioconfigonthefly utilities (written in AutoIt) for Windows 7 and Vista (old Windows PX version still available here) that extend the Sanako Study 1200.
- We now use (as it is completely adequate and actually superior to to the seemingly more applicable PC control / Launch programs features which is requires the program executable to reside under the same path on student and tutor computer) Playlist / copy and launch (folder icon) and the Sanako grouping feature to send a program with your choice of action to the student PCs of your choice. In this example,
- click playlist,

- and in the window that opens, click (1) to send to “all”, then click (2) to select which program to send:
![image_thumb[3] image_thumb[3]](https://plagwitz.files.wordpress.com/2013/12/image_thumb3_thumb.png?w=341&h=244)
- Files included in this release (each for 64-bit, and as source code, so that you can compile your own if you are still on MS-Vista/MS-Windows-732-bit platform):
- Change student recording levels (microphone sensitivity).
- Toggle student sidetone ( in Sanako = “listen” to this device in Windows)
- Control student playback level (headphone volume).
- Likely these programs can be adapted beyond Sanako Study 1200, but I do not remember (helpful comments appreciated)
-
- whether other digital audio lab platforms (Sony Virtuoso, Robotel SmartClass) allow for changing the student audio config on the fly
- and what mechanism (if any – but likely) they (and Sanako Lab300) provide to launch programs on the students’ computers
- Prerequisites:
- None other than your digital audio lab software and the utilities you can download below. In particular, it is not required to install AutoIt on teacher or student computers.
- However, there should be only 1 microphone/speaker per student computer in the digital audio lab. If you have more, you likely have bigger problems to solve first, but you also need to alter the source code (included) to select the microphone you want to work with (should be easy; note however, that I have not tested this scenario, for: “There should be only 1 microphone/speaker per student computer in the digital audio lab”

- Request here to download these utilities.
Testing and semi-automatically changing the Sanako student audio configuration
2013/12/09
Leave a comment
- Problem
- We have had teacher complaints about too much background noise from neighboring students being recorded in our Sanako Study 1200, with SLH-07 headsets.
- In addition, upon looking through some recordings as samples for a workshop, I found cases of clipping audio, especially in pair recordings.
- We are using the default settings for the Sanako SLH-07 headset. However, the default recording level (67) seems high.
- Solution approach
- We need to test
- many other settings quickly for these recording levels. We use my sanakoaudioconfigonthefly utility for this
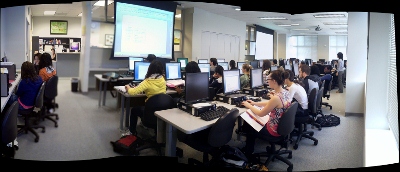
- in an acoustically realistic environment: 5 Lab assistants site in tight lab area and read out sample English text during a Sanako reading activity
- Reading practice
- Todo: Pairing
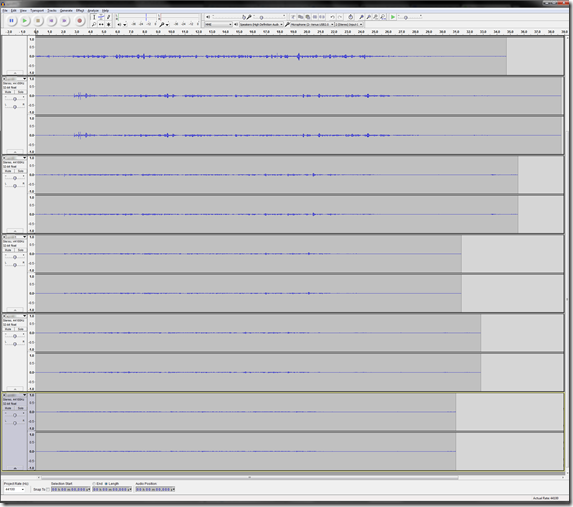
- Here is a “window” into the recorded results set, a student’s audio recording shown in Audacity at various (but all lowered) recording levels from (visible) 30 to 5, you can see the diminishing waveform amplitude.

- The waveform per se is not conclusive. You will have to listen in and compare, especially to evaluate background noise (the original complaint – we have no and will not be able to go back to language lab carrels). The Sanako SLH-07 headset microphones are supposed to be highly directional. However, our students to not always wear the headsets properly. And our acoustics is marred by large (almost 50%) window spaces and a tight positioning of the student seats.
- Any test recording is only as good as it can mimic the acoustics during an actual class session which we did as much as we could with only 6 concurrent LRC staff. This means unfortunately some more testing will have to spill into actual classes, but this test is a start.
- We need to test


