Archive
Managing responses when organizing workshops with meeting requests
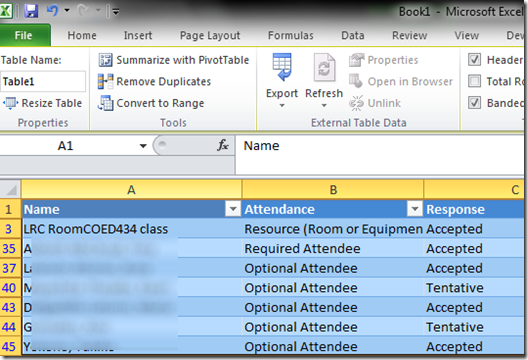
You can use “copy status to clipboard”
to move to and manage in excel:
Use an excel table autofilter to drill down to the actual participants:
and paste them right back into an outlook message:
Outlook can handle that (“check names”):
How teachers can collect any file from students’ computers with Sanako Study 1200 homework–the ultimate training…
How to access Skype using the web browser plugin in your Outlook.com web mail
Working around problems getting ELTI course worksheet out of Report Express
Problem: I used to, but cannot anymore get the course worksheet for ELTI out of Report Express. My choices:
Result set is empty:
Course enrollment does not work either:
I am still in a position to get the full class list out of the system, but that is not what I need, and is not the course worksheet sheet just a calculation based on the
Solution: Use “international programs” as the “department”.
It seems “department”and “subject” drop downs synchronize only with the selection of “college”, but selection of “department” can be in conflict with selection of “subject” (Is this a good GUI?).
It also seems that this affects only the “course worksheet", but not the “class list”(Huh?)
Another example: I seem to be able to get to the Film studies course list only if I leave all other drop down to “all”..
How to record screencasts with Kaltura in Moodle 2
- Go to your video assignment in Moodle:
 .
. - Click “Record screen”, “Add”, and pass the Java security Dialogues:

- The default video resolution is 640*480, but you can change this by unfolding the drop down menu:

- Full screen is recommended for a Slideshow:

- To start, click the red record button:

- You will get a few seconds to collect your thoughts:

- After finishing your slide show, stop the recording from the taskbar icon, and stop the recording:
 .
. - From the video window that opens:
- Finally,
- you can see the result in your media library

- preview it once more:
- and submit your video content from the media library.
- Kaltura screencasts can be used from any Java-compatible device. In the LRC, however, you can also record screencasts to files, using MS-Community Clips which you can still upload to Kaltura – extra step, though –, while maintaining compatibility with Mahara.
How a student submits prior content from “My content” into a Moodle Kaltura video assignment
- Go to your video assignment in Moodle:
 .
. - Click “Add media submission”:

- Jump through the hoops:

- switch to “my content”
- you have to click the “search” button to show content, leave search filed empty to show all
- note that there may be more
- you have to select a video
- before that, you cannot click next
- confirm on the next screen

- You are done when you see this:
 , but hey, better press “continue” to be safe:
 - On the next screen, you can review:


- Not so clear how you get out of there…
- Troubleshooting: If you run into problems, the first thing to try usually is a different web browser.
How to save your MS-Office files on SkyDrive
- Having to work on important documents from different locations – including office, classroom, and home – and getting tired of lugging thumb drives around (or worried about losing or inadvertently destroying them)?

- Use your university email and your password from last June (this one does not get force-updated every 90 days any more, you can manage it yourself).
- Upload your important files:

- Drag and drop, e.g. a PowerPoint file:


- Click the file – e.g. a Word file – to view it in your web browser.
- To edit the file , while viewing, click top menu: “Edit document”. Choose between editing it in the browser (has still some – ever fewer – limitations for complex documents)

- You will have to log in again (on a non-shared computer I prefer to choose to be “signed in automatically”).

- You have to click “Enable Editing” again, but then you are in your familiar MS-Word environment.

- No need to re-upload the file: Save and close your file, when you open it again in the web browser, it got synched automatically:

- To keep an additional local file backup, use the free MS-SkyDrive App which sets up a local copy of your MS-SkyDrive cloud storage – useful when you have to work offline (e.g. I used to travel every weekend on a plane, but needed to make good use of my travel time).
- Troubleshooting: If you run into problems, the first thing to try usually is a different web browser.


![clip_image001[4] clip_image001[4]](https://plagwitz.files.wordpress.com/2013/11/clip_image0014_thumb1.png?w=541&h=373)
![clip_image002[4] clip_image002[4]](https://plagwitz.files.wordpress.com/2013/11/clip_image0024_thumb1.png?w=548&h=385)


