Archive
A first look at the Google Dictionary extension for Chrome
- We
- have not pre-installed in the LRC (for that the extension would need to be more manageable by the teacher during face-to-face classes, which include exams),
- but can (with some reservations) recommend the Google Dictionary extension (even though it is only available for Chrome). Here is why:
- Google dictionary extension provides an interface to Google define and translate
- that is convenient (as quickly accessed like glosses) for reading activities in many languages (Q: is the privileged word sense displayed here intelligently chosen?)
- while (for some languages more than for others) providing access to additional word senses, usage examples and historical background information
- Interface 1: Tooltip,
- for English with audio

- for other languages without audio (even though audio pronunciation may be available in Google translate for that language):

- convenient access (I have been loving the tooltip interface since Google toolbar days)
- limited, but useful information,
- a word sense – not that this is still not contextually intelligent (Cannot blame them here!) and hence more than one word sense should be offered (here I must blame them: Boo!!): E.g. here “arch” should at show more than the most common word sense:


- including pronunciation (not IPA, but audio)
- a word sense – not that this is still not contextually intelligent (Cannot blame them here!) and hence more than one word sense should be offered (here I must blame them: Boo!!): E.g. here “arch” should at show more than the most common word sense:
- Interface 2 (“more”)
- For English, a click on “more” leads to the Google “define”search operator (the related etymology search operator has been reviewed here before):

- Interface 3: unfold the search results by clicking on the down arrow at the bottom to access additional information:
 =
=
- additional word sense entries
- historical:
- etymology
- frequency data
- translation/dictionary entry:
- for our learners of languages other than English, the translation appears right in the tool tip, see above;
- for our ESL learners, this seems a few too many steps for accessing this information, although a monolingual dictionary is useful in many instances also.
- For English, a click on “more” leads to the Google “define”search operator (the related etymology search operator has been reviewed here before):
- For languages other than English, a click on more leads to Google translate, which (should get its own article, but for what it is worth) can be
- more limiting than “define”: While you are given multiple word senses for
- Spanish:

- and to a lesser extent, for
- Arabic:

- Hindi:

- Arabic:
- Spanish:
- for many languages the results are much more limiting:
- Even if you look up German or French, you revert back to the (pedagogically terrible) single word-sense original “translation” interface )

- For East Asian languages, you get Roman alphabet transcriptions
- e.g. Chinese with Pinyin:

- e.g. Japanese:

- e.g. Chinese with Pinyin:
- Even if you look up German or French, you revert back to the (pedagogically terrible) single word-sense original “translation” interface )
- more limiting than “define”: While you are given multiple word senses for
- for English with audio
- Still no per-user tracking? Here it would make sense for the user.


How to use NanoGong in your Moodle course as an audio file recorder
- NanoGong is primarily meant for submitting audio recordings to the teacher and fellow students.
- However, it can also serve as a simple audio recorder that can save a recording to a files:
- accessible anywhere where you have internet access (on a JAVA-capable device. I have not tested NanoGong’s compatibility with smartphones or tablets, though) and a microphone – provided you/your teacher have added a NanoGong activity to the Moodle Course.
- Might be useful for collecting recordings as pieces for your language learner ePortfolios.
- To use NanoGong as an audio recorder: Instead of (or on top of/before) submitting your recording to the course, click the rightmost button:
 :
:
- and you can save your recording to a file
![image_thumb[17]_thumb[1]](https://thomasplagwitz.com/wp-content/uploads/2013/10/image_thumb17_thumb1_thumb.png?w=600&h=530 "image_thumb[17]_thumb[1]") ,
,- in a variety of formats (compressed WAV is likely most compatible),
- including in the different speeds:
![image_thumb[18]_thumb](https://thomasplagwitz.com/wp-content/uploads/2013/10/image_thumb18_thumb_thumb.png?w=244&h=68 "image_thumb[18]_thumb") that you de/increased the playback speed here:
that you de/increased the playback speed here: ![image_thumb[15]_thumb](https://thomasplagwitz.com/wp-content/uploads/2013/10/image_thumb15_thumb_thumb.png?w=129&h=103 "image_thumb[15]_thumb") .
.
![image_thumb[17]_thumb[1]](https://thomasplagwitz.com/wp-content/uploads/2013/10/image_thumb17_thumb1.png "image_thumb[17]_thumb[1]")
![image_thumb[18]_thumb](https://thomasplagwitz.com/wp-content/uploads/2013/10/image_thumb18_thumb1.png "image_thumb[18]_thumb")
![image_thumb[15]_thumb](https://thomasplagwitz.com/wp-content/uploads/2013/10/image_thumb15_thumb1.png "image_thumb[15]_thumb")
How a student can easily complete an audio recording assignment in Moodle, using the new NanoGong plugin
- Open your assignment (note the loudspeaker/dummy icon for NanoGong assignments/) from the Moodle landing page.

- Unfortunately, there are a considerable number JAVA warning dialogues to bypass during NanoGong activities before you can even see the recorder plugin on the page, and may be more when you try to submit.
- Once you are on the NanoGong assignment page: click red button to record,
![image_thumb[10]](https://thomasplagwitz.com/wp-content/uploads/2013/10/image_thumb10_thumb.png?w=400&h=278 "image_thumb[10]")
- Make sure the volume meter shows input when speaking (loud enough) or playing back:
![image_thumb[13]](https://thomasplagwitz.com/wp-content/uploads/2013/10/image_thumb13_thumb1.png?w=506&h=364 "image_thumb[13]")
- After recording, submit:

- After submitting,
- You can still edit your submission, by
- (1) deleting your recording or
- re-adding – or (provided your teacher’s assignment allows for (3) multiple recordings) just adding – (2) your recordings
- or adding a (4) message to the teacher
- you can also revisit this page to read (5) feedback the teacher gives you about your recording:

- You can still edit your submission, by
- Experiencing issues? Check troubleshooting page here.

![image_thumb[10]](https://thomasplagwitz.com/wp-content/uploads/2013/10/image_thumb101.png "image_thumb[10]")
![image_thumb[13]](https://thomasplagwitz.com/wp-content/uploads/2013/10/image_thumb132.png "image_thumb[13]")


How a teacher can easily assign an audio recording in Moodle, using the new NanoGong plugin
- We are back in business with easy audio recording assignments in the LMS, thanks to NanoGong – the free recorder I recommended when first starting here – now being available in MOODLE (presumably with the Upgrade to Moodle 2, I almost missed that….)
- To assign, click “turn editing on”, “Add activity or resource”, select “NanoGong voice activity”, as pictured below:

- There are a few interesting options:
- you can limit the duration
- you can limit the number of recordings (attempts?) allowed (0 is unlimited)
- You can let students listen to each other recordings. (Is there a rating feature that can be combined with this?)

- And this is what
- you will see (TBA:read on for how to listen to student submissions, give feedback and grade.)

- you will see (TBA:read on for how to listen to student submissions, give feedback and grade.)
- your students will see…


Courseworld.org offers foreign language learning video clips
- Over a 100 videos currently available:

- Summaries show when you hover over a video tile:

- Can it beat YouTube.com for scope? Can it beat textbook-integrated videos for applicability? Likely not, but you may find an add-on for your course, and even more for self-study.


Freely downloadable samples from the IPA Phonetics Handbook
- This handbook provides audio pronunciation samples (in WAV) for many different languages. While they are more useful in conjunction with the book, they also can be searched by filename (= the pronounced word in English translation).
- We make these file accessible in the LRC on the Sanako share (S:\COAS\LCS\LRC\media\TUTOR\phonetics\ipa-phonetics-handbook\). Here are the languages included:.
- American-English
- Amharic
- Arabic
- Bulgarian
- Cantonese
- Catalan
- Croatian
- Czech
- Dutch
- French
- Galician
- German
- Hausa
- Hebrew
- Hindi
- Hungarian
- Igbo
- Irish
- Japanese
- Korean
- Persian
- Portuguese
- Sindhi
- Slovene
- Swedish
- Thai
- Turkish
Protected: How to configure the LangLabEmailer for your school, and share back
Cheatsheet for typing phonetic symbols with the IPA Keyboard Layout on Windows 7 – the ultimate training…
…using animated .gifs. Slower? Compact: 0.25sec, 0.5sec, 0.75sec, 1sec, 1.5sec, 2sec, 3sec, 4sec, 5sec, 6sec, 7sec, 8sec, 9sec, 10sec. 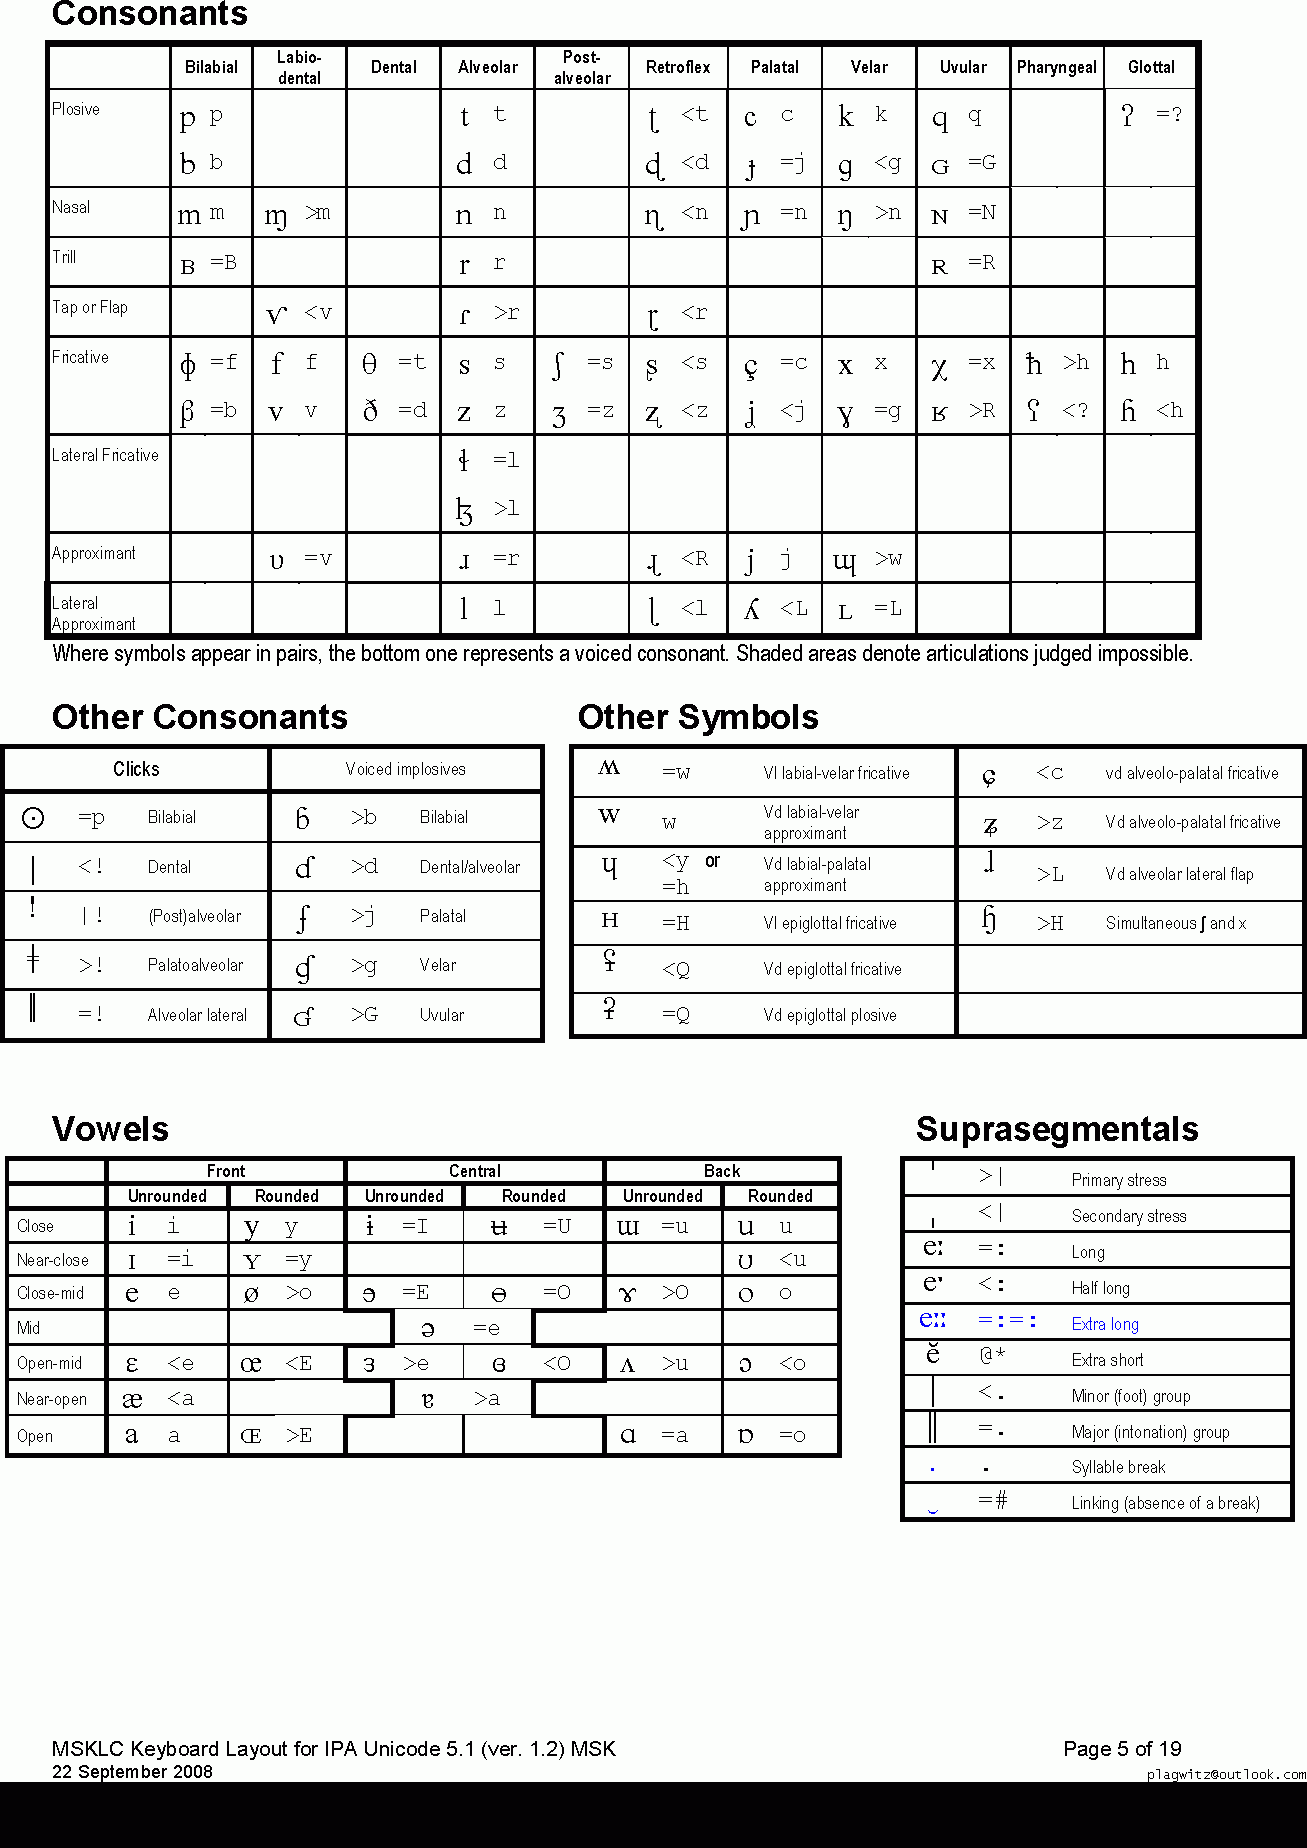
This is taken straight from the great documentation of this great Phonetic symbols Windows keyboard layout by SILS international, but needed a bit of massaging to support hands-free lookup via display on one screen of your dual screen system, while you learn or demo the keyboard to the class). Users without dual screen (including students) are better off with the slideshow below in which they can stop the images on any page:


The IPA MSKLC can produce both regular Roman characters and transcriptions with phonetic symbols by employing certain “dead keys” that can be combined with regular keys. Just and like our default LRC keyboard us-international .
Your first must select the keyboard like so.  (Icelandic is suitable since it is not used for other purposes much). In the LRC, you must wait until we upgrade to Windows7.


Questions? Read the About. Or just ask me a quick Our Databases: Resources with calendars -- Language learning material Moodle Sites, multimedia files -- films


FAQs for LRC student staff or for students or for teachers. To search our FAQs, in the browser addressbar, add after "https://plagwitz.wordpress.com/feed/?tag=faqs+/" "+TAG1" (from tag cloud below) OR "https://plagwitz.wordpress.com/feed/tag=faqs
&category_name=" "CAT1" (from category hierarchy below). OR search both categories and tags, and multiple TAGs/CATs (connect with "," for OR-search, with "+" for AND-search), like so: https://plagwitz.wordpress.com/feed/?tag=TAG1+TAG2+...TAGn&category_name=CAT1
+CAT2+...CATn"
Other ways to find help
If you cannot find it here, look there: 5,500 Language-Learning Links and Programs for learning or teaching 150 languages
Shortcuts:Our Lists, Our Maps, LRC Staff Moodle Site,LRC Project Moodle Site, 49erexpress, UNCC Moodle, Student Recordings: s:claslcslrcsanakostudent
Learning usage samples: Sanako oral exam, Kaltura webcam presentation, Dictation with speech recognition, Sanako written exam, Chinese and Japanese interactive stroke-order practice
Test the Sanako Installer, Webbrowser Popup Konfigurator for XP, or Windows7, faster LRC TeacherPC Log-in Let MS facilitate diacritics writing by installing for you US-International keyboard layout
This is my personal blog (Google+). The views expressed on these pages are mine alone and not those of my employer. The information in this weblog is provided “AS IS” with no warranties, and confers no rights.
