Archive
MS-Office Communicator: Tips for using: Screen-Sharing
Here is a successful real-world example of a screen-sharing session on getting shared calendars set up using MS-Exchange and/or MS-SharePoint.
Think of screen-sharing session as an online or virtual meeting which, while less time-consuming than a real meeting, aids in communicating, maybe even more so than the former, since the topics themselves are online/”virtual”. If you provide computer support to family members in different parts of the world, you may be familiar with “Remote Assistance” form MS-Windows XP. I have always regretted that such technology is not used more for the support needs in HE environments, since I first used it at Lycos-Bertelsmann in March 2000.
It demos how MS-Communicator allows you to start a text-messaging session, based on presence in your contacts list, and then, if need be, can easily ‘”escalate” to sharing your screen. Not quite as easy as handing papers around in a “real” meeting, but much more useful
communicator-email-contact-drag.wmv (TBA: find start and escalation – left as an exercise to the reader)
How to display rows as percentage of grand total in Excel Pivot Tables
A few notes on Excel’s Version of OLAP cubes: Here is a note detailing the steps taken to display rows as percentage integers of the grand total.

Blackboard: Content System: Ancillary digital textbook material reuse (publish to course participants, roll-over between terms)
If you have a well administered language program, your admin should have uploaded all digital (text, audio, textbook and table of contents) materials that come with your textbook for convenient reuse between sections and terms into the Blackboard content system.
As a Blackboard course administrator, you can easily give all course participants access in 1 step (as course administrator, you can also access the audio materials during classes from the Blackboard content system directly).
Here is a video recording of a real-world walkthrough of this process – voice-over is in German, but Blackboard interface is in English: blackboard-content-system-finding-adding-existing-content-item-to-course-access-play.wmv
|
Start Time |
Topic |
|
0,0 |
overview of teaching and learning procedure |
|
0,1 |
course add item / content collection link |
|
1,30 |
how to search for content. Remember: Search is your friend, if you have a consistent metadata system for your content (start with meaningful file names): |
|
3,15 |
hot to add permissions for other users |
|
5,3 |
add to course for for students |
|
5,4 |
listen to an example audio from course |
Once you have given course participants access to the audio materials, and you teach the course again next term, it is even easier to roll over the access: Just use the Copy link in the Blackboard Control Panel.
Face-to-face and beyond: Smart-board with digitized textbooks and classroom protocols, using MS_Remote Desktop, MS_Zoomit, wireless keyboard, network shares and the Blackboard: Content System
- This post strings together some already supported or freely available technologies for an effortless way to integrate technology into teaching and learning.
- I had lab assistants scan my textbook. I stored the scans on the teacher-only network share.
- In the classroom, I connect to my office computer with mstsc.
- you may have to change screen resolution in mstsc. You can save your connection settings on the teacher network share.
- To save precious class contact time, on my office computer, I have already opened and prepared the class outline and relevant textbook scan pages with the default windows viewer.
- Using zoomit, I can mark on the textbook scan pages for my students, and save the resulting pages, later easily (drag and drop all pages at once) store them in the content system or my students to review my notes.
- you may want to adjust the font size in zoomit options.
- this technique may also help with fading out document cameras which may, among other things, help with finding enough space to put.
How a teacher grades a Blackboard audio recording assignment
- Switch to interactive view, if your vertical scrollbar does not show up, and thus the assignment column is hidden (or reduce the font size in Firefox, e.g. by holding CTRL and rolling the mouse scroll wheel):

- Once you see the assignment column, you can either download all submissions as a zip file, open it with the built-in zip tools in Windows (XP or newer). This is especially practical if you want to then select all recordings and drag and drop them into an audacity window, for doing easy to comparative grading of student submissions, as described earlier.
- To grade,
- you still need to click next to the green exclamation marks which indicate where there is an assignment to be graded,
![clip_image002[5]](https://thomasplagwitz.com/wp-content/uploads/2016/03/clip_image0025_thumb.gif?w=569&h=465 "clip_image002[5]")
- on the arrow keys which unfold a menu.
![clip_image002[7]](https://thomasplagwitz.com/wp-content/uploads/2016/03/clip_image0027_thumb.gif?w=593&h=483 "clip_image002[7]")
- you still need to click next to the green exclamation marks which indicate where there is an assignment to be graded,
- This gets you to the grade details:

- You can also listen to the student recording submission by clicking on the file linked behind “users; file”.
![clip_image002[5]](https://thomasplagwitz.com/wp-content/uploads/2016/03/clip_image0025_thumb.jpg?w=600&h=488 "clip_image002[5]")
- Fill out your grade comments and grade.
- Instead of doing (only) written comments, you could also oral feedback grade the student recording, and re-upload this new recording.
- Finish by clicking button:”submit”.
- Next in series: How the student reviews a grade Blackboard audio recording assignments: TBA
- First in Series: A better way to do student homework audio recordings in the Sanako LAB 300, using Blackboard:Assignment.

![clip_image002[5]](https://thomasplagwitz.com/wp-content/uploads/2016/03/clip_image0025.gif "clip_image002[5]")
![clip_image002[7]](https://thomasplagwitz.com/wp-content/uploads/2016/03/clip_image0027.gif "clip_image002[7]")

![clip_image002[5]](https://thomasplagwitz.com/wp-content/uploads/2016/03/clip_image0025.jpg "clip_image002[5]")
How a student submits a Blackboard model imitation audio recording assignments
- Access the assignment in the location of your Blackboard course that your instructor pointed you to.
- Download the model audio recording attached to the assignment to your desktop (if any).
- Right-click on the downloaded file, choose open with (something else but the Sanako Duo which you will use to record).
- Play and listen to the model.
- Imitate the model, recording yourself using the previous instruction, using pause/play as needed.
- Upload the recording into the Blackboard assignment by clicking “browse to local file” [i.e. where you saved your recording].
- Click “submit”. If you get an error “Not a valid file’, try using another web browser to open the assignment and submit the file.
- Next steps: see How the teacher grades a Blackboard audio recording assignments
- First in series: A better way to do student homework audio recordings in the Sanako LAB 300, using Blackboard:Assignment
Language Lab Web Portal, University of Michigan – Dearborn
For lack of even an LMS – which in post-secondary language lab environments in the US in the “noughties” commonly has had to double as CMS and Groupware -, the lab web portal in the post title had to fulfill many functions.
While the technically most advanced features probably was full text search against both database and file system (uploaded documents) – which I could relatively easily implement thanks to MS-SQL-Server and a limited number of database tables –, I liked best the collaborative building of a bank of language learning exercises using authentic materials, i.e. interactive websites from the target culture.
A few sample illustrations of the use in both language lab and affiliated computerized classrooms you can see here:

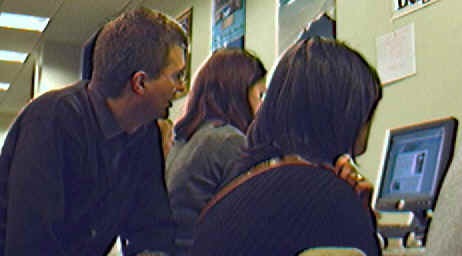


The list below links to a series screencasts of the Language Lab Web Portal that I made for training and demonstration purposes. They show the language lab web portal software in action:


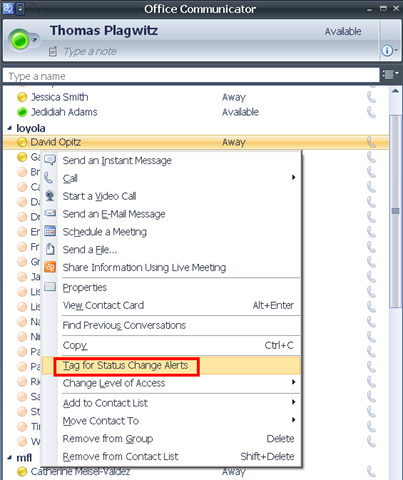
MS-Office Communicator: Tips for using: Presence
No time for playing phone-tag (or “Phone-tag: Next generation”, aka email-tag)? “Presence” is your friend.
In Communicator, from your contact-list, right-click on a contact, choose “tag-for-status-change-alerts”.
From MS-Help: Tag a contact so you are notified when they are available: “Communicator can notify you of changes in a contact’s availability by displaying an alert whenever their presence status changes to Available or Offline. The alert shows the contact’s name, title, instant messaging address, and new presence status. You can click the alert to start an instant messaging session with the contact. Configuring Communicator to display this alert for a given contact is called tagging.”
Like in these screenshots:


Questions? Read the About. Or just ask me a quick Our Databases: Resources with calendars -- Language learning material Moodle Sites, multimedia files -- films


FAQs for LRC student staff or for students or for teachers. To search our FAQs, in the browser addressbar, add after "https://plagwitz.wordpress.com/feed/?tag=faqs+/" "+TAG1" (from tag cloud below) OR "https://plagwitz.wordpress.com/feed/tag=faqs
&category_name=" "CAT1" (from category hierarchy below). OR search both categories and tags, and multiple TAGs/CATs (connect with "," for OR-search, with "+" for AND-search), like so: https://plagwitz.wordpress.com/feed/?tag=TAG1+TAG2+...TAGn&category_name=CAT1
+CAT2+...CATn"
Other ways to find help
If you cannot find it here, look there: 5,500 Language-Learning Links and Programs for learning or teaching 150 languages
Shortcuts:Our Lists, Our Maps, LRC Staff Moodle Site,LRC Project Moodle Site, 49erexpress, UNCC Moodle, Student Recordings: s:claslcslrcsanakostudent
Learning usage samples: Sanako oral exam, Kaltura webcam presentation, Dictation with speech recognition, Sanako written exam, Chinese and Japanese interactive stroke-order practice
Test the Sanako Installer, Webbrowser Popup Konfigurator for XP, or Windows7, faster LRC TeacherPC Log-in Let MS facilitate diacritics writing by installing for you US-International keyboard layout
This is my personal blog (Google+). The views expressed on these pages are mine alone and not those of my employer. The information in this weblog is provided “AS IS” with no warranties, and confers no rights.
