Archive
How to run Windows Media Center during a Remote Assistance Session
-
The /gdi switch for Windows Media Center allows for operating Windows Media Center full screen during
-
Windows Live Messenger Remote Assistance sessions if you have to help a relative over the internet.
-
Should also work in MSTSC Remote Desktop sessions if you manage media with Windows Media Center on your work network.
-
-
You can combine the above switch e.g. with the program guide shortcut to go directly there: /homepage:VideoGuide.xml /PushStartPage:True
-
Put the following in the “Target” field of your shortcut that you start on the remote computer (running Windows7 32-but here) during your remote assistance session:
-
%windir%\ehome\ehshell.exe /nostartupanimation /gdi /homepage:VideoGuide.xml /PushStartPage
- Voilà, or rather: “Dem Inschenör ist nichts zu schwör”.


How to set up your laptop to use with the LRC portable Projector
- re LCD projector
- First, book the projector from this list of bookable items (manual included).
- Here is what we have as Projector:
 <
< - connect the VGA-adapter which is in the package:

 (if your laptop does not have a secondary VGA connector, you may need to bring an adapter).
 - power the projector on:
 (also always power it off using the power button; never just pull the power plug).
- on your laptop:
- find the key combination to enable the secondary output


- right-click the windows desktop, access the graphics card settings;

- Enable the graphics card to send a video signal to the projector you just connected.
 . I the projector native resolution is not automatically recognized, it is 1024*768.
- If you want to show a slideshow on the projector, go to PowerPoint
- ribbon, (1) Slide Show/ item: (2)) set up show, and bring up the (3) set up show dialogue

- here you can configure to show on monitor 2 (numbers correspond toe the numbers 1 and 2 in the graphics card dialogue above):
 . Same principle as with other dual screen computers, like the teacher station in LRCCOED434.
- ribbon, (1) Slide Show/ item: (2)) set up show, and bring up the (3) set up show dialogue


The on-screen keyboard (OSK) for foreign language character input on MS-Windows
A little known, but useful tool for non-western languages which can not be represented by the us-international keyboard layout, when no hardware keyboard is available:
The Windows on screen keyboard reflects the soft keyboard installed via Control panel / Regional and language options / Text input languages. and selected via the language toolbar, like so:

Easiest access, click Start, click Run, type “osk”, click “OK”. Or try this on XP: 
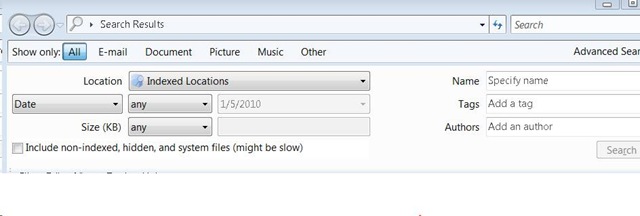
Basics of Windows Search (Windows Vista, probably Windows7) – in German
Ich könnte ohne die verbesserte Windows (als herunterladbares add-on auch für XP) Suche wohl noch leben (vegetieren! :-), aber nicht mehr arbeiten.
In MS-Vista (englisch, das müßt ihr selbst eindeutschen, aber meist gehen die die englischen Abkürzungen auch im deutschen Windows), im “control panel” kann man unter “indexing options” Feinheiten einstellen:

Man kann die Suchoptionen ändern, wenn man die “search tools” aufklappt:
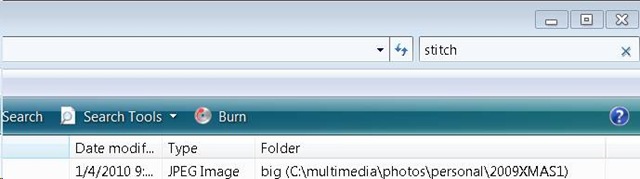
Wehttps://plagwitz.wordpress.com/wp-admin/post.php?post=6&action=editnn man mit windows taste + f eine neue Suche öffnet, hat man auch eine “Aufklappe” für “advanced search”:

Das sieht dann so aus :
Sobald man zu faul wird, immer das Gui zu benutzen, kann man nach dem öffnen von windows-Taste + f in der Einzel-Suchzeile die “advanced syntax” (in der Hilfe dokumentiert) benutzen.
Die Abkürzungen, die ich am häufigsten benutze, sind ungefähr diese :
file:weihnachtsgeschenke ext:xls folder:myfiles date:>12/24/2009
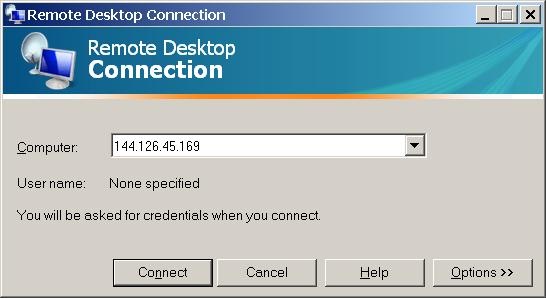
How to use your office computer in the classroom
How-to:
- Click
 , click
  , type “mstsc”, click
  .
. - In the field of the upcoming window, enter your office computer’s IP number (you have to do this only once, the teacher computer will remember the number).

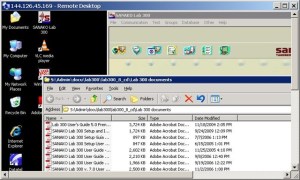
- This will connect you to your office PC, and if you run mstsc (Microsoft Terminal Services Client) in full-screen, it appears pretty much like working on your office computer.
- To find out your office IP number, on your office pc, Click , click , type “cmd”, click . cmd. On the command line, type “ipconfig”, your “IP address” appears .
- Problems? Tell OTS with a link to this post.
Benefits:
- use your local configuration with which you are most familiar also in class (e.g. US-international keyboard);
- prepare windows for classes in your office at leisure (windows will show in the state you left them in the office), saving class time;
- use the computer in class more, saving class time.
Risks:
- does not work well with multimedia. Workaround: switch mstsc to window mode and play multimedia from the local desktop of the classroom PC:
- make sure you do not have any windows open in the office which you do not want to display in the classroom
- set your online status to “busy” in Office Communicator and other instant messaging applications, or else others might send disrupting text message pop-ups while you teach
- possible screen size incompatibilities (mstsc can automatically accommodate for differences, within limits)
- always test before going live.
Swift Subtitling with Input Language Japanese in Windows XP
-
Go to control panel / regional and language options / tab: languages.
-

-
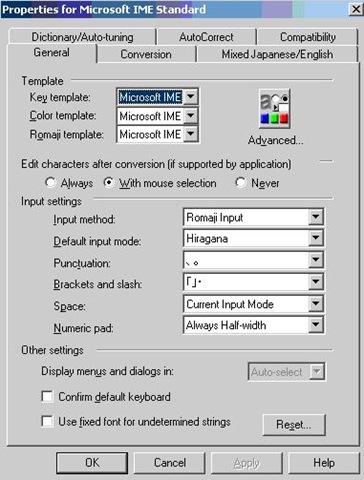
Check whether (1) Japanese / Keyboard / MS IME Standard 2003 is installed. Otherwise (2) button:add it
-
With (1) Japanese / Keyboard / MS IME Standard 2003 is installed selected, click on (3) button: properties and ensure these settings are right, then click button: “ok”
-

-
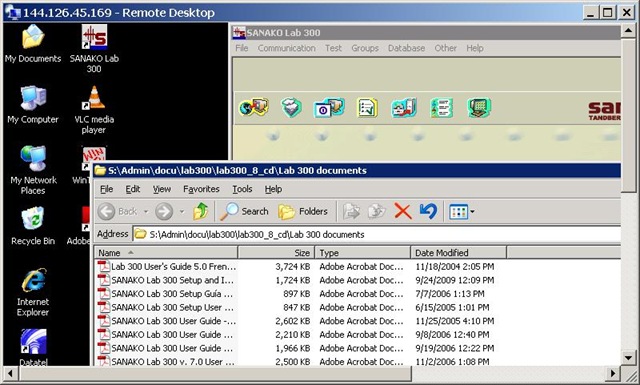
Now Open Swift.
-
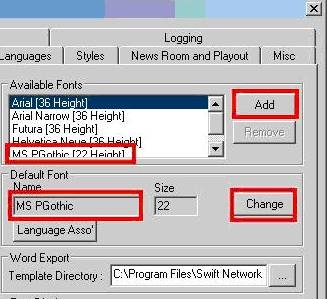
Menu file / preferences / tab: open:/ section:available fonts, button:add, add ms pgothic, section: default font, button:change, select ms pgothic, like here:
-

-
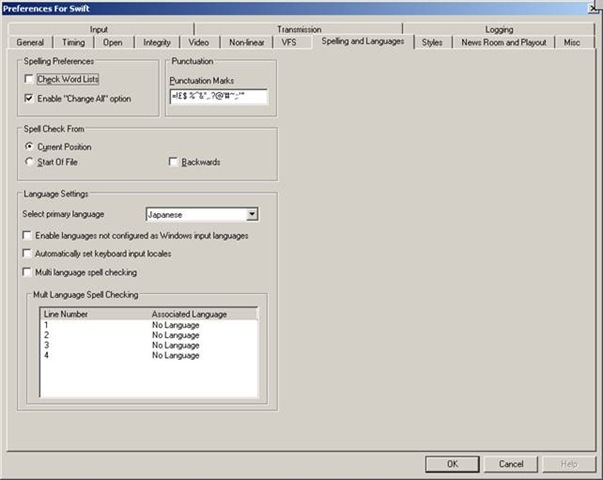
Menu file / preferences / tab: spelling and languages, select primary language: Japanese, like here, then close with button: ok,
-

-
Close the existing and open a new swift file.
-
With swift still being the active application, ensure that in the windows language bar (if you do not see all the language bar icons, right click on input language icon
 , choose additional icons in the taskbar
  ; you may also have to right-click left of the input language icon, uncheck lock language bar, then resize the bar for the additional icons to show) the right input language is chosen, like here:
 -


-
Troubleshooting: It has been observed that the IME popup editor does not appear like here:
 . This may be related to the IME option “Input type” getting reset from “Hiragana”to “Direct Input”. Double-check this. Also, if all else fails, close existing and open a new file within Swift and/or close and reopen Swift, making sure that the IME settings remain.
 -
Still won’t work? Contact me.


How to work with screenshots in Windows XP or MAC OS X
On your keyboard, press key “Print Screen” to put a picture of the entire screen into the clipboard (for the active window, hold the ALT-key while pressing “Print Screen”).
You can paste this clipboard in any windows application, for example MS-Word or MS-Paint.
In order to use the built-in windows picture editor, click “Start”, click “Run”, type “mspaint” (w/o inverted commas).
In ms-paint, you can edit the picture, using a variety of tools in a menu on the left.
E.g. click on the eraser button to activate this tool, then use the mouse pointer to erase sensitive parts of the picture.

Or select the selection tool and with the mouse pointer, draw a selection frame inside the picture. Then you cut the selection to the clipboard and paste it to a new picture.
Finally, save the result (normally as JPEG, since this results in much smaller file size).

Here is a screencast that shows the entire screenshot cycle.
Using a MAC?
|
Objective |
MAC OS X |
Capture entire screen and copy to the clipboard |
Command+Control+Shift+3 |
Capture a window and copy to the clipboard |
Command+Control+Shift+4 then Space bar, click on the target |
How to force-stop Sanako Student using VbScript and WMI
We have been experiencing issues with the Sanako student becoming unresponsive in the Language Lab. This utility resets the student on the student computer:
'debug:
'on error resume next
Const HKEY_LOCAL_MACHINE = &H80000002
arrComputers = Array("LSS-NWX13PC06") 'update this thru scriptomatic.hta strComputer = "LSS-NWX13PC06" '01<-fails, 03<- works,
'Service Name
SrvName = "Sanako Helper" 'which format? example imapiservice is not in win xp services.msc
'Process Name
'ProcessName ="Student.exe" 'überflüssig

For Each strComputer  In arrComputers
'restart helper.exe
For Each strService In GetObject("winmgmts:{impersonationLevel=impersonate}!\\" & strComputer).InstancesOf ("win32_service")
'   Set objWMIService = GetObject("winmgmts:{impersonationLevel=Impersonate}!\\" & strComputer & "\root\CIMV2")
'   Set colItems = objWMIService.ExecQuery("SELECT * FROM Win32_Service", "WQL", wbemFlagReturnImmediately + wbemFlagForwardOnly)

If strService.Name = SrvName Then
If strService.State = "Running" Then
WScript.echo "Shutting down '" & strService.Name & "' Service"
strService.StopService
wscript.sleep 5000
strService.StartService
WScript.echo "ReStarting '" & strService.Name & "' Service"
Else
strService.StartService
wscript.echo "Starting '" & strService.Name & "' Service"
End If
End If
Next 'service

'restart student.exe
'find path for starting
Set objRegistry = GetObject("winmgmts:{impersonationLevel=impersonate}!\\" & strComputer & "\root\default:StdRegProv")

'student.exe
'tutor [HKEY_LOCAL_MACHINE\SOFTWARE\Sanako\Setup]   "RootDir" "C:\\Program Files\\Sanako"
'student: HKEY_LOCAL_MACHINE\SOFTWARE\Sanako\Shared Components\CMC ClientModuleLocation C:\Program Files\Sanako\Study\Student
'student: HKEY_LOCAL_MACHINE\SOFTWARE\Sanako\Study\Student\Settings InstallPath C:\Program Files\Sanako\Study\Student
strKeyPath = "HKEY_LOCAL_MACHINE\SOFTWARE\Sanako\Study\Student\Settings"
strValueName = "InstallPath"
objRegistry.GetStringValue HKEY_LOCAL_MACHINE,strKeyPath,strValueName,strValue 'GetDWORDValue method is not needed
WScript.echo "Registry BaseDir is '" & strValue & "'"

If IsNull(strValue) Then 'Empty means that the registry value exists, but is blank; Null means that the registry value doesn’t exist.
strStudentCommandline = "C:\Program Files\Sanako\Study\Student\Student.exe" 'todo: notbehelf
Else
strStudentCommandline = strValue & "\Study\Student\Student.exe"
End If
WScript.echo "strStudentCommandline is '" & strStudentCommandline & "'"

'do you have to do the same for vieostreamer window?

For Each strProcess In GetObject("winmgmts:{impersonationLevel=impersonate}!\\" & strComputer).InstancesOf ("win32_process")
'   Set objWMIProcess = GetObject("winmgmts:{impersonationLevel=Impersonate}!\\" & strComputer & "\root\CIMV2")
'   Set colItems = objWMIProcess.ExecQuery("SELECT * FROM Win32_Process", "WQL", wbemFlagReturnImmediately + wbemFlagForwardOnly)

If strProcess.CommandLine = strStudentCommandline Then
strProcess.terminate
WScript.echo "Terminating '" & strProcess.CommandLine & "'"
wscript.sleep 5000
End If

'todo: remote
' you shoule be able to do this without a shell using .Create(CommandLine)
'todo: Processes launched by WMI can NEVER be visible. They run in their own windowstation, the same as window services.
'It make it visible you have to have a System Tray application or similar hidden application which is launched when each desktop starts. Then you have to setup some kind of IPC/RPC between the system tray app and your
'the problem is that i restart the student.exe under my credentials, but would have to do it under the logged in student credentials
set WshShell = WScript.CreateObject("WScript.Shell")
Ret = WshShell.Run(strStudentCommandline, 3, True) 'bWaitOnReturn Optional. Boolean value indicating whether the script should wait for the program to finish executing before continuing to the next statement in your script. If set to true, script execution halts until the program finishes, and Run returns any error code returned by the program. If set to false (the default), the Run method returns immediately after starting the program, automatically returning 0 (not to be interpreted as an error code
'error checking
If ret <> 0 then
wscript.echo "error starting "&  strStudentCommandline
Else
WScript.echo "Starting '" & strStudentCommandline & "' Process"
End if
Next 'process running
Next 'strComputer
UPDATE: I haven now also coded a similar utility in AutoIt, hopefully easier to use.


Questions? Read the About. Or just ask me a quick Our Databases: Resources with calendars -- Language learning material Moodle Sites, multimedia files -- films


FAQs for LRC student staff or for students or for teachers. To search our FAQs, in the browser addressbar, add after "https://plagwitz.wordpress.com/feed/?tag=faqs+/" "+TAG1" (from tag cloud below) OR "https://plagwitz.wordpress.com/feed/tag=faqs
&category_name=" "CAT1" (from category hierarchy below). OR search both categories and tags, and multiple TAGs/CATs (connect with "," for OR-search, with "+" for AND-search), like so: https://plagwitz.wordpress.com/feed/?tag=TAG1+TAG2+...TAGn&category_name=CAT1
+CAT2+...CATn"
Other ways to find help
If you cannot find it here, look there: 5,500 Language-Learning Links and Programs for learning or teaching 150 languages
Shortcuts:Our Lists, Our Maps, LRC Staff Moodle Site,LRC Project Moodle Site, 49erexpress, UNCC Moodle, Student Recordings: s:claslcslrcsanakostudent
Learning usage samples: Sanako oral exam, Kaltura webcam presentation, Dictation with speech recognition, Sanako written exam, Chinese and Japanese interactive stroke-order practice
Test the Sanako Installer, Webbrowser Popup Konfigurator for XP, or Windows7, faster LRC TeacherPC Log-in Let MS facilitate diacritics writing by installing for you US-International keyboard layout
This is my personal blog (Google+). The views expressed on these pages are mine alone and not those of my employer. The information in this weblog is provided “AS IS” with no warranties, and confers no rights.
