Archive
Introducing the LangLabEmailer
- The LangLabEmailer helps integrating the digital audio lab (still widely operating based on files and network shares) into the departmental language teaching and learning process by automatically forwarding (audio, text) assessments and assignments collected in the digital audio lab to teachers and students via campus mail (using MS-Exchange automation).
- Easy on the Language Lab Manager who can "set up and forget": 1000s of assessment files will reach their originating students and teachers in near real time without you lifting a finger.
- To earn "extra credit", show your teachers how they can override the default LangLabEmailer behavior by adding “_noemailing” or “_nostudentemailing” to the folder name when saving their digital audio lab collections.
- Status of the language lab and purpose of the software
- Features
- Prerequisites
- Downloading
- Installing
- Configuring (and sharing back)
- Running or scheduling
- End User options
- Troubleshooting
- Requesting features
- Getting Updates
- Uninstalling
- Samples & questions at my IALLT 2013 session.
How to get access to the LRC Sanako (teacher materials, student recordings) from your office or home PC
- Run the Sanako Installer (first meant for faculty offices only, but now faculty also want to have access from home, so I added that functionality).
- On your office and or home PC, you get a folder “SANAKO” on your desktop. This folder will contain all you need to access student assessments from past classes or upload learning materials for future classes:
- In the office:
 : It is sufficient to click the additional “UNCC…” links at the bottom of the list .
 - At home:

- Click “1st connect…” and log into the campus.
- Click “How teachers find…”, log in with the blog password, open the PDF, click the links in the PDF to the Sanako off-campus folders, log in again with the network credentials as shown in the PDF (sigh…).
- EXAMPLE: Here you can see on a faculty home PC:
- the sanako recorder and campus connector:

- the SANAKO desktop folder shortcuts:

- You get the Word templates only if you can use them (have WORD installed – remember you can install MS-Office with your free faculty license from here).
- (No, you won’t get the “UNCC…”shortcuts at home, we simplified since.)
- the sanako recorder and campus connector:
- Both office and home:
- Drag any audio files into the Sanako study recorder window (further reading on why the Sanako study recorder is useful for teachers).
- Need to record? configure your microphone in Sanako study recorder, menu Tools.
- In the office:


How not to have to join a Saba Centra online class from the LRC late, for lack of speaking capabilities
- Problem: We continue getting reports from teachers that students who try to participate in a Saba Centra online class from the LRC listening station computers (with analogue headphones) experience a considerable delay in joining and cause disruption to online classes since they have to troubleshoot their microphones, for lack of being audible online.
- Root cause: Saba Centra on startup automatically selects the “microphone” as recording device…
- Workaround:
- On XP, click “Start”, click “Run”, type (without quotes) “SndVol32 –R” (meaning: “SoundVolume for Recording”), click “OK” which opens the volume mixer for recording devices. The radio button selected will be “Rear input”.

- Start Saba Centra.
- Switch back to the volume mixer you opened in step 1. Note that the radio button now selected is “Microphone”. This is wrong for the listening stations (and the teacher station) in the LRC. Switch it back to “Rear input” (you know that your headset is supposed to be plugged into the rear).

- And off you go… Plus note: There is no need for “expensive” workarounds like:
- haphazardly trying to replug headphones,
- purchasing your own USB headphones,
- hogging the main classroom with its USB headphones.
- On XP, click “Start”, click “Run”, type (without quotes) “SndVol32 –R” (meaning: “SoundVolume for Recording”), click “OK” which opens the volume mixer for recording devices. The radio button selected will be “Rear input”.


Saba Centra on startup automatically selects the "microphone" as recording device…
- … But we in the language lab use the (dual function microphone/line-in) "rear input" for our headsets (for ergonomic, health&safety and security reasons). Workaround here.
- Apparently this startup behavior cannot be changed within Saba Centra:
- Any startup will bring up the “Audio Wizard” asking users, even in a controlled lab environment, to configure their audio devices,
- and if users do (and choose what they have: headset), make wrong assumptions which audio plug to enable (“Microphone” front panel, even if your headset is plugged into the rear panel dual “line-in/microphone”)
- The workaround according to these easily Googled instructions is using the “Advanced” audio wizard options to override this “Audio Wizard” error, like so:
- “Re-open the Audio Wizard, go to the third screen and change your recording device in your “Recording Device” menu. Advance two slides and determine if you can hear your recorded voice. ”
- 1st screen:

- 3rd screen:

- note the instructions – Click “Advanced”. But it is easier to just use from the start our Workaround here.
- 1st screen:
- “Re-open the Audio Wizard, go to the third screen and change your recording device in your “Recording Device” menu. Advance two slides and determine if you can hear your recorded voice. ”
- The long-term solution is reconfigure your hardware and disable the front panel audio – but will Saba Centra understand you? Stay tuned…


How a teacher can easily restart the Sanako Study 1200 licensing classroom server when experiencing a crash
- Try clicking and running this (http://goo.gl/lTVLc), if you see that:

- this is for
- if your sanako tutor hangs with status message "verifying tutor" and you are confronted with the error dialogue "Connection to the communication platform has been disconnected and the system is not able to communicate with the classroom server anymore"
- And if you run the classroom server on the same computer as the tutor (as we do)
- And if you have checked your "network connection", like gone to a website, and it is restored (e.g. If you simply had unplugged your the cable)?
- And if you do not want to "restart your system if needed" since, as in our case, that takes a big chunk time out of your class
- Hint: this can’t fix your network if that is the root cause, but may be able to work around temporary service outages.

Text messaging in class using Sanako Study 1200
Students click: ![]() – Tutors click:
– Tutors click: ![]() . Stop endless spelling out of URL’s or queuing with raised hands during class. Your students will
. Stop endless spelling out of URL’s or queuing with raised hands during class. Your students will  .
.
How a teacher can see student computer screens in Sanako Study 1200–the ultimate training summary


Cheatsheet for typing phonetic symbols with the IPA Keyboard Layout on Windows 7 – the ultimate training…
…using animated .gifs. Slower? Compact: 0.25sec, 0.5sec, 0.75sec, 1sec, 1.5sec, 2sec, 3sec, 4sec, 5sec, 6sec, 7sec, 8sec, 9sec, 10sec. 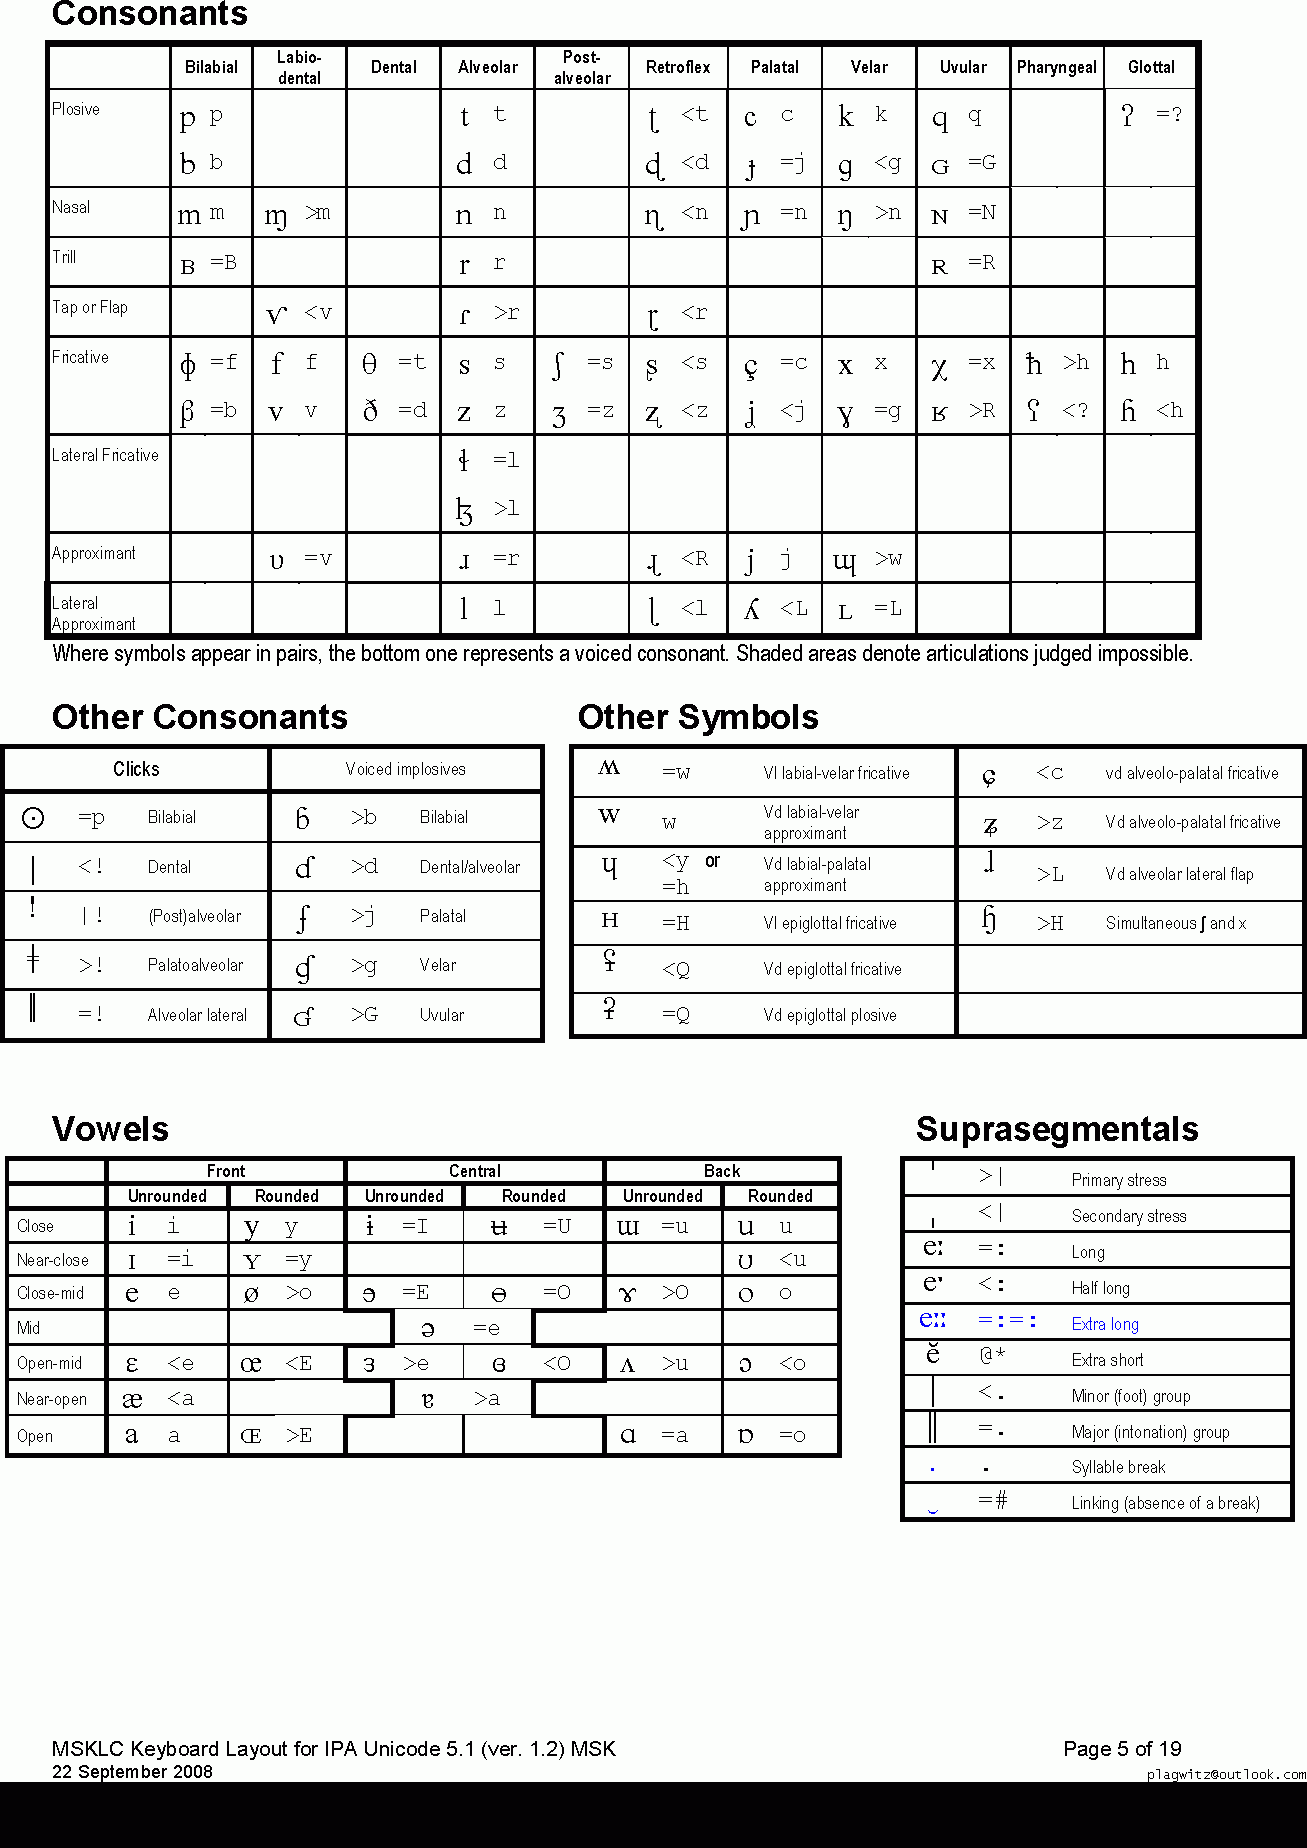
This is taken straight from the great documentation of this great Phonetic symbols Windows keyboard layout by SILS international, but needed a bit of massaging to support hands-free lookup via display on one screen of your dual screen system, while you learn or demo the keyboard to the class). Users without dual screen (including students) are better off with the slideshow below in which they can stop the images on any page:


The IPA MSKLC can produce both regular Roman characters and transcriptions with phonetic symbols by employing certain “dead keys” that can be combined with regular keys. Just and like our default LRC keyboard us-international .
Your first must select the keyboard like so.  (Icelandic is suitable since it is not used for other purposes much). In the LRC, you must wait until we upgrade to Windows7.


Questions? Read the About. Or just ask me a quick Our Databases: Resources with calendars -- Language learning material Moodle Sites, multimedia files -- films


FAQs for LRC student staff or for students or for teachers. To search our FAQs, in the browser addressbar, add after "https://plagwitz.wordpress.com/feed/?tag=faqs+/" "+TAG1" (from tag cloud below) OR "https://plagwitz.wordpress.com/feed/tag=faqs
&category_name=" "CAT1" (from category hierarchy below). OR search both categories and tags, and multiple TAGs/CATs (connect with "," for OR-search, with "+" for AND-search), like so: https://plagwitz.wordpress.com/feed/?tag=TAG1+TAG2+...TAGn&category_name=CAT1
+CAT2+...CATn"
Other ways to find help
If you cannot find it here, look there: 5,500 Language-Learning Links and Programs for learning or teaching 150 languages
Shortcuts:Our Lists, Our Maps, LRC Staff Moodle Site,LRC Project Moodle Site, 49erexpress, UNCC Moodle, Student Recordings: s:claslcslrcsanakostudent
Learning usage samples: Sanako oral exam, Kaltura webcam presentation, Dictation with speech recognition, Sanako written exam, Chinese and Japanese interactive stroke-order practice
Test the Sanako Installer, Webbrowser Popup Konfigurator for XP, or Windows7, faster LRC TeacherPC Log-in Let MS facilitate diacritics writing by installing for you US-International keyboard layout
This is my personal blog (Google+). The views expressed on these pages are mine alone and not those of my employer. The information in this weblog is provided “AS IS” with no warranties, and confers no rights.
