Archive
How to reveal your Skydrive/Office online cloud storage URL with SkyDrive Simple Viewer
A useful tool is SkydriveViewer which can reveal the URL of your MS-Office online Skydrive if you provide your Windows Live online credentials:
![skydrivesimpleviewer-url_thumb[1]](https://thomasplagwitz.com/wp-content/uploads/2011/05/skydrivesimpleviewer-url_thumb1.png "skydrivesimpleviewer-url_thumb[1]")
Download it from the SkyDrive Simple Viewer Codeplex site.
How to rip an audio CD in MS-Windows with Windows Media Player
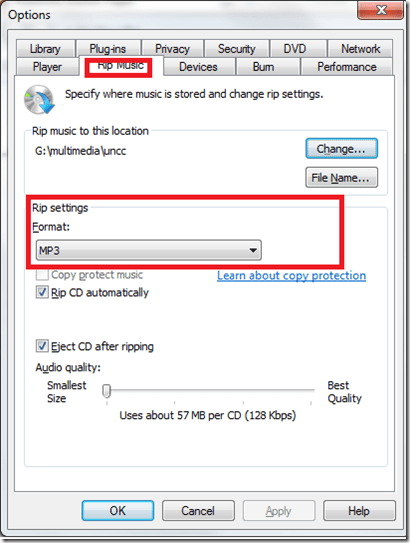
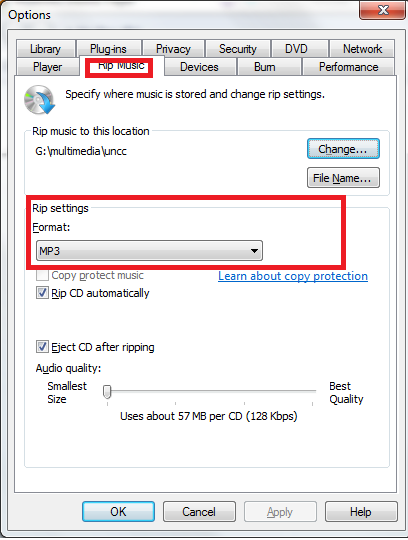
- Windows Media Player has CD-ripping capabilities built-in, WMA-format used to be the only option and is still the default in Windows 7, but can be changed under menu:”tools” / “options”/ tab:”rip music”
Potential Moodle-compatible replacements for Wimba Voice
With the demise of Wimba Voice on campus, Languages and Culture Studies lost some of their online learning acitivities and are still looking for a replacement, perferably within Moodle.
I have looked through some options and would recommend the following applications for a test install:
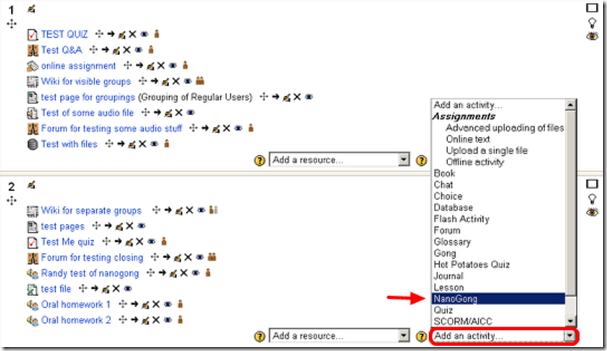
1. NanoGong, free (as in kittens). More info here:
2. WebSwami, a language learning platform, not free, and can also record video, and do much more. More info here:
Introduction of NanoGong, free open source voice recorder for Moodle
- This is a brief summary outline of NanoGong (which has just been upgraded to version 4.1, which includes an installation file for our current Moodle version 1.9.8), would be a good audio recording add-on for language learning to install in our Moodle learning system. What follows is compiled from various online sources:
- “NanoGong is an applet that can be used by someone to record, playback and save their voice, in a web page. When the recording is played back the user can speed up or slow down the sound without changing it. The speeded up or slowed down version of the recorded sound can be saved to the user’s hard disk, if he/she wishes
- There are special features for programmers, such as the ability to show or hide parts of the NanoGong interface or to completely control what the applet does.
- The NanoGong applet has been released as an open source project since version 3. The picture below shows the NanoGong applet with all components shown. “

- “NanoGong provides a very simple and transparent voice support for Moodle. Using a NanoGong activity and a NanoGong filter NanoGong provides two different types of voice support for Moodle”:
- “An extended HTML editor which supports voice-enriched content”, “ enabling a voice recording option for virtually any Moodle activity entry that uses the wysiwyg toolbar”, as you can see here:

- ”A NanoGong activity which allows students to submit voice messages to their teachers”:
- Questions remain:
- You can customize the recorder applet: Need to check whether this includes the timestretching capability, given that language teachers can be averse to student-controlled,
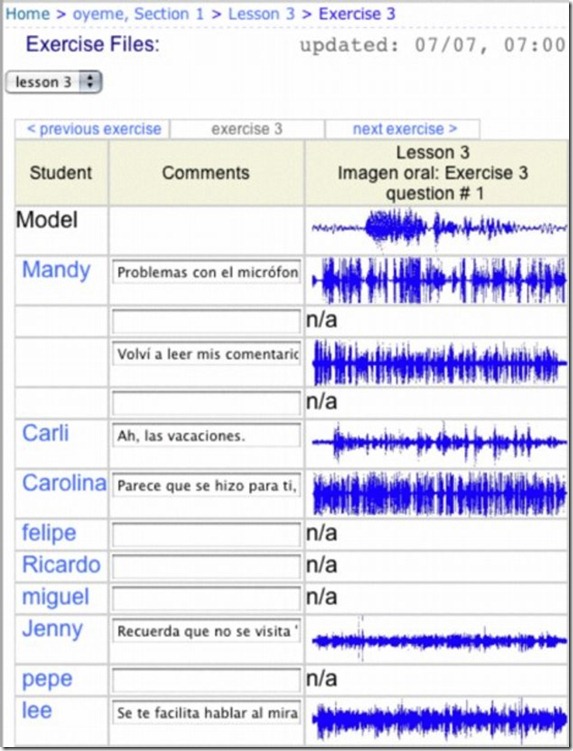
- Need to check for capability of downloading batches of submissions from the student class and grade it with time-saving techniques, like described here using Audacity. A more sophisticated example that testifies to the same features required to get graders adopt increasing audio student submissions was Web Audio Lab, an authoring system for developing interactive audio-based language courses (Language Resource Center, Cornell University. 2003-2007):

- How could one implement a dual-track recorder using NanoGong, with the program track providing aural cues for a more natural oral interaction?
- Requires JAVA (test compatibility).
- There is no Moodle 2.0 version yet.
- NanoGong seems “a derivative of the Gong standalone voice board” – without similar requirements and issues? Gong can also be integrated into Moodle, seems more advanced, but also much more difficult to implement (requires a tomkat server; problems have been reported with losing course deletion functionality in Moodle, the authentication pass-through not working from Moodle and the audio graph not working in Moodle).
- As with any open source project, there are some move Ifs.
- However, Nanogong seems the free audio recording plug-in for Moodle which is currently most favored.


Protected: How to conduct an easy oral exam with Sanako1200 (Model imitation/Question Response) – Part II: Implementation/instruction of examined students
How to do a screenshot of a full web page (beyond visible portion)
I have been meaning to find a screenshot software that can show the entire portion of a window – including the “scrollable” portion, i.e. more than the visible.
A long time ago, I used to do this with HyperSnap, but this software is not free.
Screengrab which I came by today, does it nicely – within Firefox:
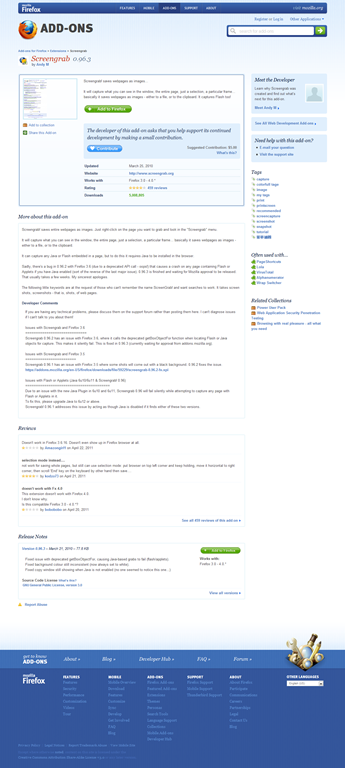
Limitation: Screengrab requires you to access the context-menu on the page via right-clicking – some web sites prevent this!
The on-screen keyboard (OSK) for foreign language character input on MS-Windows
A little known, but useful tool for non-western languages which can not be represented by the us-international keyboard layout, when no hardware keyboard is available:
The Windows on screen keyboard reflects the soft keyboard installed via Control panel / Regional and language options / Text input languages. and selected via the language toolbar, like so:

Easiest access, click Start, click Run, type “osk”, click “OK”. Or try this on XP: 
Computer Lab Imaging with Ghost Console and Deepfreeze Console
0. As of Winter 2011 Novell – AD and Deepfreeze 7 upgrade, flagged for updating: TBA.
1. DEEPFREEZE console
1.1. Unfreeze the image source client
2. Client PREPARE THE IMAGE
2.1. Login as labadmin,
2.1.1.NAL [tba], labtools, icon Microsoft Update (be sure to use icon in launcher it will disable policies that won’t allow it otherwise use windowsupdate.com
2.1.2 Remove the machine from the domain: My Computer / System Properties / Computer Name / Button: Change / Member of: Workgroup: LRC (if it asks for a user/pwd, leave both blank and click OK), restart as prompted using Ghost Console / Add to workgroup
2.2. Login as ITSadmin (work station only)
2.2.1.Create user testuser (Administrator), will be based on past default user template
2.3. Log in as testuser
2.3.1.Document what you are doing by running c:\temp\labscreencastfullhighaudio.wme / menu button: start encoding / when done, menu button: stop encoding, rename output file to not overwrite existing output,
2.3.2.Make changes ß centre_image_request_list_allda
2.3.2.1 if software installs complain about missing H: (home) drive, plug in a thumbdrive and change its driveletter to H:
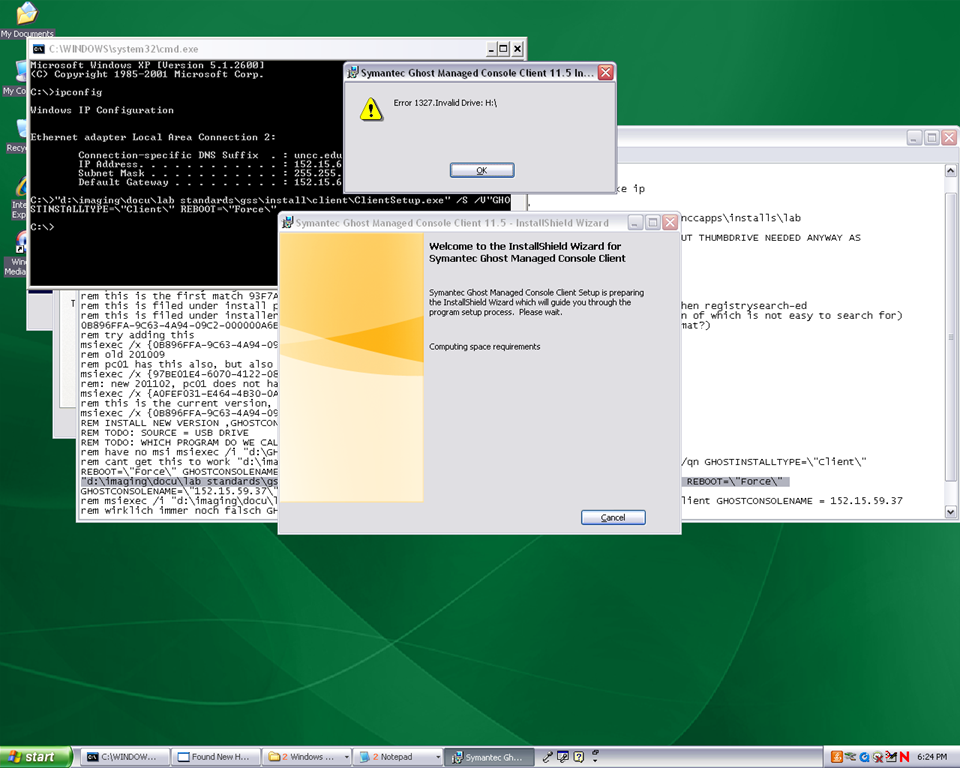
2.3.3.Clean before making testuser default user:
2.3.3.1. control / internet options / clean history and temp files
2.3.3.2. recycling bin: empty
2.3.3.3. right-click start button: / menu item:properties / button:customize / tab:general / button:clear list + tab:advanced: clear list
2.3.3.4. C: / properties /disk cleanup, all, except: “Compress old files”, “cached installers”, “Office setup files”
2.3.3.5 Firefox: menu: tools / clear recent history / time range: “everything”/ check everything and click button “clear now:” 
2.4. Log in as itsadmin
2.4.1.Document what you are doing by running c:\temp\labscreencastfullhighaudio.wme / start encoding / rename to not overwrite existing output,
2.4.2.Manage testuser – default user transition
2.4.2.1. USERS
2.4.2.1.1. Make testuser default user:
2.4.2.1.1.1. Unhide: explorer / tools / folder options / tab:view / show hidden files and folder, unhide protected operating system files
2.4.2.1.1.1.1. make a backup of old documents and settings/default user (entire directory, not only ntuser.dat): zip onto thumbdrive with date/version number )
2.4.2.1.1.2. xp copy profile windowskey+pause/break /tab:advanced / section:user profiles / button:settings, select the profile [you cannot copy the active profile, so log in as itsadmin], button: copy to, new window: copy to, section:copy profile to, button:browse, select c:\documents and settings\default user, button:ok
2.4.2.1.1.3. [not even the ntuser.dat seems necessary, since even the ntuser.dat gets updated by copy profile] c:\document and settings\testuser\ntuser.dat [+dolater:subfolders?]: back up ntuser.dat to ntuser.old, then copy into default user
2.4.2.1.1.4.Re-hide: explorer / tools / folder options / tab:view / do not show hidden files and folder, hide protected operating system files
2.4.2.1.2. Remove other accounts:
2.4.2.1.2.1. system / advanced / user profiles / clean profiles: delete all accounts except default user (it if shows) and itsadmin
2.4.2.1.2.2. administrative tools / computer management / treenode:local users and groups management / delete non built-in users and non-administrative users
2.4.3.Uninstall deepfreeze (by re-running the installer from unccapps/installs / df#wks.exe) (this will restart the computer; log in again as itsadmin)
2.4.4.delete c:\nalcache
2.4.5.backup the c:\temp \*.wmv screencasts onto a thumbdrive
2.4.6.do this as last step: run c:\windows\system32\trend\ImgSetup.exe, which gives a message: “this program has been configured to start whenever the system is restarted.”
2.4.7.if sysprep required (deploying to non-uniform hardware, e.g. dell optiplex 760 vs 780), run
2.4.8.Reboot to login screen
3. Ghost console configuration
3.1. Ghost console: upload/backup and download/deploy/clone the image
3.1.1. configuration resources / images / right-click: new / image pointing to a file with the NAME that includes today’s date in the format MMDDYY
3.1.2 task: “CAPTURE IMAGE” (not run): open
3.1.1.1. ISource machine: set to machine you have created the image on
3.1.1.2. Image: set to config resource that you have just created
3.1.1.3. [IF NOT CHECKED]check tab:general /checkbox: Remove machine from Domain before taking an image. You must remove the computer from its domain if you are going to roll out the image file to a number of computers. [except if using sysprep].
3.1.1.4 button: save, button:execute

4. DEEPFREEZE console
4.1. UNFREEZE ALL CLIENTS [LRC must be closed]
5. Ghost console configuration
5.1. Deploy task:
5.1.1.“DEPLOY IMAGE TEST”:
5.1.1.1. [ITEM IS ONLY FYI]tab:general / check: clone, but uncheck: configuration [tba: NOT unchecked now?] , refresh configuration, refresh inventory [tba: why?]
5.1.1.2. [ITEM IS ONLY FYI]tab: clone: check “use Ghost walker to perform a sid change”
5.1.2.configuration task “ADD TO DOMAIN”
5.1.2.1. [ITEM IS ONLY FYI] Alternative individually: ghost console / default configuration / right click computer / properties/ configuration / edit default configuration / tree: workgroup/domain membership
5.1.2.2. [ITEM IS ONLY FYI]alternative via batch configuration template: task “Add to AD group” to add to AD [for lcs? Is this why we do this separately from the domain?]: tab:general, check configuration , target machine group: browse for your default group / coed434, tab;configuration: browse for “add machines to ad” – based on template “add machines to ad”, check allow template settings, tree: workgroup/domain membership / check apply member of , check uncheck computer name which is already set, no description , workgroup/domain: its.uncc.edu, container:unccharlotte / labs / clas / lcs / workstations, uncheck: Move computers that are currently in a container.
6. Ghost console: TEST DEPLOY/ADD AD with 2 computers:
6.1. Test: template task: download/deploy to 2 clients
6.2. Test: on client:
6.2.1.Are clients joined to domain [cannot log in with domain account if not; global test: tba]
6.2.2.logging in (creating profiles based on default user) as staff and labstudent: language & translation apps coming up?
7. Ghost console : PRODUCTION DEPLOY/ADD AD
7.1. checks: are you deploying the right image? Are all computers turned on? Cancelling a Ghost deploy task is a pain, if it does not reboot to the login screen, run a token task like deepfreeze-boot-unfrozen
7.2. Clone/Download, Add to Domain/AD
7.3. Test the clients are joined to domain
7.3.1.For all: ghost console / default configuration / right click computer / properties/ configuration
8. Clients
8.1. Login as labadmin staff account (domain account ß uncheck “workstation only”, to freeze with this default)
8.2. DEEPFREEZE: install from novell-delivered application, from Ghost console: deepfreeze7-install, reboot to frozen install: from Ghost console:deepfreeze7-bootfrozen
9. DEEPFREEZE console
9.1. Test the clients are frozen (exclamation point denotes "not sure")
9.2 Add your scheduled maintenance window, again, to avoid domain trust issues .

Questions? Read the About. Or just ask me a quick Our Databases: Resources with calendars -- Language learning material Moodle Sites, multimedia files -- films


FAQs for LRC student staff or for students or for teachers. To search our FAQs, in the browser addressbar, add after "https://plagwitz.wordpress.com/feed/?tag=faqs+/" "+TAG1" (from tag cloud below) OR "https://plagwitz.wordpress.com/feed/tag=faqs
&category_name=" "CAT1" (from category hierarchy below). OR search both categories and tags, and multiple TAGs/CATs (connect with "," for OR-search, with "+" for AND-search), like so: https://plagwitz.wordpress.com/feed/?tag=TAG1+TAG2+...TAGn&category_name=CAT1
+CAT2+...CATn"
Other ways to find help
If you cannot find it here, look there: 5,500 Language-Learning Links and Programs for learning or teaching 150 languages
Shortcuts:Our Lists, Our Maps, LRC Staff Moodle Site,LRC Project Moodle Site, 49erexpress, UNCC Moodle, Student Recordings: s:claslcslrcsanakostudent
Learning usage samples: Sanako oral exam, Kaltura webcam presentation, Dictation with speech recognition, Sanako written exam, Chinese and Japanese interactive stroke-order practice
Test the Sanako Installer, Webbrowser Popup Konfigurator for XP, or Windows7, faster LRC TeacherPC Log-in Let MS facilitate diacritics writing by installing for you US-International keyboard layout
This is my personal blog (Google+). The views expressed on these pages are mine alone and not those of my employer. The information in this weblog is provided “AS IS” with no warranties, and confers no rights.

