Archive
Foreign Language Character Input on Windows XP in the LRC
The LRC offers the following foreign language characters writing support:
| American English | us international | not needed | us-int |
| Arabic | Google;MS;MS-maren;fontboard | maybe later, now osk | demo |
| British English | us international | not needed | us-int |
| Dutch | us international | not needed | us-int |
| Farsi | Google;MS | maybe later, now osk | demo |
| French | us international | not needed | us-int |
| German | us international | not needed | us-int |
| Greek | Google;MS | maybe later, now osk | demo |
| Italian | us international | not needed | us-int |
| Japanese | MS | not needed | |
| Korean | MS | maybe later, now osk | demo |
| Mandarin | MS;pinyinput | not needed | pinyin |
| Portuguese (Brazilian) | us international | not needed | us-int |
| Russian | Google;MS | maybe later, now osk | demo |
| Spanish | us international | not needed | us-int |
The support is best accessed from the “international toolbar”, like so: 
You can also use the windows on-screen keyboard to input non-Western characters on a computer that has not the corresponding keyboard overlay stickers. In the small-group workspaces, which have writing pads, you can also use the MS-Handwriting IME for East-Asian languages.
The on-screen keyboard (OSK) for foreign language character input on MS-Windows
A little known, but useful tool for non-western languages which can not be represented by the us-international keyboard layout, when no hardware keyboard is available:
The Windows on screen keyboard reflects the soft keyboard installed via Control panel / Regional and language options / Text input languages. and selected via the language toolbar, like so:

Easiest access, click Start, click Run, type “osk”, click “OK”. Or try this on XP: 
Multi-monitor setup on teacher podium in the LRC main classroom
- Like most modern computer workplaces, the LRC main classroom teacher podium needs multiple monitors, if you want to truly take advantage of gathering up to 28 students at 28 multimedia-enabled, networked computers which, thanks to classroom management systems like NetOp School and Sanako Study1200, can be remote controlled by the teacher.
- That’s why we built a simple extension on the teacher podium to connect a 2nd screen and more than double (resolution-wise) your on-screen teaching space.


- Note: MS-Windows is set to “extend my screen onto this monitor”, except “maximized” windows still only maximize across 1 of 2 screens. De-”maximize” a window to be able to drag a window from one screen to the other (e.g. to prepare it on the teacher screen and then display it on the classroom projector) or to span a window across both monitors (note that, while this could be very useful to display larger thumbnails of more students computer screens, the Sanako Study1200 apparently cannot be spanned across two monitors. I yet have to test whether the Mosaic/separate thumbnail window can, but even if, this one lacks the feature of being able to take advantage of the great class overview by jumping to where teacher assistance is needed).
- The left monitor is monitor 1 for Windows and being projected to the classroom. The right monitor, monitor 2 for Windows, is your staging area and control room.
- Note, however, that both NetOp School and Sanako Study 1200, normally housed in the control room, are able to project the right monitor: onto (some or all of) the student’s computer screens. While I prefer not to hog the students computers for extended periods of time (effectively “dumbing down” computers to TV screens), this feature can give you more flexibility:
- E.g. during a recent workshop on the Sanako Study, with the Sanako feature “Teacher screen to students”, I could demonstrate live operation of the Study 1200 software on my right monitor to participants’ computer screens while being able to keep up the PowerPoint overview slide show onto the classroom screen (after setting up my PowerPoint slideshow to display on the secondary screen).
- Note that, even though multicast is being used for projection, only still images, including PowerPoint Slides, and, to some extend, computer screen video can be projected in high resolution over the network at reasonable speeds. The Sanako Study 1200, Version 5 also allows for an extremely low resolution video projection to students. For high resolution video streaming, you need the add-on module Sanako Video Live, which comes with its own streaming server hardware.


Improved Lighting situation in the LRC
- The lighting situation in the LRC caused problem both when using the teacher computer and when showing videos.
- We removed the fluorescent tubes right above the teacher screen. You can get an idea how strong the glare from the ceiling lights was from the next picture:

- The teacher screen which was flickering has been replaced.
- By clicking on the button”menu on the Sympodium screen of the teacher computer, you can adjust the screen more to your liking. While not an optimum display setting, under the current ambient light circumstances, we found it an improvement to the brightness and also the contrast.
")
- You can also adjust the projector by accessing the projector menu from the NEC remote control.
")
- Note that increasing the projector brightness will lower the life-span of the expensive projector bulbs.

- Note that the menu also contains presets for displaying video, computer and other sources.

- Presentation …… Recommended for presentations from a computer.
Video …………….. Recommended for standard video such as a TV program.
Movie ……………. Recommended for film based video such as a movie (DVD or HDTV). - Finally, we made sure that the blinds cannot be raised, just tilted, to make it easier and quicker to darken the room as much as possible.

")
")


Presentation on Time-stretched Audio and Personalized Provision in Instructor-led Digital Audio Labs @ Nerallt/Neallt 2009, Yale University, New Haven, CT
The pervasiveness of networked digital media – new delivery forms for digital TV and radio by the traditional media industry, as well as new content providers using pod- and tube-casts -, owing to an ever more powerful, robust and – partially as an overhang of the bubble – abundant technical hard- and software infrastructure, has also revitalized – and poured substantial new resources into the modernization of – the older concept of the language lab. Computerized classrooms with network and multimedia facilities, basic classroom management systems and centralized databases, with some interfacing to serve as learning material repositories or portfolios demonstrating learning outcomes, have become a common underlying fabric for many of the constituents’ learning environments. The recent freezing up of the resource flow can serve as a wakeup call to remind us both of the critical “What is the benefit, or return on investment?” and of the original promise of e-learning: increased efficiency. On the one hand, scaling through crowd-sourced or automated sourcing and reuse of materials has become a pressing need in rapidly expanding second language programs like English and Spanish that new technologies can help meet. On the other hand, widely differing learner proficiency is increasingly a problem when trying to form classes in the shrinking programs of other languages, and personalization of learning provision is increasingly expected in an environment shaped by “long tail”-economies. This paper will evaluate common practices in SLA that have served as workaround, recapitulate a number of different time-stretching algorithms, summarize existing software solutions and introduce a new option which is based on MS-Windows Media Encoder’s time-stretching and pause detection capabilities. Finally, the presentation will exemplify instructor-led utilization of this simplified and/or automated time-stretching of authentic materials, with more teacher-control and a more realistic output than that built into current media players, as a – not exclusive, but valuable – step towards more comprehensible input of level “i+1” in a more personalized language learning provision.
Slide Deck: plagwitz_timestretching_audio_nerallt09.pdf
Digitization of the SAVILLE analogue Conference interpreting recording facility: Lecture/Floor recording and CCTV streaming
The original conference interpreting lab setup had no provision for digital video recording of the lecture/floor. A workaround used on of the booth VCRs for analogue recording, with video form an ELMO dome cameras and audio from a lectern microphone – an audio installation which ran in parallel to the main DSI conference interpreting facility (and covered only the lectern, not the conference table).
A home-brew add-on was based on a consumer handheld digital camera for video. Experiments with different add-on microphones for audio from the lectern and floor were less than successful.
The DIS system however provides an audio out of the lectern an/or floor audio, as well as the capability for the conference administrator to open or mute floor microphones and for the technical administrator to set the maximum number of open microphones, and control their gain.
For the digitization of this system, I used
- an already retired standard university student lab computer
- to which I added an old spare ATI All-in-Wonder video card
- to which I connected a TEVION home TV switch as a poor man’s (~5£) video splitter into which I fed
- the (hitherto unused) DIS audio out balanced stereo, using an RCA adapter, as well as
- the ELMO video, using a coax to RCA adapter (video signal was split into the ATI as well as back into the original SAVILLE Kramer AV switch).
While originally coming with its own digitization software, the ATI All-in-wonder also works well with Windows Media Encoder.
Two wme configuration files were created:
- capturetestaticomposite_pal-l_480x320works.wme(find this file on the computer connected to the central rack, then double-click it in order to start Windows Media Encoder, then click the Record button in the top menu – no custom GUI was deemed necessary for this non-student operated recording) for recording to files that can be played with Windows media player, whether on Windows or on Mac OS X.
- streamtest480x320_15fps_pal.wme (again, simply find this file on the central rack computer, then double-click it) for streaming CCTV live to the back office. An onsite admin office was one of the usual features of a teaching lab which was missing in this installation. CCTV allows to keep an eye on teaching activities in the conference interpreting lab, proactively spot support needs ands absorb feature requirements which instructors tend to have problems articulating (or even seeing the need for articulating). A (lower quality archived stream is created on the side and can be picked up, post-processed and archived at TBA).


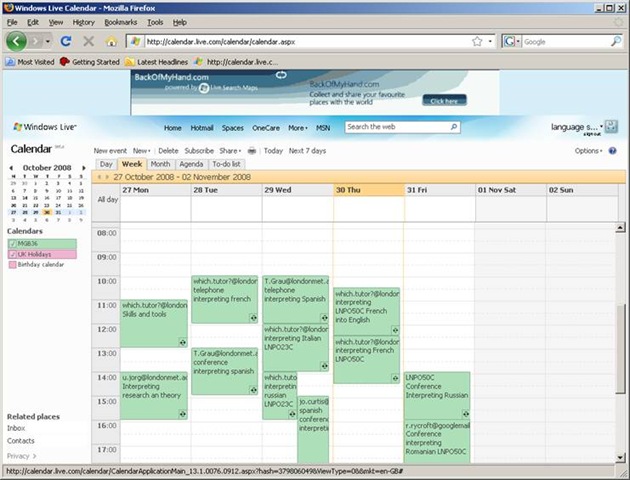
Shared Calendar for Interpreting Suite Bookings on Windows Live: How to get started
1. We have set up a *shared online calendar*:
2. 
3. Where do I find this calendar?
a. It is on Windows Live.
b. hale.language.services@live.co.uk will email you an invitation to share this calendar on line.
4. What do I do when I receive the email?
a. In the email, click ‘accept’.
i. If the link does not work, copy /paste the text link from the bottom of the email, but first remove line breaks (paste the link into notepad and make sure that the entire link is on single line).
b. If you do not have a Windows Live account, you will be given the option to ‘sign up‘.
i. If you are not asked to sign up, you may be logged in as somebody else: make sure to create your own account with your own password.
c. For best results, open the calendar with a recent Web browser: Firefox 3 or Internet Explorer 7 (if you cannot upgrade, version 6 works also, with some limitations) or better.
5. MGB36 is the coded room number for the interpreting suite. It is also the name of the online calendar.
6. What do I do next?
a. Simply add an appointment to the calendar by hovering over the time slot required and clicking on “ADD“

i. Under “Calendar”, select “MGB36” (if you add to your personal Calendar, other users won’t be able to see).
ii. Under “what”, include your e mail address so we can contact you in case of changes, as well as Module number
iii. Under “where” include if you do not need all booths (others may want to share)
iv. for additional options, like recurrence (= enter 1 appointment – recurring weekly, until end of it…, no wait: teaching period! – to book your weekly class meeting for the entire teaching period), click on “Add more details”.
b. Don’t forget to update the calendar if you need to cancel a booking.
c. If you want to see a demonstration, watch the live_calendar_shared_mgb36.wmv using Windows media player
7. Who can view the information on line?
a. Interpreting lecturers only.
b. Students can currently not access the data. We may decide later to let them view it (i.e. make the calendar public).
Did you run into problems with the calendar not explained here? View the FAQ.


Questions? Read the About. Or just ask me a quick Our Databases: Resources with calendars -- Language learning material Moodle Sites, multimedia files -- films


FAQs for LRC student staff or for students or for teachers. To search our FAQs, in the browser addressbar, add after "https://plagwitz.wordpress.com/feed/?tag=faqs+/" "+TAG1" (from tag cloud below) OR "https://plagwitz.wordpress.com/feed/tag=faqs
&category_name=" "CAT1" (from category hierarchy below). OR search both categories and tags, and multiple TAGs/CATs (connect with "," for OR-search, with "+" for AND-search), like so: https://plagwitz.wordpress.com/feed/?tag=TAG1+TAG2+...TAGn&category_name=CAT1
+CAT2+...CATn"
Other ways to find help
If you cannot find it here, look there: 5,500 Language-Learning Links and Programs for learning or teaching 150 languages
Shortcuts:Our Lists, Our Maps, LRC Staff Moodle Site,LRC Project Moodle Site, 49erexpress, UNCC Moodle, Student Recordings: s:claslcslrcsanakostudent
Learning usage samples: Sanako oral exam, Kaltura webcam presentation, Dictation with speech recognition, Sanako written exam, Chinese and Japanese interactive stroke-order practice
Test the Sanako Installer, Webbrowser Popup Konfigurator for XP, or Windows7, faster LRC TeacherPC Log-in Let MS facilitate diacritics writing by installing for you US-International keyboard layout
This is my personal blog (Google+). The views expressed on these pages are mine alone and not those of my employer. The information in this weblog is provided “AS IS” with no warranties, and confers no rights.
