Archive
Archive for the ‘Learning-Tool-is-any’ Category
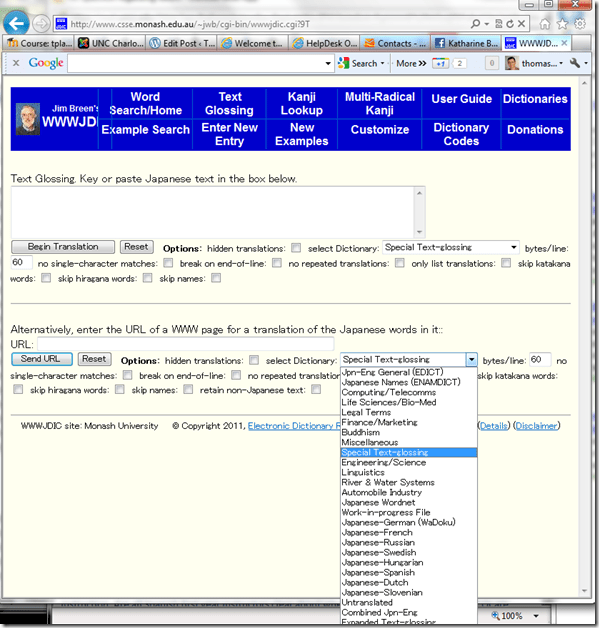
Jim Breen (Monash) Japanese-English Dictionary
2012/02/08
Leave a comment
Categories: audience-is-students, Dictionaries, Japanese, websites
links
Collections of online dictionaries
2012/01/30
Leave a comment
- Here you can haz dictionaries. And if you use them in the Language Resource Center, you even have the chance to run into someone who can show you how to use them well.
- http://linguistlist.org/sp/GetWRListings.cfm?WRAbbrev=Dict
- http://lexicall.widged.com/repository/listing.php?category=words
Categories: all-languages, Arabic, English, Farsi, French, German, Greek (ancient), Greek (modern), Hindi, Italian, Japanese, Korean, Latin, Mandarin, Polish, Portuguese, Russian, Spanish, Swahili, Vocabulary, websites, Yoruba
dictionaries, links
How a teacher creates a Moodle file upload assignment for writing
2012/01/30
1 comment
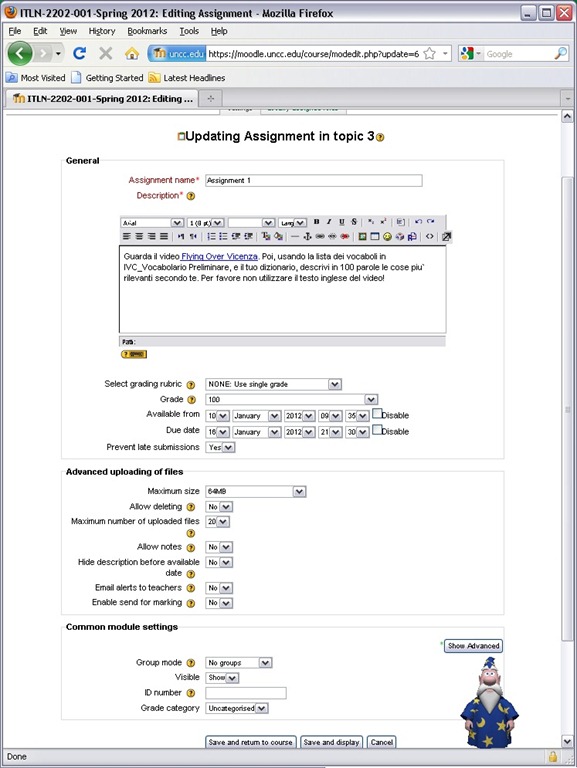
- In your Moodle course, turn editing on, choose Assignment: Advanced upload of files (required for response file from teacher).
- Provide name and instructions. Choose the desired options (uploading one file is enough):
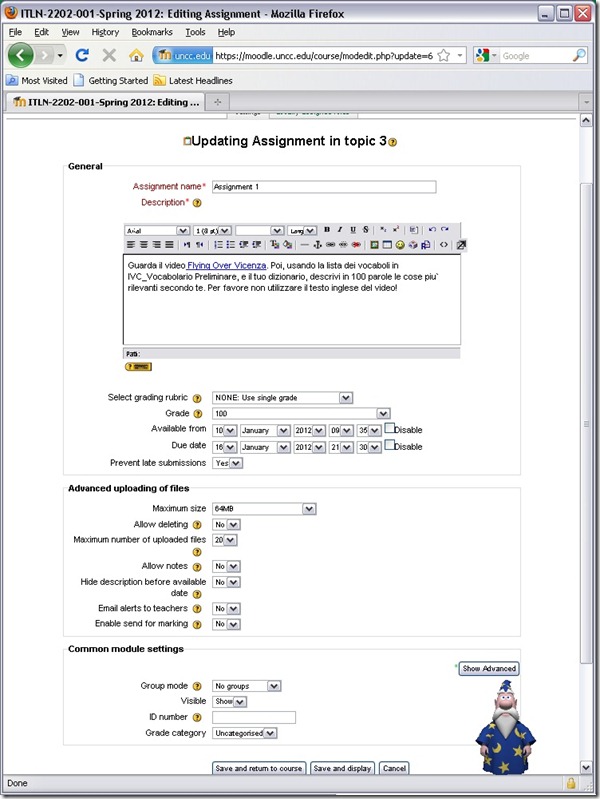
- A gradebook column will be automatically created, and will be initially empty.

- Instruct your students how to take the MS-Word upload assignment, and when (if you leave the default availability/due date on, the assignment will automatically appear in their Moodle Calendar, and can appear in their Ninermail calendar).

How a student uses the Sanako Recorder Voice Insert mode for Moodle comparative recording exercises
2012/01/25
2 comments
- to load a file
- from Moodle:
- Find your assignment with the model audio file, presumably in your Moodle course.
- download the model audio file
- open the Sanako Student Recorder (introduction).
- go to menu: file / open, and open the file you downloaded
- from student recorder playlist: double-click the file.
- from Moodle:
- enable voice insert:
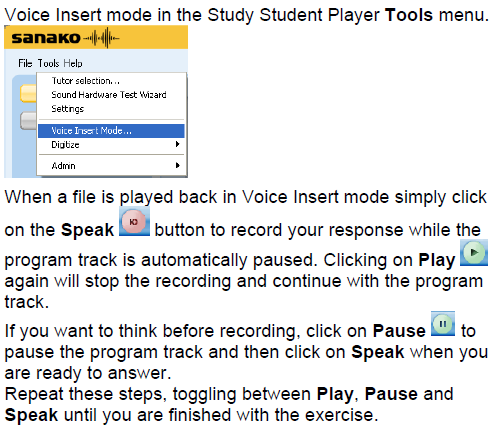
- To activate voice insert (which is a toggle that changes the behavior of the other buttons)
- either go to tools/ voice insert mode
- or click the voice insert button
 (darker shade of brown = OFF; tooltip should say “Toggle Voice Insert OFF”, meaning: it is ON now)
- To activate voice insert (which is a toggle that changes the behavior of the other buttons)
- press the green play button to listen until you reach the point (your teacher may have inserted a pause or aural cue) where you can repeat or respond.
- Then click the red speak-button
 to repeat after/respond to the source/teacher
 - When you are done repeating/responding, press the green play-button.
- At the end, press the blue stop-button.
- Rewind and review your recording (e.g. compare your pronunciation with the teacher’s model).
- When done, click file / save as and save only your, the student track, as mp3 or wma.
- Additional notes:
- TBA: you can overwrite your pronunciation where you deem necessary.
- Fixed in Sanako 7:
you cannot show the voice graph when in Voice insert mode – both are incompatible. - To see in action how to record with voice insert and save the student track, view
- The previous is just a step-by-step for our environment based on the Sanako Study 1200 documentation which follows here:


How a teacher best adds cues and pauses to an mp3-recording with Audacity to create student language exercises
2012/01/25
1 comment
- The first screencast example uses insert tones and a gut amount of pause, for an interpreting exercise, into an authentic German political speech
- 1:00 search for a break (button: play/stop – pause prevents edits)
- 1:05 move the cursor to the break (mouse left-click on timeline)
- 1:20 insert a pause (menu:Generate / Silence )
- 1:25 zoom in (button:magnifying glass, CTRL + mouse scroll wheel)
- 1:45 generate a tone (menu:Generate / Noise), change the duration
- 2:10 do not replace the selection
- 2:20 use undo, just like in MS-word and other programs
- 2:30 move the cursor to the start of the selection (mouse left-click on timeline)
- 2:40 generate a tone (menu:Generate / Noise)
- don’t forget to review results before distributing to students
- the second screencast example, of post-editing a questions/response exercise in ESL, takes the amount of pause inserted from the recorded teacher instruction for the student, and uses copy/paste to speed things up even more.
- You can also only insert tones and not pauses, as in the 3rd screencast, and allow the students flexible pause lengths, if you can rely on the Sanako Student recorder Voice insert. Or if you must, let students use audacity for recording also, and have them learn how to move the recording cursor around manually, and throw away the source track.
How a teacher creates audio recordings for use with Sanako Student Voice Insert mode
2012/01/24
Leave a comment
- One of the Sanako Student player’s useful features geared toward language learning activities, is that it can save the teacher the time and effort for inserting pauses into their audio recordings, so that students can record responses into them.
- Meaning the teacher can just press the red speak button
 and record through the entire file in one sitting.
 - The teacher can still help students finding their way around the file, especially where to insert their own audio recording responses, by adding aural cues.
- This can be done in minimal time: I once saw a teacher use a bicycle bell – and why not, if it saves time.
- A spoken instruction “Respond”/”Answer in 10 seconds” is not more difficult to spot (unless only the voice graph is being browsed) and might be even better.
- If you have spare time:
- You can post-edit the file with audacity, generating and inserting sinus tones.
- You can use the Sanako player to insert bookmarks instead of cues.
- Meaning the teacher can just press the red speak button
- As long as students have been instructed to how to use voice insert recording mode with the Sanako student recorder.
- This is for self access of students to teacher recorded files – be it during class or homework.
- If you want to record students under exam conditions, a similar insert recording feature is available within the activity: Model imitation, but not with a pre-recorded file, only when the live teacher is the program source students listen to for cues.

Categories: Arabic, audience-is-teachers, documentation, English, Farsi, French, German, Greek (modern), Hindi, Italian, Japanese, Korean, Listening, Mandarin, Polish, Portuguese, presenter-computer, Russian, service-is-learning-materials-creation, software, Spanish, Speaking, Student-Computers, Swahili, Yoruba
audio, recording, sanako-study-1200, student.exe, voice-insert
How to bypass a Moodle Popup Window when using Respondus lockdown browser
2012/01/24
Leave a comment
- Problem: when starting the Moodle Lockdown browser to take an online exam, it opens with a popup window about messages. Popup window prevents access to the underlying main Moodle browser window (and exam). When closing the popup window, the entire lockdown browser closes, including main Moodle browser window.
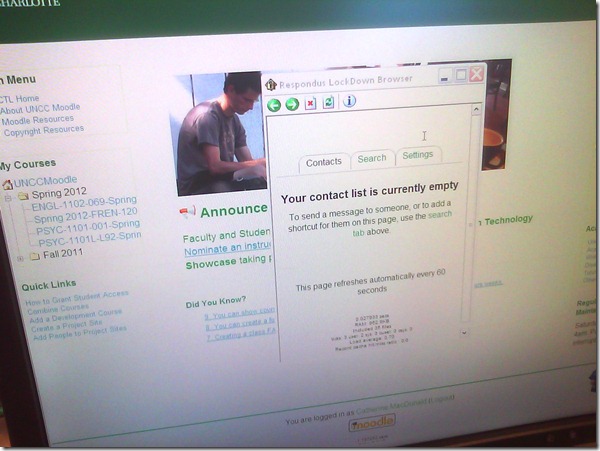
- Cause: Moodle can be configured to show a notification window when messages have arrived since your last login. This notification window has poor compatibility with the lockdown browser.
- Workaround: In the popup window, click on the tab: “Settings” and uncheck (at least for this exam session) the checkbox to show the message box as a popup when logging in. Close the popup window.

- Result: Even if this closes the main Moodle browser window once again, when you start the Moodle Lockdown browser again, the popup window will not appear again, and you can take your exam.



Questions? Read the About. Or just ask me a quick Our Databases: Resources with calendars -- Language learning material Moodle Sites, multimedia files -- films


FAQs for LRC student staff or for students or for teachers. To search our FAQs, in the browser addressbar, add after "https://plagwitz.wordpress.com/feed/?tag=faqs+/" "+TAG1" (from tag cloud below) OR "https://plagwitz.wordpress.com/feed/tag=faqs
&category_name=" "CAT1" (from category hierarchy below). OR search both categories and tags, and multiple TAGs/CATs (connect with "," for OR-search, with "+" for AND-search), like so: https://plagwitz.wordpress.com/feed/?tag=TAG1+TAG2+...TAGn&category_name=CAT1
+CAT2+...CATn"
Other ways to find help
If you cannot find it here, look there: 5,500 Language-Learning Links and Programs for learning or teaching 150 languages
Shortcuts:Our Lists, Our Maps, LRC Staff Moodle Site,LRC Project Moodle Site, 49erexpress, UNCC Moodle, Student Recordings: s:claslcslrcsanakostudent
Learning usage samples: Sanako oral exam, Kaltura webcam presentation, Dictation with speech recognition, Sanako written exam, Chinese and Japanese interactive stroke-order practice
Test the Sanako Installer, Webbrowser Popup Konfigurator for XP, or Windows7, faster LRC TeacherPC Log-in Let MS facilitate diacritics writing by installing for you US-International keyboard layout
This is my personal blog (Google+). The views expressed on these pages are mine alone and not those of my employer. The information in this weblog is provided “AS IS” with no warranties, and confers no rights.

