Archive
A team calendar for work groups on Windows Live
I have been asked whether we can have a workgroup calendar to coordinate who is on campus when.
We can use the hale-interpreting (http://hale-translation.groups.live.com) and hale-translation groups in Windows Live for this (http://hale-interpreting.groups.live.com).
Remember: Members only! You need to be a member of these groups to have access to their calendars. If you have not accepted my invitation email from a long time ago, you are not a member – and there is no point in digging that email out now, since it will have expired. However, you can go to either of the group’s home pages linked above and ask for being added. Then wait for the confirmation email response.
If you go to your calendar home page (http://calendar.live.com), all events from all “calendars” that you have access to (in the time span which you chose as your default – I use week view) display be default in one and the same “calendar”.
A bit of terminology: Lemma “calendar”, meaning: (1) a web page which looks like a paper calendar. (2) a series of related events (E.g. the MGB-36 events belong in one such “calendar” (2) as they all take place in this room).
Windows Live puts/displays all “calendars” (2) you have access to in one “calendar” (1), and differentiates the “calendars” (2) by giving each “calendar” (2) a distinct colour within “calendar” (1). The colours displayed in the picture below may be different for you – you can choose you own colour scheme from the calendar options –, but you, too, will have different colours per calendar.
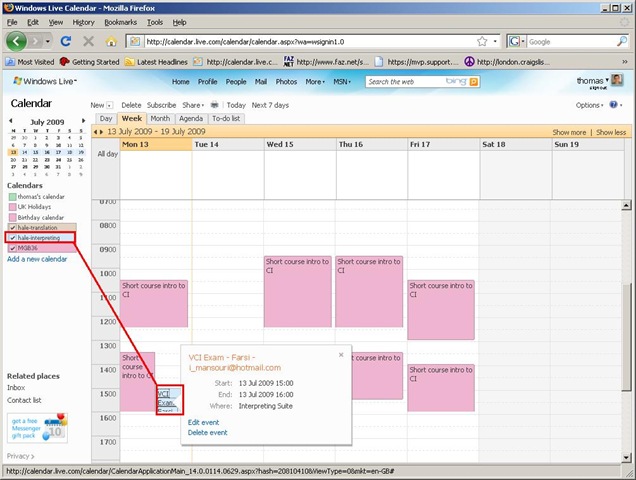
You will note that the Monday “Exam” above should be in the (red) MGB-36 calendar, not in the (light blue) interpreting group calendar. That is something you will have to pay attention to when you add an event, now that you have more than one ”calendar” (2) at your disposal (actually, you always had, and the most common initial error was users putting events in their personal ”calendar” (2) (coloured green above), with the result that nobody else but them could see those events).
You can set which “calendar” (2) to add an event to in the dropdown box labelled “Calendar” (framed red below, meaning “Which one?”). Also note the “All day [event]” option which should prove especially useful for a work group leave calendar (If you find a multi-day span option, let me know).

And here is the result, viewable for all users that have access to the hale-interpreting group calendar:
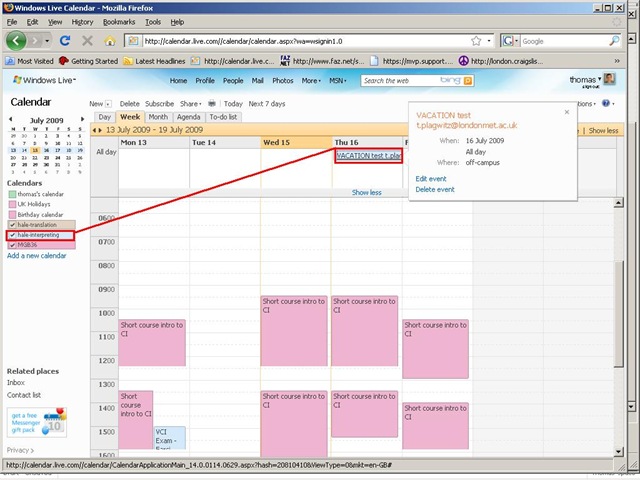
If colouring is not clear enough, filter the calendar (1) for specific “calendars”(2) = display only events from selected “calendars”(2). To do that, in the left menu, uncheck the box next to the calendar to hide all events from this calendar. Result if you view only the interpreting group calendar:

The natural next step is to have better collaboration even when not all workgroup members are in the same location, using instant messaging, including what is called presence. Windows Messenger 4.7 is already installed and ready on our computers (NOT if you have not abandoned Windows 2000 yet – do it now!). Just follow the quick start under my portrait picture at the right of my spaces home page . If you use your Windows Live login, a few things things should just fall into place. If you also want group messaging (multipoint), have the newer Windows Live Messenger installed.
Digitization of the SAVILLE analogue Conference interpreting recording facility: Booths. Technical instructions
Prerequisites:
The original SAVILLE setup to add (floor and booth) video and enable recording in the DIS 6000 conference interpreting facility. The cabling, switching and interfacing can all be used unchanged, and the VHS recorders should indeed be used as backup. OTOH, once you feel confident about digital recording, you can fade out the VHS recorders (or replace them by yet another output device).
Digital video capture card – the cheapest I could find was this and it tested to work (including lip synching),
Miscellaneous AV splitters and cables.
Windows Media Encoder 9 and the Windows Media Encoder SDK, both available from Microsoft and installed by campus ICT support.
Windows Media Encoder Configuration Files trprecord_a.wme and trprecord_av.wme in \\stushare_server\StuShare\Humanities, Arts and Languages\Language_Services\configuration
AutoIt3, a scripting language used on campus for computer deployment. The compiled executable I provide has no prerequisites on our MS-Windows installation. If you want to make changes in the au3 script, you will need the free AutoIt3 language and development environment.
The script relies on impersonation to access the network shares. If the user/password this impersonation is based on changes, you can still work with the recordings on the local PC. To restore the network archiving/sharing functionality, you have to run trpPwdEncrypt.exe (a slight adaptation from the AutoIT3 help file example) and follow the included instructions:

Then recompile the script trprecord.au3 (both files are stored on the instructors-only share) and put the resulting trprecord.exe on the student-accessible share.
Troubleshooting:
- Check the AV cables and connectors.
- Check the screenshots and their filenames which the software produces for logging in the local temp directory (note that this directory gets purged on restart).
- If you make changes in the environment, do not fail to also change the corresponding configuration strings at the top of trprecord.au3, then recompile.
Demoing a requirements gathering template for IT project management
Designed for SME focus group meeting capture when upgrading the City-of-London conference interpreting facility at London Metropolitan University. Querying users for business requirements in use case form. Watch a demo: 
to generate functional requirements:

and to generate technical requirements (and questions for vendors):

While keeping an eye on requirements metrics (what is important, contentious, unclear):

Passing around European Parliament Plenary Video Clips & Transcripts
-
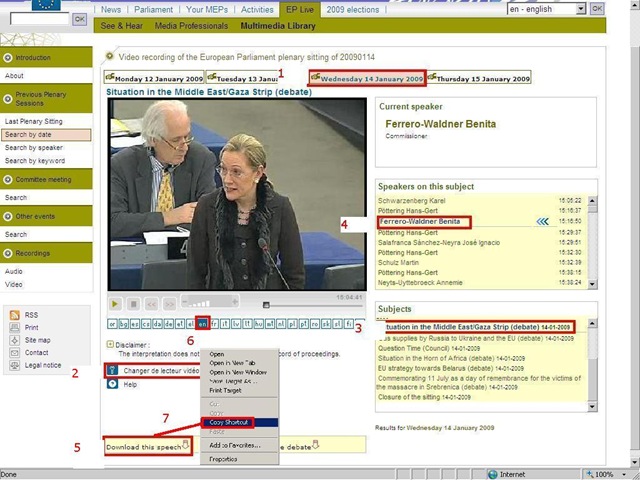
European parliament video clips are quite big and it would be easier not to have to pass them around. But how to communicate to somebody else which video clip to watch if the clip selected is not reflected in the browser address bar? The flash application unfortunately forces you to provide the “bibliographic” information in pieces (start url, date, possibly video format, debate title, speaker name). But in the end you get a direct link which you can pass on to save others from having to jump through the same hoops: If you just need the direct link, skip to step 7. Otherwise: Start with the calendar interface: http://www.europarl.europa.eu/wps-europarl-internet/frd/vod/research-by-date?language=en, find your (1) date, e.g. “Wednesday 14 January 2009”,
-
The window with the recording of that date will come up; now you CAN (2) change the video format – wmv (should work on most Windows PCs, free upgrade for MACs here:http://www.microsoft.com/windows/windowsmedia/player/wmcomponents.mspx) or mp4 -, an option that will show in the browser address bar. If you must, change format this first, as it seems to rewind the video to the beginning of the session.
-
Click on your (3) debate, e.g. “Situation in the Middle East/Gaza Strip (debate) 14-01-2009”.
-
Click on your (4) speaker, e.g. “ 15:16:50 Benita Ferrero-Waldner 00:13:12 15:30:02”
-
Instead of watching online (e.g. if you find the stream quality lacking), you can (5) download the video (in the format you have chosen, either wmv or mp4). UPDATE: The web site added a disclaimer that you have to 1.read, 2.check before you can 3. download, as illustrated below:

-
Note: you can (6) change the b-language (for relay interpreting) when streaming. Plus, when you download the video, all the b-languages are downloaded together with the a-language. See here how to select the desired b-language when playing the downloaded file.

-
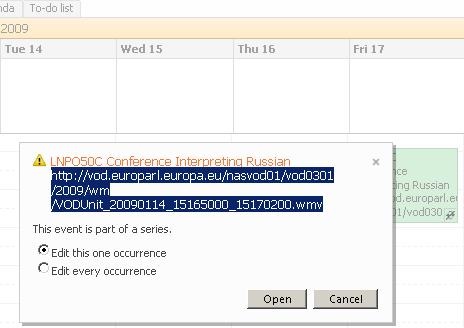
Easier than providing all bibliographical information (calendar URL, date, debate and speaker) is the direct URL of the download clip. Right click on “Download this Speech”, select (7) “Copy shortcut” from the context menu. Then paste this, e.g. http://vod.europarl.europa.eu/nasvod01/vod0301/2009/wm/VODUnit_20090114_15165000_15300200.wmv or if you chose mp4 format: http://vod.europarl.europa.eu/nasvod02/vod0301/2009/isma/VODUnit_20090114_15165000_15300200.mp4, into the calendar event for the exam – completes your checklist for the exam, and at the beginning of the exam, you can download the link from here onto the students’ computer. Or, for assigning materials to students or passing them to external examiners, email this direct link.
-
Unfortunately, it appears that the transcripts, unlike the audio channels, do not include the relay languages and have to be accessed from a different (calendar-)interface here: http://www.europarl.europa.eu/activities/plenary/cre/calendar.do?language=EN: “The verbatim report of proceedings of each sitting (often referred to by its French abbreviation, CRE) is published (Rule 173 of the Rules of Procedure) and contains the speeches made in plenary, in the original language.”

Appendix: The file size of these videos is about 10MB per minute. If you feel you need to save the videos locally, use an appropriate location (where you have sufficient space, the file will not be erased, only appropriate users have access – consider this before using a public network share, personal drive). Not really more “local” is saving the video clip on the http://hale-interpreting.groups.live.com Skydrive which can also hold clips larger than 50MB[ doubled to 100MB on June 20,2011] if you pre-process them like described in the zipping instruction.
Watch a 5-minute narrated video-clip that demonstrates the above steps.
Swift Subtitling with Input Language Japanese in Windows XP
-
Go to control panel / regional and language options / tab: languages.
-

-
Check whether (1) Japanese / Keyboard / MS IME Standard 2003 is installed. Otherwise (2) button:add it
-
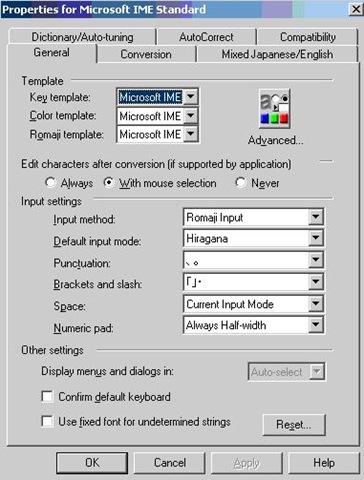
With (1) Japanese / Keyboard / MS IME Standard 2003 is installed selected, click on (3) button: properties and ensure these settings are right, then click button: “ok”
-

-
Now Open Swift.
-
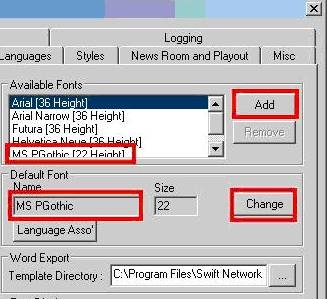
Menu file / preferences / tab: open:/ section:available fonts, button:add, add ms pgothic, section: default font, button:change, select ms pgothic, like here:
-

-
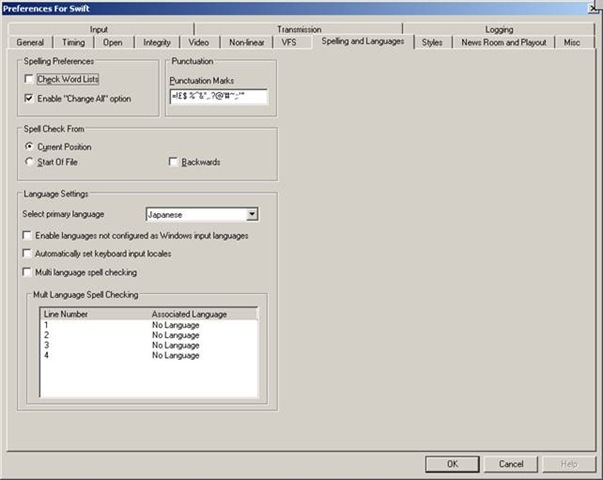
Menu file / preferences / tab: spelling and languages, select primary language: Japanese, like here, then close with button: ok,
-

-
Close the existing and open a new swift file.
-
With swift still being the active application, ensure that in the windows language bar (if you do not see all the language bar icons, right click on input language icon
 , choose additional icons in the taskbar
  ; you may also have to right-click left of the input language icon, uncheck lock language bar, then resize the bar for the additional icons to show) the right input language is chosen, like here:
 -


-
Troubleshooting: It has been observed that the IME popup editor does not appear like here:
 . This may be related to the IME option “Input type” getting reset from “Hiragana”to “Direct Input”. Double-check this. Also, if all else fails, close existing and open a new file within Swift and/or close and reopen Swift, making sure that the IME settings remain.
 -
Still won’t work? Contact me.


Saville Interpreting Suite layout diagram

Which I had to derive from photos:

Interpreting Suite use: Policies
WHEN YOU BEGIN:
1. Always 1st log on PC
2. Ensure VCR Channel is on A1 
3. No food or drink (except water, on floor)
4. To speak, turn on DIS6132 microphone  (only 1 microphone per booth can be used at a time)
5. To record, wear 1-ear pad black headphones around neck
6. When listening to recorded video, adjust the BT928 volume 
WHEN YOU LEAVE:
7. Turn down the DIS6132 volume 
8. Log off the PC (do not power off)
9. Clean up your desk (handouts, water…)
How to work with screenshots in Windows XP or MAC OS X
On your keyboard, press key “Print Screen” to put a picture of the entire screen into the clipboard (for the active window, hold the ALT-key while pressing “Print Screen”).
You can paste this clipboard in any windows application, for example MS-Word or MS-Paint.
In order to use the built-in windows picture editor, click “Start”, click “Run”, type “mspaint” (w/o inverted commas).
In ms-paint, you can edit the picture, using a variety of tools in a menu on the left.
E.g. click on the eraser button to activate this tool, then use the mouse pointer to erase sensitive parts of the picture.

Or select the selection tool and with the mouse pointer, draw a selection frame inside the picture. Then you cut the selection to the clipboard and paste it to a new picture.
Finally, save the result (normally as JPEG, since this results in much smaller file size).

Here is a screencast that shows the entire screenshot cycle.
Using a MAC?
|
Objective |
MAC OS X |
Capture entire screen and copy to the clipboard |
Command+Control+Shift+3 |
Capture a window and copy to the clipboard |
Command+Control+Shift+4 then Space bar, click on the target |


Questions? Read the About. Or just ask me a quick Our Databases: Resources with calendars -- Language learning material Moodle Sites, multimedia files -- films


FAQs for LRC student staff or for students or for teachers. To search our FAQs, in the browser addressbar, add after "https://plagwitz.wordpress.com/feed/?tag=faqs+/" "+TAG1" (from tag cloud below) OR "https://plagwitz.wordpress.com/feed/tag=faqs
&category_name=" "CAT1" (from category hierarchy below). OR search both categories and tags, and multiple TAGs/CATs (connect with "," for OR-search, with "+" for AND-search), like so: https://plagwitz.wordpress.com/feed/?tag=TAG1+TAG2+...TAGn&category_name=CAT1
+CAT2+...CATn"
Other ways to find help
If you cannot find it here, look there: 5,500 Language-Learning Links and Programs for learning or teaching 150 languages
Shortcuts:Our Lists, Our Maps, LRC Staff Moodle Site,LRC Project Moodle Site, 49erexpress, UNCC Moodle, Student Recordings: s:claslcslrcsanakostudent
Learning usage samples: Sanako oral exam, Kaltura webcam presentation, Dictation with speech recognition, Sanako written exam, Chinese and Japanese interactive stroke-order practice
Test the Sanako Installer, Webbrowser Popup Konfigurator for XP, or Windows7, faster LRC TeacherPC Log-in Let MS facilitate diacritics writing by installing for you US-International keyboard layout
This is my personal blog (Google+). The views expressed on these pages are mine alone and not those of my employer. The information in this weblog is provided “AS IS” with no warranties, and confers no rights.
