Archive
Wimba Classroom Session with AppSharing for online tutoring or support
Here you can view a 2.5 minutes screencast of how to initiate a Wimba Classroom session with Appsharing.
|
0:28
|
Logging in as participant
|
|
0:44
|
Chime indicates: loading finished
|
|
1:05
|
Demo:hand raising
|
|
1:17
|
Demo:messaging
|
|
1:42
|
Local screen sharing started by remote
|
|
1:57
|
Local dialogue to permit
|
|
2:02
|
Text message: “the app sharing is now displaying Plagwitz’desktop”
|
|
2:07
|
Local frame to select screen portion shared.
|
Now students can share a Moodle or other online assignment or all local text file with their tutor; users in need of computing support the offending application.
One-on-one virtual language tutoring using Wimba Classroom
The most useful tools in Wimba Classroom for synchronous one-on-one online tutoring, apart from the basic text instant messaging, may be not the videoconferencing, but the audio tools combined with screen-sharing or application-sharing AKA desktop sharing (remote user can control the application – especially for reviewing online learning materials with automated feedback which the student may need additional help with.
A two-way audio connection is obviously useful for language learning, and incurs no phone costs. Videoconferencing is only available on the most advanced phones. And more than video even,
we thought that especially the application screen sharing in wimba would be useful, e.g. if tutor and student go through some of the online exercises together live and the tutor can answer additional questions of the student that the automated online correction has not answered).
To start application sharing, click in tab:content button:share, set the desired sharing options and click “begin sharing”
Recommended learning path:
-
Both Wimba.com on their Wimba Classroom page and the CTL on their Wimba entry page have a wealth of learning resources on (notice that I
 loop inductions, learning by doing):
 -
First watch an archived session held using Wimba classroom: Both the vendor (TBA) and the CTL have archived sessions, including introductory sessions on the use of Wimba Classroom and components.
-
Then take the student perspective: You can anticipate student issues and learn from/with the teacher without full responsibility for the session, if you participate in a live session using Wimba Classroom., like the ones the CTL regularly offers (the next one: http://teaching.uncc.edu/how-do-i-moodle-more-course-web-site-30-min-webinar).
-
Read the FAQ, to learn from colleagues with a similar background/context: Intricacies of the talk button (keep it pressed, or set the options so that you do not ; video/audio/text out of sync may indicate slow internet connection, consider dropping video, the biggest bandwidth hog.
-
Practice makes perfect: Once equipped with a computer, I plan to test out the Wimba Classroom instructor room, by using it for intra- and inter-office communications. There are competing platforms that I like, e.g. MS-Communicator with its strong presence and escalation features. But Wimba rooms which span students, teachers and staff – any staff member has one by default, any student can enter a room -, have the strongest network effect).
-
Do one-on-one student support, like in tutoring or online office hours. This can serve you as a gentle introduction to doing more ambitious Wimba classroom projects:
-
Meeting online with small student groups, e.g. when planning or reviewing student groups projects.
-
Teaching large online classes.
-
Before you do this and for your specialized features, you may want to review in–depth multimedia documentation: Wimba Classroom has in depth print manual for presenters and students. Screencast videos (Using Audio, Web Page Display, Application Sharing) are instructional, 1-page “cheat sheets” (Web Page Display, Application Sharing) are perfect for putting up at your computer during your first session.
-
Once you are experts, don’t forget that your studentsmay not have used Wimba classroom.
We can support such online tutoring
-
in the LRC when open (not on weekends unfortunately);
- Or in your office, with spare parts from the LRC hardware resources (headsets and webcams) which we can set up for you;
-
Or – to gain maximum benefit from the flexibility synchronous online affords – from home: This however hinges on teachers’ (and students!) whether you are comfortable independently supporting this and if your setup can handle the requirements – – soundcard, headset with microphone (fewer audio problems than with a microphone/speakers built-in/connected to your webcam/laptop), (webcam is possible, but not necessarily the most useful language learning feature , and but maybe contenting with more instructional screen-sharing or application-sharing, capability of running the Java plugin in your browser, sufficiently fast computer and internet connection
All participants must run the Wimba wizard well ahead of session, to be able to address any technical problems before entering a classroom. You can watch the Wizard at work in this screencast video.
Face-to-face and beyond: Smart-board with digitized textbooks and classroom protocols, using MS_Remote Desktop, MS_Zoomit, wireless keyboard, network shares and the Blackboard: Content System
- This post strings together some already supported or freely available technologies for an effortless way to integrate technology into teaching and learning.
- I had lab assistants scan my textbook. I stored the scans on the teacher-only network share.
- In the classroom, I connect to my office computer with mstsc.
- you may have to change screen resolution in mstsc. You can save your connection settings on the teacher network share.
- To save precious class contact time, on my office computer, I have already opened and prepared the class outline and relevant textbook scan pages with the default windows viewer.
- Using zoomit, I can mark on the textbook scan pages for my students, and save the resulting pages, later easily (drag and drop all pages at once) store them in the content system or my students to review my notes.
- you may want to adjust the font size in zoomit options.
- this technique may also help with fading out document cameras which may, among other things, help with finding enough space to put.
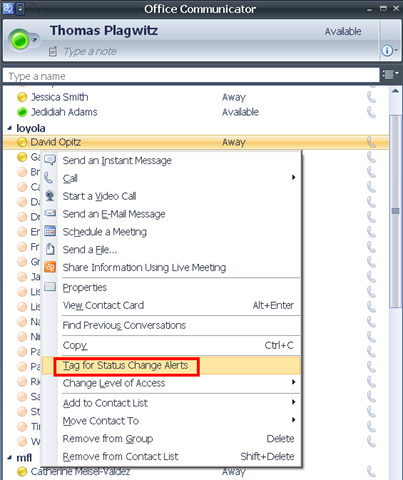
MS-Office Communicator: Tips for using: Presence
No time for playing phone-tag (or “Phone-tag: Next generation”, aka email-tag)? “Presence” is your friend.
In Communicator, from your contact-list, right-click on a contact, choose “tag-for-status-change-alerts”.
From MS-Help: Tag a contact so you are notified when they are available: “Communicator can notify you of changes in a contact’s availability by displaying an alert whenever their presence status changes to Available or Offline. The alert shows the contact’s name, title, instant messaging address, and new presence status. You can click the alert to start an instant messaging session with the contact. Configuring Communicator to display this alert for a given contact is called tagging.”
Like in these screenshots:

Videoconferencing: Tandberg Conference-Me Test
While we initially ran into a glitch during the client install:
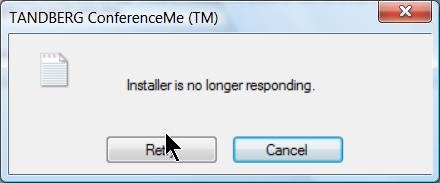
The application did seem to install correctly.
The video quality was acceptable even with low bandwidth settings. The application provides well-structured documentation as well as convenient interface, including through context menus:
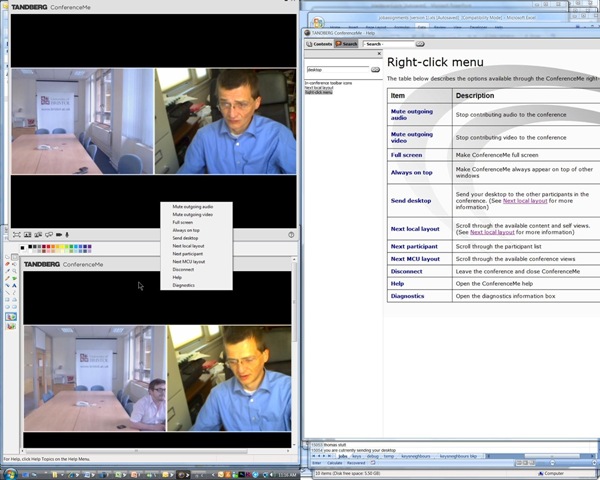
The diagnostic tools also seems strong:

Overall, Tandberg’s Conference-Me application looks like an attractive package.
MS-Office Communicator: Getting Started
https://thomasplagwitz.com/2009/11/13/collaboration-using-ms-office-and-network-shares/Click  , click
  , type “communicator”, click
  .
.
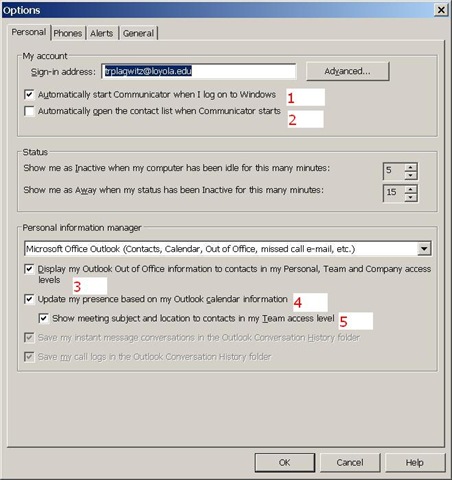
To adjust options, click (1), (2) and (3) here:

To start communicator with Windows, select (1).
To have Outlook automatically show you as busy during calendar appointments (e.g. your classes), select (4).
To get your contact list up to speed, select all the contacts in the to-address line of a mass email and drag them to your communicator window, see this screencast here: communicator-email-contact-drag.wmv.
Microsoft has a useful “Getting Started” web-based training here:
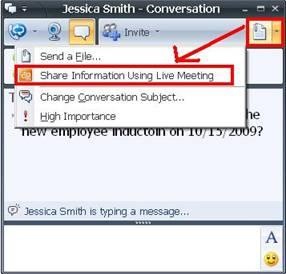
To use the advanced features of Live Meeting, you can either use the context menu of the contact, or within an existing messaging session, escalate to Live Meeting by using the upper right hand corner menu, like in these 2 screnshots:

How to use your office computer in the classroom
How-to:
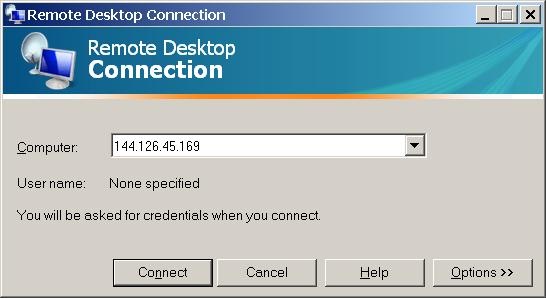
- Click , click , type “mstsc”, click .
- In the field of the upcoming window, enter your office computer’s IP number (you have to do this only once, the teacher computer will remember the number).

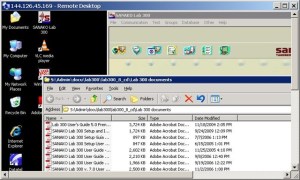
- This will connect you to your office PC, and if you run mstsc (Microsoft Terminal Services Client) in full-screen, it appears pretty much like working on your office computer.
- To find out your office IP number, on your office pc, Click , click , type “cmd”, click . cmd. On the command line, type “ipconfig”, your “IP address” appears .
- Problems? Tell OTS with a link to this post.
Benefits:
- use your local configuration with which you are most familiar also in class (e.g. US-international keyboard);
- prepare windows for classes in your office at leisure (windows will show in the state you left them in the office), saving class time;
- use the computer in class more, saving class time.
Risks:
- does not work well with multimedia. Workaround: switch mstsc to window mode and play multimedia from the local desktop of the classroom PC:
- make sure you do not have any windows open in the office which you do not want to display in the classroom
- set your online status to “busy” in Office Communicator and other instant messaging applications, or else others might send disrupting text message pop-ups while you teach
- possible screen size incompatibilities (mstsc can automatically accommodate for differences, within limits)
- always test before going live.
An outline of the MS-Word Cloze Quiz, MS-PowerPoint Multiple Choice Quiz and Internet Lookup tools for
- To facilitate lesson delivery and student interaction in our language lab and computerized classrooms, I am programming two MS-Office templates with interactive lookup and quiz functions and create new/convert traditional language teaching materials in French, German and Spanish with them.
- These templates support the learner by strengthening learner autonomy and providing immediate corrective feedback and – in conjunction with the grouping facilities of the centre’s infrastructure – allow for custom-tailored instruction based on the immediately available outcome of formative assessments.
- MS-Word-Template
- The student can be given additional hints when tabbing into a form entry field.
- The student can easily look up words and terms in internet-based reference works and collections.
- Double clicking on a word opens a browser window with the corresponding entry in a dictionary of the corresponding foreign language.
- Selecting a word or phrase and clicking on a menu item in the lookup menu a browser window with the corresponding entry of various reference works and databases (Figure 3: Look up Internet Reference Works, Figure 4: Look up Internet Illustrations).
- The student will receive instant feedback when tabbing out of an entry field.
- During quiz-taking, the screen will be formatted (font face, size, spacing, colors) so that the teacher keeps easily informed, whether through a computer lab management system / screen monitoring tool or by a more “pedestrian” approach for student monitoring.
- After collection and before correction by the teacher and reviewing by the student, the screen will be re-formatted to facilitate reading outside of the classroom setting.
- The template can be used for a wide variety of typical foreign language teaching exercises:
- Instructors have requested fuzzy matching for fill-in-the-blank exercises, which I am planning to implement by integrating an existing COM add-in that can make available the Levenshtein Distance Metric to MS-Word.
- Upgrade of Templates from Sanako Lab300 to better integrate with the new Sanako Study1200 software features.
- Teaching Content Creation:
- Making subtitles for foreign language movie digitally available;
- Programming regular expressions ins VS.Net that match function words (example: demonstrative pronouns in Spanish) to run over these templates in order to batch create fill-in-the-blank exercises;
- Importing them into the templates and creating grammar and listening comprehension exercises
- Support: Implementing an Error Logging Application
- MS-PowerPoint-Template
- The teacher can easily lookup words and terms in internet-based reference works and collections
- Currently implementing additional lookup options (NLP and Corpus Linguistics (ACORN, BNC, Sketchup), Dictionaries (Visurwords, Wiktionary, Google Define).
- A number of templated custom-animated exercises can be used for
- presenting students with guiding questions before watching/listening to a target language segment
- Revealing correct answers after the segment.
- A number of templated interactive exercises can be used for revealing correct answers (word lists) depending on students’ responses.
- The templates support typical activities in the digital language lab (interactive presentations with multimedia, listening comprehensions, speaking and dialoguing activities for language learning, view usage examples in my Templates Eurocall Presentation video of September 2007). Teachers can use them as exercise-generating engines: they allow copy/paste of their own exercises into these templates. These templates have the advantage of being able to hook into the rich infrastructure that MS-Office provides for language teaching; they work with all Western Languages (but have been thoroughly tested only with ESL, French, German, Italian and Spanish so far). These templates that are better geared than VLE and other CALL resources for daily use in a computerized classroom environment: easy to author, take and monitor and either multimedia-heavy or focused on human interaction. These templates support the instructor by relieving of routine tasks in favor of well-informed, well-focused non-routine intervention, and extend the centre’s screen-sharing and VOIP infrastructure to provide the instructor with an unprecedented control of the learning of an entire class.
- APP delivery format:
- MS-PowerPoint: 1 template-file (.pot) and 1 addin (.ppa)
- MS-Word: 1 template (.dot – incorporates Lookup application) and 1 COM application (fuzzy matching)
- Apart from the templates themselves, there is
- Explanation: documentation of the tool
- see Figure 4: Template Documentation,
- Figure 8: PowerPoint Exercise Templates,
- sample materials which illustrate the practical exploitation of a tool the development of a skill or the response to an issue
- see Figure 3: Quiz Template with Chanson Lyrics
- Figure 9: PowerPoint-Exercises for German History Documentary,
- Sample Exercise material: hands-on activities for materials development, skills training or discussion
- Figure 9: PowerPoint-Exercises for German History Documentary)
- Explanation: documentation of the tool
- Since January 2008, the templates have been adapted for use in the Aston university Study1200 lab and a series of 3 teacher training workshops has been delivered in May/June of 2008. During that time, the implementation of the distance metrics within the templates has been started also which is currently still in the debugging state (see following slide below.)

Figure 1: Look up Internet Reference Works

Figure 2: Look up Internet Illustrations

Figure 3: Quiz Template with Chanson Lyrics

Figure 4: Template Documentation

Figure 5: Quiz Result Summary

Figure 6: Spanish Movie Subtitling Exercise Creation

Figure 7: Information Gap Dialogues (Language Lab Example)

Figure 8: PowerPoint Exercise Templates


Questions? Read the About. Or just ask me a quick Our Databases: Resources with calendars -- Language learning material Moodle Sites, multimedia files -- films


FAQs for LRC student staff or for students or for teachers. To search our FAQs, in the browser addressbar, add after "https://plagwitz.wordpress.com/feed/?tag=faqs+/" "+TAG1" (from tag cloud below) OR "https://plagwitz.wordpress.com/feed/tag=faqs
&category_name=" "CAT1" (from category hierarchy below). OR search both categories and tags, and multiple TAGs/CATs (connect with "," for OR-search, with "+" for AND-search), like so: https://plagwitz.wordpress.com/feed/?tag=TAG1+TAG2+...TAGn&category_name=CAT1
+CAT2+...CATn"
Other ways to find help
If you cannot find it here, look there: 5,500 Language-Learning Links and Programs for learning or teaching 150 languages
Shortcuts:Our Lists, Our Maps, LRC Staff Moodle Site,LRC Project Moodle Site, 49erexpress, UNCC Moodle, Student Recordings: s:claslcslrcsanakostudent
Learning usage samples: Sanako oral exam, Kaltura webcam presentation, Dictation with speech recognition, Sanako written exam, Chinese and Japanese interactive stroke-order practice
Test the Sanako Installer, Webbrowser Popup Konfigurator for XP, or Windows7, faster LRC TeacherPC Log-in Let MS facilitate diacritics writing by installing for you US-International keyboard layout
This is my personal blog (Google+). The views expressed on these pages are mine alone and not those of my employer. The information in this weblog is provided “AS IS” with no warranties, and confers no rights.
