Archive
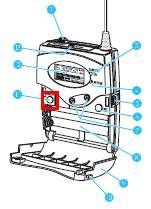
Canon ZR-200 LLC Camera Basics
The camera can store only about 30 [check, might be 100 or more, recording size is 5MB per 1 min video] minutes on its SD card
Currently we are using my personal SD card, bring your own to extend the recording time (by swapping the cards. You can move video clips onto classroom computers’ network shares if the classroom computer is in MS-Active Directory (which most should be) and if the classroom computer has an SD card reader (which most will NOT have).
Video–clips (internal access only) showing how to operate the camera are here:
camera-canon-zr200-Inserting&Removing_Memory_Card_Starting&Stopping&Filming.avi
camera-canon-zr200-Inserting_Memory_Card_into_Card_Reader_on_Assistant-Computer.AVI
camera-canon-zr200-moving_video_from_memory_card_to_H-Drive.avi
For base documentation, see these graphics:


You can change the audio modes:


Optimum video mode with card is 320*240.
All in all: Quick and dirty recording and archiving for basic assessments…
Interpreting Suite: How to avoid audio feedback
- symptom: loud squealing noise over the classroom speakers
- context: left lectern microphone is turned on; Creston / main room /
[Elmo room] camera is chose (e.g. to display the speaker on the projector; may also be chosen for background recording purposes only)
- resolution: Creston / room controls / speaker: up/own, on/off, to turn the classroom speaker volume down or off entirely
- explanation: the Elmo camera works with the sound from the left lectern microphone (not from the right or DIS microphone); if the Elmo camera is room source, its sound is displayed over the classroom speakers; from where it feeds back into the microphone; etc (infinite loop, feedback).
How to Digital Audio Record: Olympus Voice Recorder
- Layout:

- To prepare
- Turn on by pressing “OK” (14) button on front
- No external microphone needed, but do not cove built-in microphone (2)
- Troubleshooting: If the device will not turn on/function, check the battery (compartment (23) on rear, uses AAA)
- Make sure
- the “hold” switch (21) is on unlocked
- the “mode” switch (22) on the left is not set to “music” , but “voice”
- Turn on by pressing “OK” (14) button on front
- To record: press record button (4) on right
- To pause, press “record”(4)
- To end, press “stop” (5) on right
- Advanced:
- Voice Activation mode: TBA
- Troubleshooting: if the device does not record and says “music mode”, change
- To saving recordings
- On rear, press release (24) button
- Slide the recorder out of the battery compartment to reveal the usb connector (8)
- Insert the usb connector into a pc of the booths, wait until windows recognizes the device, then move the (wma) files and store them on your home (x:) drive or email them to yourself.
- Loan policy:
- to borrow a digital voice recorder, leave your student or staff card in the plastic pocket of the recorder
- Students need to ask before they can borrow one. Tutors need to collect them back by the end of the session.
- You must return the recorder at the end of the lesson. Digital voice recorders must not leave the interpreting suite premises (MGB-36).

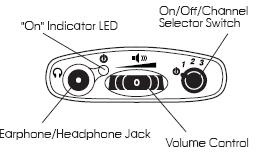
Whisper interpreting with radio transmitter/receiver (“bidule” by williamssound.com)

We have:
- 3 transmitters (larger antenna), with headset (with microphone) or collar microphone:
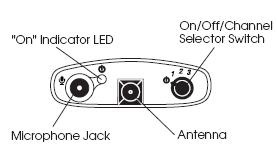
- 10 receivers with regular 3.5 mm headphones (without microphones):


Usage:
- Speaker speaks
- Interpreter
- listens to speaker in room
- wearing one of the transmitters, whisper interprets into target language channel 1,2or 3
- delegates
- wearing receiver and headphones, listens to one of the interpreter channels
Troubleshooting:
- If you cannot send/receive audio at all, check
-
Channel selector on top of unit: make sure you are on the right channel
-
Power indicator light is on? If not , adjust batteries in compartment at rear of unit
- If you cannot send/receive audio well, check
-
Transmitter:
- microphone adjustment wheel under rear panel door
- position yourself and the microphone so that there is no ambient noise going into your (sensitive) microphone, especially not from the speaker
-
Receiver: Volume wheel on top of unit


Questions? Read the About. Or just ask me a quick Our Databases: Resources with calendars -- Language learning material Moodle Sites, multimedia files -- films


FAQs for LRC student staff or for students or for teachers. To search our FAQs, in the browser addressbar, add after "https://plagwitz.wordpress.com/feed/?tag=faqs+/" "+TAG1" (from tag cloud below) OR "https://plagwitz.wordpress.com/feed/tag=faqs
&category_name=" "CAT1" (from category hierarchy below). OR search both categories and tags, and multiple TAGs/CATs (connect with "," for OR-search, with "+" for AND-search), like so: https://plagwitz.wordpress.com/feed/?tag=TAG1+TAG2+...TAGn&category_name=CAT1
+CAT2+...CATn"
Other ways to find help
If you cannot find it here, look there: 5,500 Language-Learning Links and Programs for learning or teaching 150 languages
Shortcuts:Our Lists, Our Maps, LRC Staff Moodle Site,LRC Project Moodle Site, 49erexpress, UNCC Moodle, Student Recordings: s:claslcslrcsanakostudent
Learning usage samples: Sanako oral exam, Kaltura webcam presentation, Dictation with speech recognition, Sanako written exam, Chinese and Japanese interactive stroke-order practice
Test the Sanako Installer, Webbrowser Popup Konfigurator for XP, or Windows7, faster LRC TeacherPC Log-in Let MS facilitate diacritics writing by installing for you US-International keyboard layout
This is my personal blog (Google+). The views expressed on these pages are mine alone and not those of my employer. The information in this weblog is provided “AS IS” with no warranties, and confers no rights.
