Archive
Grouping students using Sanako Study 1200 “sessions”
This sccreencast on grouping with Study 1200 demonstrates:
|
0:00
|
left activity pane – button:add
|
|
0:25
|
right classroom layout pane – click or drag frame
|
|
0:50
|
the effects of grouping
|
|
1:05
|
bottom link: show corridor
|
|
1:25
|
moving between session/groups with context menu (not shown)
|
|
1:30
|
You may have to start/end the current activity from the activity pane first
|
Protected: How to conduct an easy oral exam with Sanako1200 (Model imitation/Question Response) – Part II: Implementation/instruction of examined students
Foreign Language Character Input on Windows XP in the LRC
The LRC offers the following foreign language characters writing support:
| American English | us international | not needed | us-int |
| Arabic | Google;MS;MS-maren;fontboard | maybe later, now osk | demo |
| British English | us international | not needed | us-int |
| Dutch | us international | not needed | us-int |
| Farsi | Google;MS | maybe later, now osk | demo |
| French | us international | not needed | us-int |
| German | us international | not needed | us-int |
| Greek | Google;MS | maybe later, now osk | demo |
| Italian | us international | not needed | us-int |
| Japanese | MS | not needed | |
| Korean | MS | maybe later, now osk | demo |
| Mandarin | MS;pinyinput | not needed | pinyin |
| Portuguese (Brazilian) | us international | not needed | us-int |
| Russian | Google;MS | maybe later, now osk | demo |
| Spanish | us international | not needed | us-int |
The support is best accessed from the “international toolbar”, like so: 
You can also use the windows on-screen keyboard to input non-Western characters on a computer that has not the corresponding keyboard overlay stickers. In the small-group workspaces, which have writing pads, you can also use the MS-Handwriting IME for East-Asian languages.
The on-screen keyboard (OSK) for foreign language character input on MS-Windows
A little known, but useful tool for non-western languages which can not be represented by the us-international keyboard layout, when no hardware keyboard is available:
The Windows on screen keyboard reflects the soft keyboard installed via Control panel / Regional and language options / Text input languages. and selected via the language toolbar, like so:

Easiest access, click Start, click Run, type “osk”, click “OK”. Or try this on XP: 
Multi-monitor setup on teacher podium in the LRC main classroom
- Like most modern computer workplaces, the LRC main classroom teacher podium needs multiple monitors, if you want to truly take advantage of gathering up to 28 students at 28 multimedia-enabled, networked computers which, thanks to classroom management systems like NetOp School and Sanako Study1200, can be remote controlled by the teacher.
- That’s why we built a simple extension on the teacher podium to connect a 2nd screen and more than double (resolution-wise) your on-screen teaching space.


- Note: MS-Windows is set to “extend my screen onto this monitor”, except “maximized” windows still only maximize across 1 of 2 screens. De-”maximize” a window to be able to drag a window from one screen to the other (e.g. to prepare it on the teacher screen and then display it on the classroom projector) or to span a window across both monitors (note that, while this could be very useful to display larger thumbnails of more students computer screens, the Sanako Study1200 apparently cannot be spanned across two monitors. I yet have to test whether the Mosaic/separate thumbnail window can, but even if, this one lacks the feature of being able to take advantage of the great class overview by jumping to where teacher assistance is needed).
- The left monitor is monitor 1 for Windows and being projected to the classroom. The right monitor, monitor 2 for Windows, is your staging area and control room.
- Note, however, that both NetOp School and Sanako Study 1200, normally housed in the control room, are able to project the right monitor: onto (some or all of) the student’s computer screens. While I prefer not to hog the students computers for extended periods of time (effectively “dumbing down” computers to TV screens), this feature can give you more flexibility:
- E.g. during a recent workshop on the Sanako Study, with the Sanako feature “Teacher screen to students”, I could demonstrate live operation of the Study 1200 software on my right monitor to participants’ computer screens while being able to keep up the PowerPoint overview slide show onto the classroom screen (after setting up my PowerPoint slideshow to display on the secondary screen).
- Note that, even though multicast is being used for projection, only still images, including PowerPoint Slides, and, to some extend, computer screen video can be projected in high resolution over the network at reasonable speeds. The Sanako Study 1200, Version 5 also allows for an extremely low resolution video projection to students. For high resolution video streaming, you need the add-on module Sanako Video Live, which comes with its own streaming server hardware.


Blackboard: Content System: Ancillary digital textbook material reuse (publish to course participants, roll-over between terms)
If you have a well administered language program, your admin should have uploaded all digital (text, audio, textbook and table of contents) materials that come with your textbook for convenient reuse between sections and terms into the Blackboard content system.
As a Blackboard course administrator, you can easily give all course participants access in 1 step (as course administrator, you can also access the audio materials during classes from the Blackboard content system directly).
Here is a video recording of a real-world walkthrough of this process – voice-over is in German, but Blackboard interface is in English: blackboard-content-system-finding-adding-existing-content-item-to-course-access-play.wmv
|
Start Time |
Topic |
|
0,0 |
overview of teaching and learning procedure |
|
0,1 |
course add item / content collection link |
|
1,30 |
how to search for content. Remember: Search is your friend, if you have a consistent metadata system for your content (start with meaningful file names): |
|
3,15 |
hot to add permissions for other users |
|
5,3 |
add to course for for students |
|
5,4 |
listen to an example audio from course |
Once you have given course participants access to the audio materials, and you teach the course again next term, it is even easier to roll over the access: Just use the Copy link in the Blackboard Control Panel.
Blackboard: Rolling over courses between terms
In your old course, go to CONTROL PANEL > COURSE COPY”.
Choose: “Copy Course Materials into an Existing Course” (assuming your new course shell has been created for you by your IT admin).
Click button:“Browse” and in the opening window, choose your existing current course, by the term identifier:
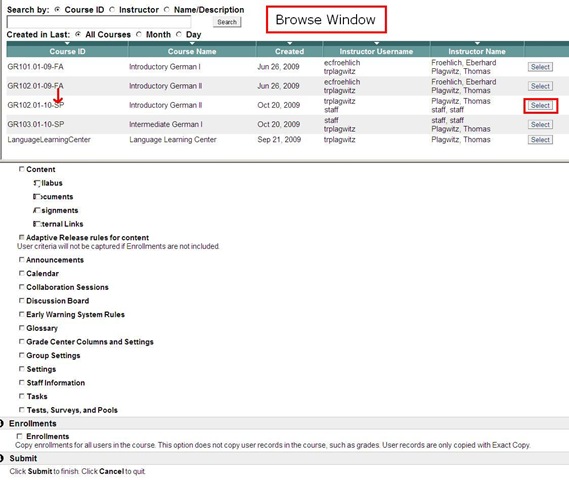
Check all items you want to copy. What is safest to avoid errors? Everything, except enrollments?
Click “Submit”/“OK” until done.
The course copy operation will be queued up, and you will be notified when the operation is finished.
Then go to your new course. This operation also copied the content items, including the content management system items.

How Teachers grade Student recordings from the Sanako Lab 300
-
Teacher on their office PC (MAC users talk to OTS at loyola.edu) can press
 windows-key+e, and in the window, that opens,
 -
browse to the student mp3 recordings in the “studentcollect” folder or in “their” folder on S:\[put teacher name here] (no S: drive on office PC? read the “Shortcuts” section on http://plagwitz1.spaces.live.com, right hand side, under my portrait),
-
open the student recording file, either by doubleclicking to, presumably, open it in Windows Media Player, or, preferably, by selecting multiple files, right-clicking and chosing “Open with” to open them for comparative grading in Audacity).


Questions? Read the About. Or just ask me a quick Our Databases: Resources with calendars -- Language learning material Moodle Sites, multimedia files -- films


FAQs for LRC student staff or for students or for teachers. To search our FAQs, in the browser addressbar, add after "https://plagwitz.wordpress.com/feed/?tag=faqs+/" "+TAG1" (from tag cloud below) OR "https://plagwitz.wordpress.com/feed/tag=faqs
&category_name=" "CAT1" (from category hierarchy below). OR search both categories and tags, and multiple TAGs/CATs (connect with "," for OR-search, with "+" for AND-search), like so: https://plagwitz.wordpress.com/feed/?tag=TAG1+TAG2+...TAGn&category_name=CAT1
+CAT2+...CATn"
Other ways to find help
If you cannot find it here, look there: 5,500 Language-Learning Links and Programs for learning or teaching 150 languages
Shortcuts:Our Lists, Our Maps, LRC Staff Moodle Site,LRC Project Moodle Site, 49erexpress, UNCC Moodle, Student Recordings: s:claslcslrcsanakostudent
Learning usage samples: Sanako oral exam, Kaltura webcam presentation, Dictation with speech recognition, Sanako written exam, Chinese and Japanese interactive stroke-order practice
Test the Sanako Installer, Webbrowser Popup Konfigurator for XP, or Windows7, faster LRC TeacherPC Log-in Let MS facilitate diacritics writing by installing for you US-International keyboard layout
This is my personal blog (Google+). The views expressed on these pages are mine alone and not those of my employer. The information in this weblog is provided “AS IS” with no warranties, and confers no rights.
