Archive
Quia Online Exercises
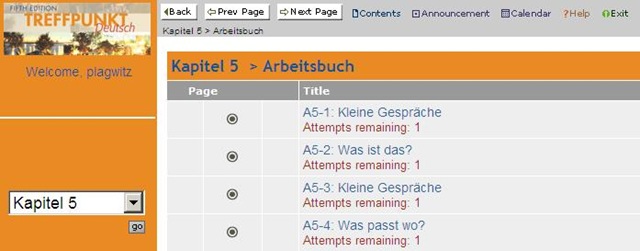
Here are examples from the Treffpunkt Deutsch Quia Website. Quia Treffpunkt Deutsch is organized in chapters which you can select from the dropdown navigation control on the left. As you see on the following page, each chapter contains 3 different types of exercises, organized in sections.

If you click on a section header, you will see a list of exercises:
Here is an example of an exercise, assigned as “A[rbeitsbuch=work book], K[apitel=chapter]9: A9[=chapter-number, again]-1[=exercise-number]”.
The letters and numbers from the assignment repeat in the exercise, see this screenshot:
 \
\
You can also hover your mouse over the info button in the upper left corner to get a summary of this information: 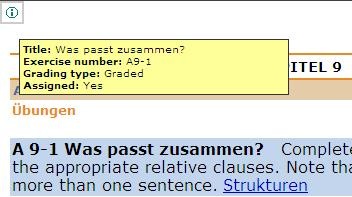
Also note the link to the corresponding preparatory web page which opens in a new window (Problems getting the window to open? the popup-blocker of your web browser may be the root? instead of simply clicking on the link, try CTRL-clicking, on the link as well as the browser information bar, if it comes up). It is crucial to read/review the corresponding preparatory web page first.
It is not necessary to get everything 100% correct. It is not even a good use of your time to redo the exercise until you get everything 100% correct. Especially if you try speeding up this tedious task by doing the first round mechanically to get at the automated feedback answers, then doing the second round mechanically by pasting them in. That is why I have my Quia course “Options” set to “Calculate cumulative scores based on students’ first attempt” and to “Ignore student results after the 1st attempt”.
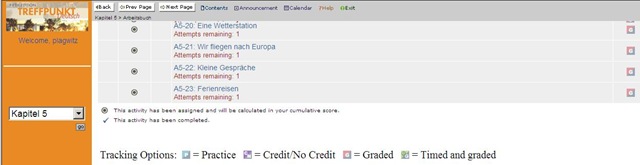
Therefore, you will see that you have only 1 “Attempt remaining” for each exercise. You will also, unless individually told otherwise, only have to do the exercises that are “Assigned” (consult legend at bottom of page).
Rather use the valuable error feedback to go back to the Structures and try to learn and bring any remaining questions to class – it is highly likely that fellow students have the same problems, especially if they have the same native tongue. That is also the reason why I review your submission before class – not to mark you down, but to see from your problems help what to spend valuable class time one.

Also, the exercises are integrated into the progression of the course (including your ability to do partner work with others during class meetings). That is why you will not be able to submit exercises long after when they were due:

For reviewing, we will use other materials.
Finally, consult the Help which is linked in the top menu:
![]()
Digitization of the SAVILLE analogue Conference interpreting recording facility: Lecture/Floor recording and CCTV streaming
The original conference interpreting lab setup had no provision for digital video recording of the lecture/floor. A workaround used on of the booth VCRs for analogue recording, with video form an ELMO dome cameras and audio from a lectern microphone – an audio installation which ran in parallel to the main DSI conference interpreting facility (and covered only the lectern, not the conference table).
A home-brew add-on was based on a consumer handheld digital camera for video. Experiments with different add-on microphones for audio from the lectern and floor were less than successful.
The DIS system however provides an audio out of the lectern an/or floor audio, as well as the capability for the conference administrator to open or mute floor microphones and for the technical administrator to set the maximum number of open microphones, and control their gain.
For the digitization of this system, I used
- an already retired standard university student lab computer
- to which I added an old spare ATI All-in-Wonder video card
- to which I connected a TEVION home TV switch as a poor man’s (~5£) video splitter into which I fed
- the (hitherto unused) DIS audio out balanced stereo, using an RCA adapter, as well as
- the ELMO video, using a coax to RCA adapter (video signal was split into the ATI as well as back into the original SAVILLE Kramer AV switch).
While originally coming with its own digitization software, the ATI All-in-wonder also works well with Windows Media Encoder.
Two wme configuration files were created:
- capturetestaticomposite_pal-l_480x320works.wme(find this file on the computer connected to the central rack, then double-click it in order to start Windows Media Encoder, then click the Record button in the top menu – no custom GUI was deemed necessary for this non-student operated recording) for recording to files that can be played with Windows media player, whether on Windows or on Mac OS X.
- streamtest480x320_15fps_pal.wme (again, simply find this file on the central rack computer, then double-click it) for streaming CCTV live to the back office. An onsite admin office was one of the usual features of a teaching lab which was missing in this installation. CCTV allows to keep an eye on teaching activities in the conference interpreting lab, proactively spot support needs ands absorb feature requirements which instructors tend to have problems articulating (or even seeing the need for articulating). A (lower quality archived stream is created on the side and can be picked up, post-processed and archived at TBA).


Conference Interpreting Videos on Intranet
On campus, students can click  , click
  , paste “\\lgu.ac.uk\lgu$\multimedia student\mmedia\mmedia1\language_services\teaching_materials\online_resources.xls”, click
  . Click a cell with a hyperlinked video to play the video in Windows Media Player.
In Windows Media Player, you can access (right-click on top window frame if menus are hidden) the menu: “File”/”Save” to save the video on a flash memory drive and take if off campus. You can play back the videos on MS-Windows and MAC computers (you may first have to install the support for the Windows Media Video format on the MAC from Microsoft). More help.


Questions? Read the About. Or just ask me a quick Our Databases: Resources with calendars -- Language learning material Moodle Sites, multimedia files -- films


FAQs for LRC student staff or for students or for teachers. To search our FAQs, in the browser addressbar, add after "https://plagwitz.wordpress.com/feed/?tag=faqs+/" "+TAG1" (from tag cloud below) OR "https://plagwitz.wordpress.com/feed/tag=faqs
&category_name=" "CAT1" (from category hierarchy below). OR search both categories and tags, and multiple TAGs/CATs (connect with "," for OR-search, with "+" for AND-search), like so: https://plagwitz.wordpress.com/feed/?tag=TAG1+TAG2+...TAGn&category_name=CAT1
+CAT2+...CATn"
Other ways to find help
If you cannot find it here, look there: 5,500 Language-Learning Links and Programs for learning or teaching 150 languages
Shortcuts:Our Lists, Our Maps, LRC Staff Moodle Site,LRC Project Moodle Site, 49erexpress, UNCC Moodle, Student Recordings: s:claslcslrcsanakostudent
Learning usage samples: Sanako oral exam, Kaltura webcam presentation, Dictation with speech recognition, Sanako written exam, Chinese and Japanese interactive stroke-order practice
Test the Sanako Installer, Webbrowser Popup Konfigurator for XP, or Windows7, faster LRC TeacherPC Log-in Let MS facilitate diacritics writing by installing for you US-International keyboard layout
This is my personal blog (Google+). The views expressed on these pages are mine alone and not those of my employer. The information in this weblog is provided “AS IS” with no warranties, and confers no rights.
