Archive
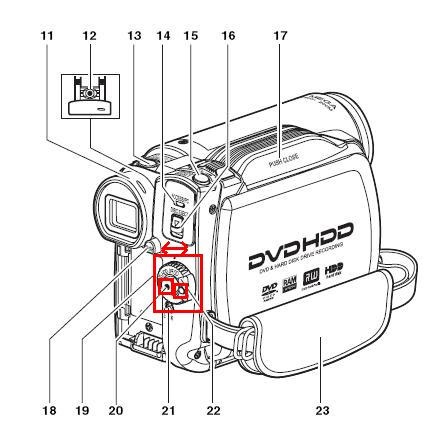
How to Digital Audio Record: Olympus Voice Recorder
- Layout:

- To prepare
- Turn on by pressing “OK” (14) button on front
- No external microphone needed, but do not cove built-in microphone (2)
- Troubleshooting: If the device will not turn on/function, check the battery (compartment (23) on rear, uses AAA)
- Make sure
- the “hold” switch (21) is on unlocked
- the “mode” switch (22) on the left is not set to “music” , but “voice”
- Turn on by pressing “OK” (14) button on front
- To record: press record button (4) on right
- To pause, press “record”(4)
- To end, press “stop” (5) on right
- Advanced:
- Voice Activation mode: TBA
- Troubleshooting: if the device does not record and says “music mode”, change
- To saving recordings
- On rear, press release (24) button
- Slide the recorder out of the battery compartment to reveal the usb connector (8)
- Insert the usb connector into a pc of the booths, wait until windows recognizes the device, then move the (wma) files and store them on your home (x:) drive or email them to yourself.
- Loan policy:
- to borrow a digital voice recorder, leave your student or staff card in the plastic pocket of the recorder
- Students need to ask before they can borrow one. Tutors need to collect them back by the end of the session.
- You must return the recorder at the end of the lesson. Digital voice recorders must not leave the interpreting suite premises (MGB-36).

How to Video Record Floor (using Hitachi Camera and Sennheiser Wireless audio)
- To start recording,
- On the camera, turn the wheel, using the grey knob (22), to “HDD”, and press the red button (20)
- Check whether camera display shows red recording symbol
- On the audio transmitter/receiver, under the rear door, turn the “on/off”button to on
- On the audio transmitter top, make sure “mute”is NOT set
- Check whether display backlight is on and signal bar shows activity when you tab the micro
- To stop recording,
- On the camera, turn the wheel, using the grey knob (22), to “Off”
- On the audio transmitter/receiver, , under the rear door, turn the “on/off”button to “Off”

-
v
Video Conferencing during Simultaneous Conference Interpreting Training
- i should probably step further away from implementation details, but i am looking for an anchor in a field which is heavily in flux, and in an environment which seems opaque.
- existing solutions: seem to be a superficially adapted/integrated application of existing video conferencing implementations for business meetings (Polycom VXS 7000 based?). I have seen academics complaining about “the emperor’s new clothes” when it came to teaching with technology innovation that made much more sense to me than this one, so i am concerned what will be the uptake once the hype is over (Yes, you can video conference over the internet. And for quite some time now. My 70-year old mother calls me every Sunday night on Windows Live Messenger. But we do not do interpreting training in an educational business environment).
- solutions more fit for purpose for interpreting in general and interpreter training in particular: the incoming speaker audio can be displayed to every one; but the interpreter audio, insofar outgoing (as opposed to be displayed to select audience locally), while being able to use the video conferencing unit, if its audio is full duplex, should not be universally displayed remotely,
- neither on the speaker-side (it would confuse and interrupt the speaker; but another part of the speaker-side audience likely needs to hear it, either for interpreting or for training (evaluation) purposes;
- nor on the 3rd-party (if video conferencing unit supports 3-point connections) site, but rather be displayed separate from the speaker audio
- for 3-point conferences, if the video conferencing unit supports separate (left – right) tracks for incoming audio, and if the incoming audio can be routed/switched, it should be possible to transmit 1 speaker (a-language) and 2 interpreters (b-language 1 and b-language 2) during the same video conferencing session
- implementation example: audio should be sent from video conferencing unit to headphones, or better a headphone connected to a system that allows switching and routing locally (e.g. a language lab system);
- video is only needed from the speaker
- live video from the speaker is not needed: there is no interaction between the speaker and the interpreter and (practically? sometimes it is recommended that the interpreter can visually sign to the audience) no visual interaction between the interpreter and the audience. if the video of the speaker can be launched to remote sites (streamed or downloaded as an archived file), only audio connections are needed.
B-languages for Relay interpreting in European Parliament Plenary Video (2009)
You can do relay interpreting from European parliament plenary videos by selecting one of the b-languages which the parliament interpreters provide.
The (3) video download control for videos older than 20080711 allows for the recording of only one language-track in the video. You can download, from a link emailed to you, either the a- (e.g. (1) Italian here) or one b-language (e.g. (2) German here), as you can see below:

Given that software tends to always get impoved, is is rather surprising that one does not seem to have a similar choice in the new video downloader – however, the improvement is just a bit hidden.
For Videos newer than 20080710, all language-tracks are automatically contained within the downloaded (how? see here) video file. To switch between a- and b-language or between b-languages, in Windows Media Player, go to menu (if the menu does not show, right-click left from the “Now playing”button””: file / play / audio and language tracks / [now choose your language].
E.g. if you do not want to listen to Ferrero-Waldner not speaking her native tongue, choose like pictured below:

And she does not really speak “Zulu” which seems to have been chosen by the European Parliament technicians as the designator of the original a-language, there being no such concept in windows media player. Çan’t have it all. Pretty close, though.
Passing around European Parliament Plenary Video Clips & Transcripts
-
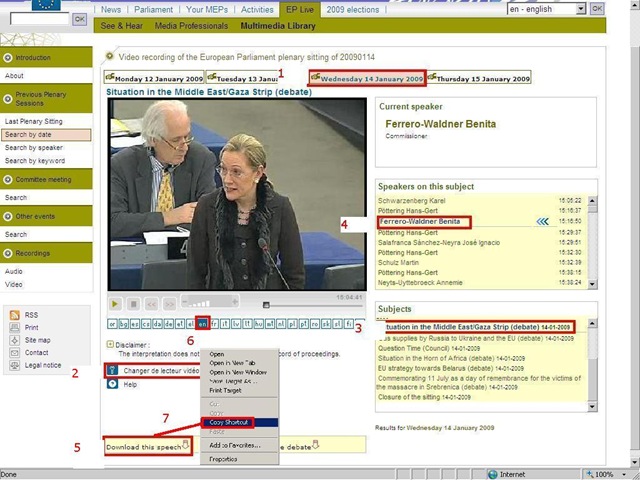
European parliament video clips are quite big and it would be easier not to have to pass them around. But how to communicate to somebody else which video clip to watch if the clip selected is not reflected in the browser address bar? The flash application unfortunately forces you to provide the “bibliographic” information in pieces (start url, date, possibly video format, debate title, speaker name). But in the end you get a direct link which you can pass on to save others from having to jump through the same hoops: If you just need the direct link, skip to step 7. Otherwise: Start with the calendar interface: http://www.europarl.europa.eu/wps-europarl-internet/frd/vod/research-by-date?language=en, find your (1) date, e.g. “Wednesday 14 January 2009”,
-
The window with the recording of that date will come up; now you CAN (2) change the video format – wmv (should work on most Windows PCs, free upgrade for MACs here:http://www.microsoft.com/windows/windowsmedia/player/wmcomponents.mspx) or mp4 -, an option that will show in the browser address bar. If you must, change format this first, as it seems to rewind the video to the beginning of the session.
-
Click on your (3) debate, e.g. “Situation in the Middle East/Gaza Strip (debate) 14-01-2009”.
-
Click on your (4) speaker, e.g. “ 15:16:50 Benita Ferrero-Waldner 00:13:12 15:30:02”
-
Instead of watching online (e.g. if you find the stream quality lacking), you can (5) download the video (in the format you have chosen, either wmv or mp4). UPDATE: The web site added a disclaimer that you have to 1.read, 2.check before you can 3. download, as illustrated below:

-
Note: you can (6) change the b-language (for relay interpreting) when streaming. Plus, when you download the video, all the b-languages are downloaded together with the a-language. See here how to select the desired b-language when playing the downloaded file.

-
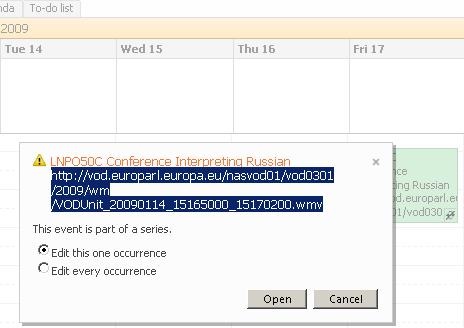
Easier than providing all bibliographical information (calendar URL, date, debate and speaker) is the direct URL of the download clip. Right click on “Download this Speech”, select (7) “Copy shortcut” from the context menu. Then paste this, e.g. http://vod.europarl.europa.eu/nasvod01/vod0301/2009/wm/VODUnit_20090114_15165000_15300200.wmv or if you chose mp4 format: http://vod.europarl.europa.eu/nasvod02/vod0301/2009/isma/VODUnit_20090114_15165000_15300200.mp4, into the calendar event for the exam – completes your checklist for the exam, and at the beginning of the exam, you can download the link from here onto the students’ computer. Or, for assigning materials to students or passing them to external examiners, email this direct link.
-
Unfortunately, it appears that the transcripts, unlike the audio channels, do not include the relay languages and have to be accessed from a different (calendar-)interface here: http://www.europarl.europa.eu/activities/plenary/cre/calendar.do?language=EN: “The verbatim report of proceedings of each sitting (often referred to by its French abbreviation, CRE) is published (Rule 173 of the Rules of Procedure) and contains the speeches made in plenary, in the original language.”

Appendix: The file size of these videos is about 10MB per minute. If you feel you need to save the videos locally, use an appropriate location (where you have sufficient space, the file will not be erased, only appropriate users have access – consider this before using a public network share, personal drive). Not really more “local” is saving the video clip on the http://hale-interpreting.groups.live.com Skydrive which can also hold clips larger than 50MB[ doubled to 100MB on June 20,2011] if you pre-process them like described in the zipping instruction.
Watch a 5-minute narrated video-clip that demonstrates the above steps.
Saville Interpreting Suite layout diagram

Which I had to derive from photos:

Relay Interpreting with the DIS 6000
Before relay interpreting begins:
- interpreter who becomes relay source: ds6132 left/in channel remains on “floor”; right/out channel: “English” (first turn your Mic off, switching with button “B/A” to out language “A” is easier than cycling through the individual languages)
- interpreter who interprets relay into target language: ds6132: left/in channel switch from “Floor” to “Relay select” : “English” (whatever button A/B/C/D).
When relay interpreting ends:
- interpreter who stops being relay source: ds6132 left/in channel remains on “Floor”; right/out channel: back to your native language (switching with button “B/A” to out language B is easier than cycling through the individual languages)
- interpreter who interpreted relay into target language: ds6132: left/in channel switch from “English” back to “floor”.


Questions? Read the About. Or just ask me a quick Our Databases: Resources with calendars -- Language learning material Moodle Sites, multimedia files -- films


FAQs for LRC student staff or for students or for teachers. To search our FAQs, in the browser addressbar, add after "https://plagwitz.wordpress.com/feed/?tag=faqs+/" "+TAG1" (from tag cloud below) OR "https://plagwitz.wordpress.com/feed/tag=faqs
&category_name=" "CAT1" (from category hierarchy below). OR search both categories and tags, and multiple TAGs/CATs (connect with "," for OR-search, with "+" for AND-search), like so: https://plagwitz.wordpress.com/feed/?tag=TAG1+TAG2+...TAGn&category_name=CAT1
+CAT2+...CATn"
Other ways to find help
If you cannot find it here, look there: 5,500 Language-Learning Links and Programs for learning or teaching 150 languages
Shortcuts:Our Lists, Our Maps, LRC Staff Moodle Site,LRC Project Moodle Site, 49erexpress, UNCC Moodle, Student Recordings: s:claslcslrcsanakostudent
Learning usage samples: Sanako oral exam, Kaltura webcam presentation, Dictation with speech recognition, Sanako written exam, Chinese and Japanese interactive stroke-order practice
Test the Sanako Installer, Webbrowser Popup Konfigurator for XP, or Windows7, faster LRC TeacherPC Log-in Let MS facilitate diacritics writing by installing for you US-International keyboard layout
This is my personal blog (Google+). The views expressed on these pages are mine alone and not those of my employer. The information in this weblog is provided “AS IS” with no warranties, and confers no rights.
