Digitization of the SAVILLE analogue Conference interpreting recording facility: Booths: End-user
The instructor sets the booth AV sources as usual (using the CRESTRON remote control).
The student in the booth starts the trprecord.exe from the student-accessible share (if the application is already running, an attempt to start another instance brings the current instance to the foreground).
In the GUI (which should not be hidden by blocking the student screen with AV signal; one more reason to stop the wasteful sharing of one screen between AV and VGA signal):
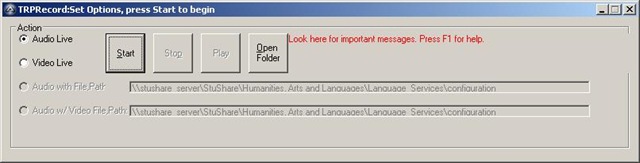
- choose whether to record “Audio” or “Video”(the disabled (grayed out) non-live recording modes are not yet implemented. they would be a completely separate extension of the SAVILLE system.).
- press “Start”, wait for the message indicating recording has begun
- pressing “Start” enables the “Stop” button; press “Stop” when finished
- once the “Play” button has been activated, the student can listen to the last recording in the default player for WMA or WMV files (normally Windows Media Player).
- both student and instructors can listen to other (past and/or peer) recordings by “open[ing the network share] folder”. The instructor (having full control permissions on the network share folder) controls the release of network share videos. Students can only read from this network share folder. The filename, e.g. trprecord_2009_08_04_18_24_47_MORLIB–PCC6392_plagwitt.wma, indicates this:
-
Prefix
Date recording started
Time recording started
on which computer
for which logged-in user
Audio or video
trprecord_
2009_08_04_
18_24_47_
MORLIB–PCC6392_
plagwitt
.wma/v
- Currently, the computer in the booths of the interpreting suite have the following names (note that the computer names are not aligned with the booth numbers; update this when the computers get upgraded):
-
Booth
Computer
mgb-41
morb43-6374
mgb-42
morb44-6344
mgb-43
morb45-6363
mgb-44
morb46-6353
mgb-45
morb42-6368
mgb-46
morb47-6359
- When listening to the recording in Windows Media Player, use the “Balance” slider which you can enable by clicking Menu:File / View / Enhancements / Graphics Equalizer. Wiggle the slider
- Press F1-key for (this) Help. Pay attention to program feedback messages in red.
View trprecord_demo_walkthrough.AVI (your problems with videos are addressed here; no screencast this time, as 2 simultaneous video encoding sessions would overtax the recording computer and could not demonstrate the interaction with the new secondary video screen) which demonstrates ease of use of the program itself and recording files it


Questions? Read the About. Or just ask me a quick Our Databases: Resources with calendars -- Language learning material Moodle Sites, multimedia files -- films


FAQs for LRC student staff or for students or for teachers. To search our FAQs, in the browser addressbar, add after "https://plagwitz.wordpress.com/feed/?tag=faqs+/" "+TAG1" (from tag cloud below) OR "https://plagwitz.wordpress.com/feed/tag=faqs
&category_name=" "CAT1" (from category hierarchy below). OR search both categories and tags, and multiple TAGs/CATs (connect with "," for OR-search, with "+" for AND-search), like so: https://plagwitz.wordpress.com/feed/?tag=TAG1+TAG2+...TAGn&category_name=CAT1
+CAT2+...CATn"
Other ways to find help
If you cannot find it here, look there: 5,500 Language-Learning Links and Programs for learning or teaching 150 languages
Shortcuts:Our Lists, Our Maps, LRC Staff Moodle Site,LRC Project Moodle Site, 49erexpress, UNCC Moodle, Student Recordings: s:claslcslrcsanakostudent
Learning usage samples: Sanako oral exam, Kaltura webcam presentation, Dictation with speech recognition, Sanako written exam, Chinese and Japanese interactive stroke-order practice
Test the Sanako Installer, Webbrowser Popup Konfigurator for XP, or Windows7, faster LRC TeacherPC Log-in Let MS facilitate diacritics writing by installing for you US-International keyboard layout
This is my personal blog (Google+). The views expressed on these pages are mine alone and not those of my employer. The information in this weblog is provided “AS IS” with no warranties, and confers no rights.
