Archive
Languages & Culture Studies Film Collection: Pivot Table and Labeling System
We analyzed the film collection for diversity and media, by setting up a pivot table (the underlying spreadsheet is getting updated currently, but is current enough for an overview), snapshot:

You can make your own analysis at S:\plagwitz\labconfig\spreadsheets\film-collection\film-collection.xlsx. (temporary location). The sheet also contains the new labeling system to facilitate locating videos:
|
IN |
From |
To |
Language |
|
AR |
0001 |
0400 |
Arabic |
|
CH |
0401 |
1400 |
Chinese |
|
EN |
1401 |
2400 |
English |
|
FA |
2401 |
2500 |
Farsi |
|
FR |
2501 |
3900 |
French |
|
GR |
3901 |
5300 |
German |
|
IT |
5301 |
5700 |
Italian |
|
JP |
5701 |
6700 |
Japanese |
|
KO |
6701 |
6900 |
Korean |
|
PL |
6901 |
7000 |
Polish |
|
PT |
7001 |
7200 |
Portuguese |
|
RU |
7201 |
7400 |
Russian |
|
SP |
7401 |
9400 |
Spanish |
|
SW |
9401 |
9500 |
Swahili |
|
OT |
9501 |
10000 |
Other |
Using the MS-Word Quiz Template (and the MS-Excel subtitles spreadsheet)
Part I: quiz_dot_create_excel: Watch a screencast on How to ready target language subtitle source material for the quiz template:
|
0,00
|
Working with subtitle material from the source: time coding is not correct
|
|
1,40
|
spreadsheet formulae can fix the subtitle time codes
|
|
2,00
|
why using DVD chapters as learning units
|
|
2,20
|
filtering on chapters in the DVD
|
|
3,00
|
ready to copy paste the filtered learning unit text data into the quiz template
|
Part II: Watch a screencast on How you can apply your pedagogy with ease to a text and transform the same to a quiz, and how the student benefits from both
|
0,00
|
start quiz from word template (on file share)
|
|
0,35
|
paste text data, e.g. for listening comprehension, e.g. from target language movie subtitles
|
|
1,15
|
create markup from pedagogy
|
|
3,14
|
generate quiz from markup : parenthesis 1 {helpful hint}, parenthesis 2 [correct answer]
|
|
3,35
|
closing and saving the quiz, receiving a summary
|
|
3,55
|
create a backup
|
|
4,00
|
open the quiz to test the quiz from student perspective
|
|
4,30
|
what opening information the student receives
|
|
5,00
|
how the student inputs answers and receives feedback
|
|
5,20
|
language learning lookup menu , after pausing the quiz
|
|
6,30
|
or double-click words to look them up in the default dictionary for the set language
|
|
7,10
|
how the student resumes the quiz
|
|
7,20
|
how the student closes the quiz
|
Part III: Watch a screencast on How you can revise your pedagogy
|
0,15
|
open the quiz, enable macros
|
|
0,30
|
unprotect the quiz
|
|
0,45
|
office 2003: tools / macros / macros
|
|
1,00
|
now you can edit your pedagogical markup
|
|
1,10
|
regenerated the altered quiz
|
List of Maps for Foreign Language and Culture Study
The United Nations has a nice – even though not complete – collection of PDF-downloadable political maps of countries and regions – including some language regions – around the world:
- World
- [Broken:] Non-Self-Governing Territories (En.)
- [Broken:] Non-Self-Governing Territories (Fr.)
- [Broken:] Non-Self-Governing Territories (Esp.)
- South Asia
- South East Asia
- Central Asia
- Western Asia
- Greater Mekong Subregion
- Africa
- Africa(french)
- Eastern Africa
- Horn of Africa
- Horn of Africa (with Relief)
- South-Eastern Africa, Drainage
- Western Africa
- Great Lakes Region 1
- Great Lakes Region 2
- Great Lakes Region 2 (french)
- Central & Eastern Europe
- Baltic States
- South Eastern Mediterranean
- Middle East Region
- ECA
- ECE
- ECLAC
- ESCAP
- ESCWA
- Darfur Regional map
- Afghanistan
- Afghanistan, Regions
- Albania
- Angola
- Armenia
- Azerbaijan
- Bahrain
- Bangladesh
- Belarus
- Bolivia
- Bosnia and Herzegovina
- Bougainville Island
- Burkina Faso
- Burundi
- Cambodia
- Cameroon
- Central African Republic
- Chad
- Central Chile
- Chile
- Comoros
- Congo
- Costa Rica
- Côte d’Ivoire
- Croatia
- East Croatia
- Cyprus
- Czech Republic
- Djibouti
- Democratic People’s Republic of Korea
- Democratic Republic of the Congo
- Democratic Republic of the Congo (East)
- Ecuador
- Egypt
- El Salvador
- Equatorial Guinea
- [Removed:] Eritrea
- Estonia
- [Removed:]Ethiopia
- Fiji
- Gabon
- Georgia
- Ghana
- Greece
- Guatemala
- Guatemala (Southern)
- Guinea
- Guinea-Bissau
- Haiti
- Honduras
- Indonesia
- Iran (Islamic Republic of)
- Iraq
- Israel
- Jammu and Kashmir area
- Kazakhstan
- Kenya
- Kosovo
- Kuwait
- Kyrgyzstan
- Lao People’s Democratic Republic
- Latvia
- Lebanon
- Region of Southern Lebanon
- Liberia
- Libyan Arab Jamahiriya
- Lithuania
- The frmr Yugoslav Republic of Macedonia
- Madagascar
- Malawi
- Mali
- Moldova
- Mongolia
- Montenegro
- Morocco
- Mozambique
- Myanmar
- Nepal
- Nicaragua
- Niger
- Nigeria
- Oman
- Pakistan
- Palau
- Papua New Guinea
- Paraguay
- Peru
- Poland
- Prevlaka
- Qatar
- Moldova
- Romania
- Russian Federation
- Rwanda
- Southern Serbia
- Senegal
- Serbia
- Sierra Leone
- Slovakia
- Slovenia
- Somalia
- South Africa
- Sri Lanka
- Sudan
- Syria
- Tajikistan
- Tanzania, United Republic of
- Thailand
- Timor-Leste
- Timor-Leste (Regions)
- Turkmenistan
- Uganda
- Uganda (regions only)
- Ukraine
- Uzbekistan
- Western Sahara
- Yemen
- Former Yugoslavia map
- Zambia
- Zimbabwe
How to batch-upload learning materials, give students access in Moodle
To upload a set of learning materials (e.g. multiple audio tracks from a CD) at once:
- On your computer, browse to the files (assuming that, if your source material is on an audio CD, you have already “ripped” the audio to files on your computer)
- Zip the folder, e.g. using the built-in Windows right-click/context menu option “send to”/ “compressed file” (for more options, install the free 7-zip is more powerful, which is required on Windows XP if your file names contain foreign language diacritics).
In your Moodle course, Step 1 is to upload the files: click at the bottom of the left menu: “File”
- No need to create a folder since this is done automatically (advantage: keep files manageably together, e.g. applying student permissions to an entire folder set of files versus individual files – disadvantage: you may run into our Moodle file size limit (as of 2011-05 64MB for individual files, including the uploaded zip-file; you may ask for an increase or TBA:compress your audio files) .
- Enter the folder and upload, by browsing to the zipped file on your computer
- Wait for the upload to finish (remember you may have a single file size limit, so while it is not as convenient as uploading all files in one batch, you may have to split the files. When using Windows “Send to”, you have to manage this manually. 7-zip offers more assistance),
- Once the file appears in the folder, there will be a link “unzip” to the right of it: Click it.


- Once the initial files appear in the folder, you can and may want to delete the zipped file.


Step 2 is to to make these files accessible to your students, by wrapping them as a resource:
- Button: “Turn editing on.”
- Section / drop-down:“Resources” / “Display a directory”.
- Enter a descriptive Name (your folder name will not carry over).
- You can enter a description of the file if you want into the Summary field. This is optional.
- Under “Display a directory”,’ select the desired folder directory from the pull-down menu.
- Click “Save and Display” to check the results.
Blackboard: Content System: Ancillary digital textbook material reuse (publish to course participants, roll-over between terms)
If you have a well administered language program, your admin should have uploaded all digital (text, audio, textbook and table of contents) materials that come with your textbook for convenient reuse between sections and terms into the Blackboard content system.
As a Blackboard course administrator, you can easily give all course participants access in 1 step (as course administrator, you can also access the audio materials during classes from the Blackboard content system directly).
Here is a video recording of a real-world walkthrough of this process – voice-over is in German, but Blackboard interface is in English: blackboard-content-system-finding-adding-existing-content-item-to-course-access-play.wmv
|
Start Time |
Topic |
|
0,0 |
overview of teaching and learning procedure |
|
0,1 |
course add item / content collection link |
|
1,30 |
how to search for content. Remember: Search is your friend, if you have a consistent metadata system for your content (start with meaningful file names): |
|
3,15 |
hot to add permissions for other users |
|
5,3 |
add to course for for students |
|
5,4 |
listen to an example audio from course |
Once you have given course participants access to the audio materials, and you teach the course again next term, it is even easier to roll over the access: Just use the Copy link in the Blackboard Control Panel.
How a teacher grades a Blackboard audio recording assignment
- Switch to interactive view, if your vertical scrollbar does not show up, and thus the assignment column is hidden (or reduce the font size in Firefox, e.g. by holding CTRL and rolling the mouse scroll wheel):

- Once you see the assignment column, you can either download all submissions as a zip file, open it with the built-in zip tools in Windows (XP or newer). This is especially practical if you want to then select all recordings and drag and drop them into an audacity window, for doing easy to comparative grading of student submissions, as described earlier.
- To grade,
- you still need to click next to the green exclamation marks which indicate where there is an assignment to be graded,
![clip_image002[5]](https://thomasplagwitz.com/wp-content/uploads/2016/03/clip_image0025_thumb.gif?w=569&h=465 "clip_image002[5]")
- on the arrow keys which unfold a menu.
![clip_image002[7]](https://thomasplagwitz.com/wp-content/uploads/2016/03/clip_image0027_thumb.gif?w=593&h=483 "clip_image002[7]")
- you still need to click next to the green exclamation marks which indicate where there is an assignment to be graded,
- This gets you to the grade details:

- You can also listen to the student recording submission by clicking on the file linked behind “users; file”.
![clip_image002[5]](https://thomasplagwitz.com/wp-content/uploads/2016/03/clip_image0025_thumb.jpg?w=600&h=488 "clip_image002[5]")
- Fill out your grade comments and grade.
- Instead of doing (only) written comments, you could also oral feedback grade the student recording, and re-upload this new recording.
- Finish by clicking button:”submit”.
- Next in series: How the student reviews a grade Blackboard audio recording assignments: TBA
- First in Series: A better way to do student homework audio recordings in the Sanako LAB 300, using Blackboard:Assignment.

![clip_image002[5]](https://thomasplagwitz.com/wp-content/uploads/2016/03/clip_image0025.gif "clip_image002[5]")
![clip_image002[7]](https://thomasplagwitz.com/wp-content/uploads/2016/03/clip_image0027.gif "clip_image002[7]")

![clip_image002[5]](https://thomasplagwitz.com/wp-content/uploads/2016/03/clip_image0025.jpg "clip_image002[5]")
How a student submits a Blackboard model imitation audio recording assignments
- Access the assignment in the location of your Blackboard course that your instructor pointed you to.
- Download the model audio recording attached to the assignment to your desktop (if any).
- Right-click on the downloaded file, choose open with (something else but the Sanako Duo which you will use to record).
- Play and listen to the model.
- Imitate the model, recording yourself using the previous instruction, using pause/play as needed.
- Upload the recording into the Blackboard assignment by clicking “browse to local file” [i.e. where you saved your recording].
- Click “submit”. If you get an error “Not a valid file’, try using another web browser to open the assignment and submit the file.
- Next steps: see How the teacher grades a Blackboard audio recording assignments
- First in series: A better way to do student homework audio recordings in the Sanako LAB 300, using Blackboard:Assignment
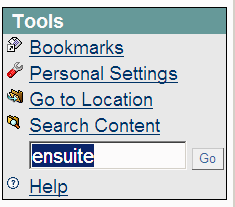
Quia Online Exercises
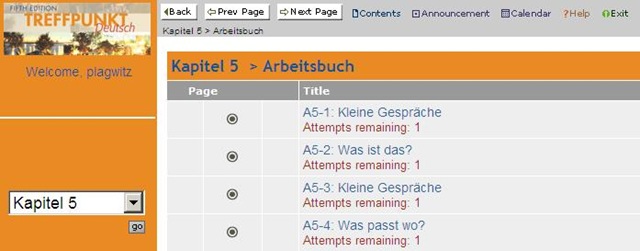
Here are examples from the Treffpunkt Deutsch Quia Website. Quia Treffpunkt Deutsch is organized in chapters which you can select from the dropdown navigation control on the left. As you see on the following page, each chapter contains 3 different types of exercises, organized in sections.

If you click on a section header, you will see a list of exercises:
Here is an example of an exercise, assigned as “A[rbeitsbuch=work book], K[apitel=chapter]9: A9[=chapter-number, again]-1[=exercise-number]”.
The letters and numbers from the assignment repeat in the exercise, see this screenshot:
 \
\
You can also hover your mouse over the info button in the upper left corner to get a summary of this information: 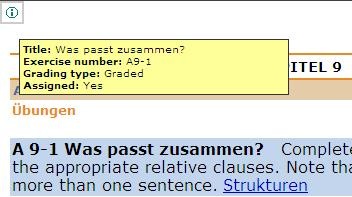
Also note the link to the corresponding preparatory web page which opens in a new window (Problems getting the window to open? the popup-blocker of your web browser may be the root? instead of simply clicking on the link, try CTRL-clicking, on the link as well as the browser information bar, if it comes up). It is crucial to read/review the corresponding preparatory web page first.
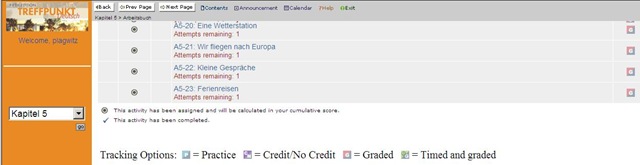
It is not necessary to get everything 100% correct. It is not even a good use of your time to redo the exercise until you get everything 100% correct. Especially if you try speeding up this tedious task by doing the first round mechanically to get at the automated feedback answers, then doing the second round mechanically by pasting them in. That is why I have my Quia course “Options” set to “Calculate cumulative scores based on students’ first attempt” and to “Ignore student results after the 1st attempt”.
Therefore, you will see that you have only 1 “Attempt remaining” for each exercise. You will also, unless individually told otherwise, only have to do the exercises that are “Assigned” (consult legend at bottom of page).
Rather use the valuable error feedback to go back to the Structures and try to learn and bring any remaining questions to class – it is highly likely that fellow students have the same problems, especially if they have the same native tongue. That is also the reason why I review your submission before class – not to mark you down, but to see from your problems help what to spend valuable class time one.

Also, the exercises are integrated into the progression of the course (including your ability to do partner work with others during class meetings). That is why you will not be able to submit exercises long after when they were due:

For reviewing, we will use other materials.
Finally, consult the Help which is linked in the top menu:
![]()


Questions? Read the About. Or just ask me a quick Our Databases: Resources with calendars -- Language learning material Moodle Sites, multimedia files -- films


FAQs for LRC student staff or for students or for teachers. To search our FAQs, in the browser addressbar, add after "https://plagwitz.wordpress.com/feed/?tag=faqs+/" "+TAG1" (from tag cloud below) OR "https://plagwitz.wordpress.com/feed/tag=faqs
&category_name=" "CAT1" (from category hierarchy below). OR search both categories and tags, and multiple TAGs/CATs (connect with "," for OR-search, with "+" for AND-search), like so: https://plagwitz.wordpress.com/feed/?tag=TAG1+TAG2+...TAGn&category_name=CAT1
+CAT2+...CATn"
Other ways to find help
If you cannot find it here, look there: 5,500 Language-Learning Links and Programs for learning or teaching 150 languages
Shortcuts:Our Lists, Our Maps, LRC Staff Moodle Site,LRC Project Moodle Site, 49erexpress, UNCC Moodle, Student Recordings: s:claslcslrcsanakostudent
Learning usage samples: Sanako oral exam, Kaltura webcam presentation, Dictation with speech recognition, Sanako written exam, Chinese and Japanese interactive stroke-order practice
Test the Sanako Installer, Webbrowser Popup Konfigurator for XP, or Windows7, faster LRC TeacherPC Log-in Let MS facilitate diacritics writing by installing for you US-International keyboard layout
This is my personal blog (Google+). The views expressed on these pages are mine alone and not those of my employer. The information in this weblog is provided “AS IS” with no warranties, and confers no rights.
