Archive
Film equipment booking FAQ
- Do not send the meeting request to lrchelp@uncc.edu or some other person you know in the LRC, but rather send to the equipment email as listed here. Your meeting request will reach this equipment item’s “Resource Attendant who manages the item.
- Do not attempt to book equipment items that are “blocked” on the Scheduling Assistant tab of your meeting request. The Attendant currently mails acceptance responses only to permanent staff, not to students (check for booking success instead using the calendars shared with you in your NINERMAIL), but still has her Scheduling Assistant update the equipment’s publically visible calendar with the booking (tentatively for students). You may have figured by now that TBA:the Resource Attendant and her Scheduling Assistant are actually robots, “Do more with less” and all.
- Do not write in the notes field “I would like a Boom Pole as well” or similar. Nobody but robots is supposed to look at your message, and Robots cannot process this note, and they do not need to: Just add all equipment items,that you plan to check out and back in at the same time, as additional recipients in the “Resources” textbox, as listed here, so that the Resource Attendant and her Scheduling Assistant can manage the sharing of the items.
- Do not load only a single equipment piece – you would be playing a time-consuming lottery with the availability of this item. Rather, load all equivalent equipment pieces in the “Resources” field (see explanation on list of bookable items ) that you could use. E.g. if you need a Vixia camera with a heavy tripod and a microphone, load (-> list of bookable items ) LRC Camera 11-14 and all LRC Tripods 01-04. Then compare availability lines in the scheduling assistant for these items: You will find more easily one Vixia camera and one heavy tripod that fits well into your schedule. Just remember to remove the other equivalent items that do not fit as well into your schedule, before sending the meeting request.
- New memory options from Summer 2013:
- Cameras do not include sd-cards anymore. If you need an LRC sd-card, you have to check it out (and back in) separately, by adding to the “resources:” LRCsd-card##
- Have no way of getting your footage off the camera when returning equipment. Don’t hog the equipment. You can now store your footage temporarily on an LRCthumbdrive##.
Shortlinks for RUSS1201, RUSS1202 classes with Sanako Study 1200
|
1 |
sanako-study-1200;students;teachers;intro;cheatsheet;faqs;screencasts |
|
|
2 |
russian;students;writing;teacher |
|
|
3 |
sanako-study-1200;students;teachers;intro;cheatsheet;faqs |
|
|
4 |
sanako-study-1200;teachers;intro;cheatsheet;faqs |
Or use OSK: https://thomasplagwitz.com/tag/osk/o
Meta-search many historical German dictionaries and encyclopedias using Woerterbuchnetz.de
A meta-search by the University of Trier Center for Digital Humanities may not teach you much German – you need to know it already –, but help prevent you remaining a “one-dimensional man”.

I came to know a lot of those during my own German and history studies a long time ago – – when they still only existed on paper, if not parchment ![]() . Gotta love Digital Humanities, and find other activities for physical exercise. Her is an example search result:
. Gotta love Digital Humanities, and find other activities for physical exercise. Her is an example search result:

How to download Centro Spanish Textbook audio
The audio is in (compressed) mp3 format. Just right-click on any audio link and choose save target/link as (or similar, depending on browser), like so: 
Example from Centro – Puntos de partida: Online Laboratory Manual, 8th Edition (you need access privileges to follow this link, but you can send links around, users can open them, provided their webbrowser is already logged into the centro site – getting access and finding you way around the website is the real issue. Webspiders are prohibited, though – and even Downthemall saves only files without extensions: rename them to .mp3 or save them manually as .mp3 in the first place, as shown above. Does not work as above? Try a different web browser.
Phonetic Russian character input on US-keyboards with Google IME in the LRC
- To write Russian phonetically in Cyrillic:
- Since “input methods”are specific to each window (and automatically switch to that of the window you make active), first open the application you want to write in, preferably MS-Word (has proofing tools for Russian).
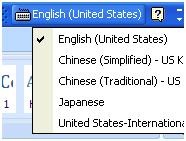
- In the language bar on the lower right, click on “EN”, select “Russian” instead

- Click on the keyboard symbol and select “Google”:

- You first may have to right-click on the language bar on the lower right of your desktop and select “Adjust” to show the keyboard symbol:

- You first may have to right-click on the language bar on the lower right of your desktop and select “Adjust” to show the keyboard symbol:
- If you now type in MS-Word Russian (your selection did not “stick” in MS-Word? do the above steps again, eventually it will…) phonetically on a US-keyboard, you will be able to select from suggestions in Cyrillic:

- Click the desired suggestion to have it entered into MS-Word:

- To go back to writing temporarily in English (without changing the entire input method back to English), click the (Cyrillic/Latin) letter symbol on the Google Russian IME menu:
 and you can enter English (Latin alphabet) without the popup suggesting you Russian equivalents:
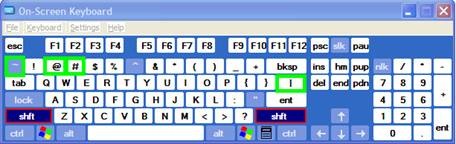
- To switch from the phonetic input to a floating Cyrillic keyboard,
- click on the keyboard symbol in the Google Russian IME.

- Or from the Language bar, switch to the other (Microsoft) keyboard layout for "Russian" (see #4 above), and go to "Start" / "Run" / type OSK, click "OK".
- click on the keyboard symbol in the Google Russian IME.


Character Input Methods for SLA (Western)
For studying (typing) Western Languages (= need for diacritics only; whether you have a US keyboard hardware or UK which is pretty similar), we recommend the MS Windows US International Keyboard layout which is based on “dead keys”.
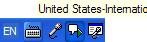
Currently installed in the LLC are the Language Bar (floating on top of screen or accessible from the taskbar) with these keyboard layouts:
Keyboard layout settings are application/window specific, and “US” (non-international) is still the default for new applications/windows, so prepare to switch after you start a new application;
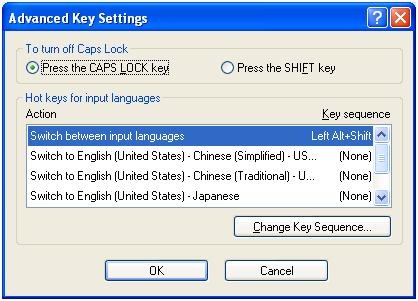
There are keyboard shortcuts for switching, however, “Key settings”: “switch between input languages” , using LEFT ALT + SHIFT, does not work. Workaround: use the language bar for switching:
Windows keyboard layout settings can be temperamental – if you find you cannot switch to a certain layout anymore, you may have to restart the computer.
Use the following keyboard shortcuts to enter diacritics more easily:
|
Press (together, then release) |
then press |
Example Result |
|
` (accent grave) |
any letter that can have this accent, e.g. "a”, also cedilla ç |
à |
|
‘ (apostrophe) |
á |
|
|
^ (caret)- |
â |
|
|
~ (tilde) |
ã |
|
|
” (double quotation marks) |
ä |
|
|
CTRL+& |
Z or z |
æ |
|
rightALT+ |
X or x |
œ |
|
rightAlt+n |
|
ñ |
|
ALT+CTRL+? |
|
¿ |
|
rightAlt+? |
|
|
|
ALT+CTRL+! |
|
¡ |
|
rightAlt+1 |
|
|
|
rightAlt+s |
S |
ß |
To access the original, now dead keys, press space bar after pressing the dead key.
|
Modifiers(blue)/Layout |
Note the new modifier = “dead” keys, indicated by light blue color (click to enlarge) |
|
Normal |
|
|
|
|
|
Shift |
|
|
|
US International |
|
|
|

Screencast of US International in action here: deadkeys.wmv
Interactive Demo of installation procedure (personal computers outside of the LLC) here: keyboard_usinternational.swf
Planned improvements:
- Use LEFT ALT+Shift to switch to (Software) “Keyboard Layout” “United-States International”.
- Use other keyboard short cuts to access a desired keyboard layout directly
- Dock the “Language Bar” in the Taskbar, then hover over it to make sure you selected the proper “Keyboard Layout”.
· 

How to get started with Moodle here
- Moodle is the UNCC LMS – it is central to teaching with technology.
- The LRC provides Moodle-information specific to language learning, incuding FAQ’s.
- The CTL (= Center for Teaching and Learning) has oodles of general Moodle help.
- Search the CTL site for Moodle by clicking here, and you will find:
- Moodle specific:
- view Moodle on-demand screencast video tutorials,
- read Moodle FAQ’s (updated).
- sign up for instructor-led (face-to-face or webinars, some of which are archived and available on-demand) training:
- Updated Webinar list, which includes for Moodle (I highlighted the more general ones)
- Avoiding the Moodle Scroll of Death (30 min. Webinar)
- Copying a Moodle Course (30 min. Webinar)
- Find & Embed Videos in Moodle (30-min. Webinar)
- How Do I: Peer Review in Moodle (30 min. Webinar)
- Incorporating Streaming Media into Moodle (30 min. Webinar)
- Making Moodle Beautiful (30 min. Webinar)
- Moodle 2 FAQ (30 min. Webinar)
- Moodle Grade Book and Mail Merge (30-min. Webinar)
- Moodle Under the Hood (30 min. Webinar)
- Using Moodle’s Team Assignment (30 min. Webinar)
- Previous (Moodle 1.9)
- Updated Webinar list, which includes for Moodle (I highlighted the more general ones)
- There is more Moodle-information here, just no way for me to provide a direct, filtered link so just browse the pages:
- the CTL podcasts
- Episode 106 Getting Students to Read Your Syllabus: Quizzing in Moodle
- the CTL podcasts
- Moodle specific:


Questions? Read the About. Or just ask me a quick Our Databases: Resources with calendars -- Language learning material Moodle Sites, multimedia files -- films


FAQs for LRC student staff or for students or for teachers. To search our FAQs, in the browser addressbar, add after "https://plagwitz.wordpress.com/feed/?tag=faqs+/" "+TAG1" (from tag cloud below) OR "https://plagwitz.wordpress.com/feed/tag=faqs
&category_name=" "CAT1" (from category hierarchy below). OR search both categories and tags, and multiple TAGs/CATs (connect with "," for OR-search, with "+" for AND-search), like so: https://plagwitz.wordpress.com/feed/?tag=TAG1+TAG2+...TAGn&category_name=CAT1
+CAT2+...CATn"
Other ways to find help
If you cannot find it here, look there: 5,500 Language-Learning Links and Programs for learning or teaching 150 languages
Shortcuts:Our Lists, Our Maps, LRC Staff Moodle Site,LRC Project Moodle Site, 49erexpress, UNCC Moodle, Student Recordings: s:claslcslrcsanakostudent
Learning usage samples: Sanako oral exam, Kaltura webcam presentation, Dictation with speech recognition, Sanako written exam, Chinese and Japanese interactive stroke-order practice
Test the Sanako Installer, Webbrowser Popup Konfigurator for XP, or Windows7, faster LRC TeacherPC Log-in Let MS facilitate diacritics writing by installing for you US-International keyboard layout
This is my personal blog (Google+). The views expressed on these pages are mine alone and not those of my employer. The information in this weblog is provided “AS IS” with no warranties, and confers no rights.
