Archive
Archive for the ‘Area-is-any’ Category
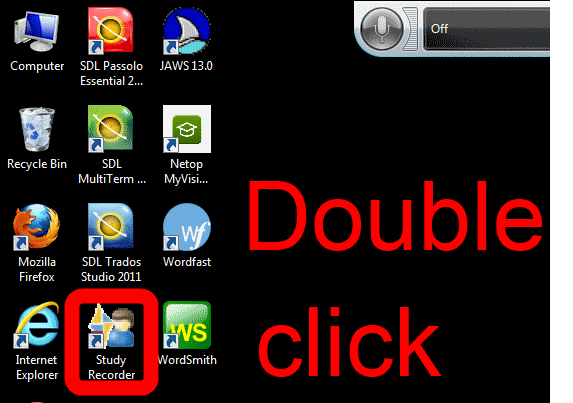
How students need to work around Sanako startup issues at start of 2014
2014/01/31
Leave a comment
UPDATE: Step 1 is not necessary anymore, Step2 (Microphone click) still is.
Categories: animated-GIFs, audience-is-students, audience-is-teachers, digital-audio-lab, e-languages, Glitches&Errors, Institution-is-University-of-North-Carolina-Charlotte, Listening, multimedia-recording, service-is-testing-troubleshooting-debugging, Speaking, Student-Computers
image2014spring, sanako-study-1200, student.exe
“Back to basics”: Need once again to default to color scheme basic on teacher computer
2014/01/27
Leave a comment
- Same problem as last term: (What made it come unstuck/unfixed?):


- No Sanako screen sharing activity involved here, but MS-Community-Clips screen sharing.
- Classes are moving in, and we cannot have the teacher computer slow to a crawl and eventually crash in the middle of a Sanako class, especially not when an assessment is involved.


New supervisor role for senior LRC Assistants
2014/01/13
Leave a comment
- A new LRC Assistant list, sorted by hire date, has been posted on the inside LRC reception desk. Use it to determine who is currently the most senior LRC assistant at the desk. The current most senior LRC assistant serves as supervisor and always wears the green supervisor badge pictured below. When the supervisor leaves, the supervisor passes on the badge to the next senior LRC assistant in line.

- Supervisors do not have to perform clerical tasks (meeting requests, equipment handling, etc.) as long as there are enough less senior LRC assistants to handle the client load. Rather, supervisors monitor less experienced LRC assistants operating the reception desk computers, equipment etc. , help train them and avoid mistakes.

Positioning of Language Lab PCs needs improving
2014/01/11
3 comments
- Update: We worked around the issue with a male/female USB extension cord (black) to connect the Sanako USB connector (blue) into, this way, the whole setup can be aligned with the rear of the PC and won’t stick out and get in the way:

- Problem: Rear connectors of computers get disconnected or even damaged. Input (keyboard, mouse, microphone) and output devices (headset) get disconnected connected and therefore fails to work. Damaged equipment needs to be ordered and replaced, at considerable cost of time and money ($TBA per Sanako cable). It is too time-consuming to test equipment functionality (30 headsets and mice and keyboards) before each assessments and exam.
- Example of student in seat:

- We have observed these and similar damages regularly:


- Cause: Our language lab computer desks and rows are too narrow, for individual student sitting in front of the computer, not to mention classes moving in and out of their seats
- Other requirements:
- We need to have equipment plugged in the rear connectors of the computer and cable-tied to prevent students from trying to adjust or “fix” computers by re-plugging the equipment (often improperly, making them fail to work), and also because there is limited desk surface in front of the computers, given keyboard and mouse need to fit in front.
- For the functionality of the Sanako digital audio language lab system, we especially need to make sure, that the headset is plugged in on the same USB port in all computers.
- Solutionsthat we have
- already tried
- we have tied down the connectors with cable ties, but this has not worked sufficiently.
- yet to try: is there a way
- to permanently attach computers in a different, safer position on the existing furniture?
- or to buy and install different furniture, computers seated under desks inaccessible for end user and locked?
- already tried


Categories: e-infrastructure, Glitches&Errors, headphones, Photos, proposals, Student-Computers
furniture
LRC headset test on PCs
2014/01/02
Leave a comment
- Log in on a PC.
- Launch the Sanako student recorder form the desktop:


- Click the red recording button then record for 5 sec (speak into the microphone; then tab the microphone with your finger several times, to make sure you are recording through this source), then the blue stop button

- Click the green Play (from beginning):
- can you hear yourself speaking/ the noise from the tabs?

- turn your head left and right: can you still hear (sometimes a short cuts out the sound).
- If not check headsets cables as described in LRC routine walkthrough for classroom PCs (Sanako headsets) or in LRC routine walkthrough for listening and group room stations(brown headsets).
- If it still does not work, report Computer # on clip board.


LRC daily walkthrough for classroom PCs
2014/01/02
Leave a comment
- Find a time when the classroom is not busy on the LRC calendar – if necessary, do it earlier rather than later.
- If somebody else than coordinator or director is logged onto the teacher computer, tell the LRC coordinator.
- Check the projector? Turned off , screen up


- Make sure classroom blinds are closed

- Make sure the classroom whiteboard is clean

- Make sure headsets are
- hanging on the back of the monitor in the classroom (each headset on the computer it is connected to, and not a neighboring computer).

- and are
- firmly plugged in
- plugged in firmly AND and in the correct (= bottom left) USB port
- cable-tied ((spares in coed436 box “office supplies”).


LRC daily walkthrough for iMacs and printer
2014/01/02
Leave a comment
- For the iMacs,

- make sure headset is plugged into the USB adapter as pictured,
- make sure the 2 “Do not use” labels on the adapter and over the inputs on the rear of the screen are in place and intact (or apply spares from box on reception desk).
- Check that the printer has papers (or replenish paper from the reserves shelves in coed436).


LRC daily walkthrough for listening and group room stations
2014/01/02
Leave a comment
- Ensure that the listening station/group room PC headsets are stored hanging from the side cubicle walls:

- Headsets need to be plugged into the rear:
- Make sure "Do Not Use" sticker is on the front panel (or apply spares from box on reception desk).

- As pictured:
- Plug headset to in the right rear outlets (black into green, red into red/blue).
- Make sure cables are secured with a cable tie (or apply spares from box "office supplies” on shelves in coed436).


Questions? Read the About. Or just ask me a quick Our Databases: Resources with calendars -- Language learning material Moodle Sites, multimedia files -- films


FAQs for LRC student staff or for students or for teachers. To search our FAQs, in the browser addressbar, add after "https://plagwitz.wordpress.com/feed/?tag=faqs+/" "+TAG1" (from tag cloud below) OR "https://plagwitz.wordpress.com/feed/tag=faqs
&category_name=" "CAT1" (from category hierarchy below). OR search both categories and tags, and multiple TAGs/CATs (connect with "," for OR-search, with "+" for AND-search), like so: https://plagwitz.wordpress.com/feed/?tag=TAG1+TAG2+...TAGn&category_name=CAT1
+CAT2+...CATn"
Other ways to find help
If you cannot find it here, look there: 5,500 Language-Learning Links and Programs for learning or teaching 150 languages
Shortcuts:Our Lists, Our Maps, LRC Staff Moodle Site,LRC Project Moodle Site, 49erexpress, UNCC Moodle, Student Recordings: s:claslcslrcsanakostudent
Learning usage samples: Sanako oral exam, Kaltura webcam presentation, Dictation with speech recognition, Sanako written exam, Chinese and Japanese interactive stroke-order practice
Test the Sanako Installer, Webbrowser Popup Konfigurator for XP, or Windows7, faster LRC TeacherPC Log-in Let MS facilitate diacritics writing by installing for you US-International keyboard layout
This is my personal blog (Google+). The views expressed on these pages are mine alone and not those of my employer. The information in this weblog is provided “AS IS” with no warranties, and confers no rights.
