Archive
Posts Tagged ‘files’
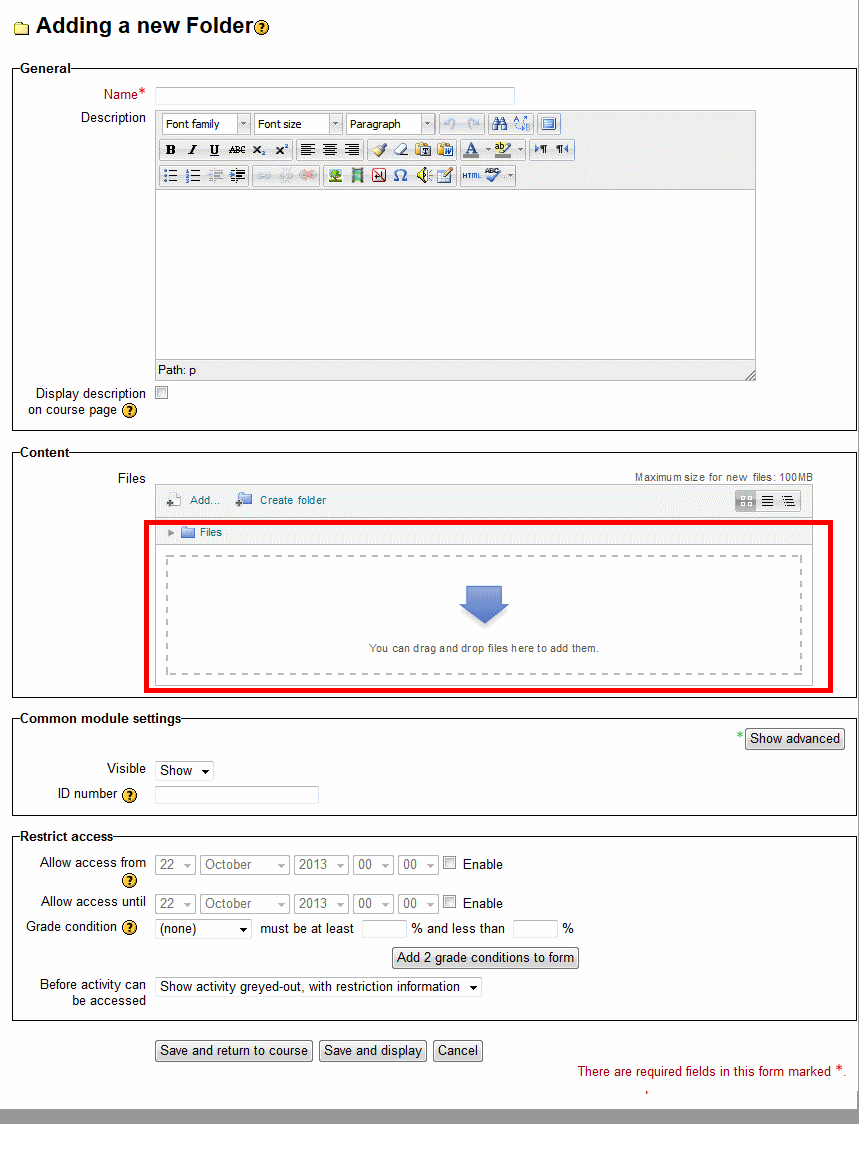
Another way to upload many files into Moodle 2
2013/12/04
Leave a comment
- Last time we started from “Add folder” to get to the handy drag-and-drop file upload control in Moodle 2.
- This time we do not want to create a new folder, but work within an existing folder (better for categorizing lots of files).
- Browse into the folder and click edit

- click create folder

- add name and click create

- click to open folder

- drag/drop files as zip in folder

- oops, check the upper right warning :

- Split your files into smaller segments

- And be patient, there is no visual indicator of progress, or any action, after the drop), or else you get duplicates:

- Just delete duplicates you might have created:


- click on each zip file and choose “unzip”:


- Delete the zip files (not needed anymore)

- Finally, click “save changes”
-

- Note, by working within a folder, you cannot link directly to the new folder you created. It should however be easy enough to navigate to it if you send the link to the root folder, here “Interaction”.


Categories: audience-is-teachers, e-learning, lms, training
files, folders, moodle
How to upload a folder with many files in Moodle 2–the ultimate training
2013/10/22
Leave a comment
- …using animated .gifs. Different speed? 0.25sec,0.5sec, 0.75sec, 1sec, , 2sec, 3sec, 4sec, 5sec, 6sec, 7sec, 8sec, 9sec, 10sec. 1.5sec

- And the answer is: You now can simply drag-and-drop a zip file (provided you are using a recent web browser). Start with “Turn editing on”, “Add resource”, “Folder”, and then proceed like so:
- Easy enough, but you can still save time: If your folder is reusable not only between terms, but also teachers (sections etc.), I suggest doing this in our Moodle metacourses (once).
- If you want to use an existing instead of adding a new folder, a slightly different way to manage your multiple files upload in Moodle 2 is described here.
Categories: animated-GIFs, audience-is-teachers, e-learning, lms, training
files, folders, moodle
How teachers find their Sanako files – once they are in the right network share folder
2013/03/11
Leave a comment
- The beginning of the folder name with your recordings corresponds to the date/ time the exam was collected (some translation required – the date time appears in this special format yyyy-MM-dd hh_mm) so that the folders can also be easily sorted by name, see below).

- When viewing the folder, click on the column headers to sort by name (sorting by date also often works):

- If you forgot when you held your exam: The exam appointment is not only in the LRC room calendar (which can get busy and takes some prior setup to be searchable), but in your own NINERMAIL calendar, so that you can check there also:

- We recommend that the exams (unlike the system tests (“nametests”) which can be collected using the computer name as filename) be collected using the student username as recording filename, you can also search the student folder for students with your username:

- We also recommend that you add a memorable (to you) tag to the folder name when collecting (in this case “level2 speaking exam1”) to make it easier for you to retrieve your assessments. The best tags in this world of computers helping us find things seem to be long unique strings (think of twitter hashtags).


Categories: digital-audio-lab, multimedia-recording, service-is-assessing
FAQs, files, sanako-study-1200
How to batch download all submissions as a zip file from a Moodle: Gradebook File-upload assignment column.
2013/03/01
Leave a comment
- I have no file upload assignment with submissions handy in my own Moodle course, so I am patching this together from other universities (thanks, umass.edu, cotc.edu).
- “ Another time saver you can use is the Download all assignments as a zip link. This will package all uploaded documents from any submissions in the assignment into
a zipped folder that you can download. Once downloaded, you can unzip the file and access each paper. This can be a real time saver!”. Image: 
- Extra: This procedure will add the student’s name to the file. No more wading through submitted audio files named by students trying to identify submitters.
Categories: e-learning, grading, lms
automation, batches, file-upload, files, gradebook, moodle
Protected: How teachers find their Sanako materials
2012/11/06
Enter your password to view comments.
How to batch-upload learning materials, give students access in Moodle
2011/01/26
Leave a comment
To upload a set of learning materials (e.g. multiple audio tracks from a CD) at once:
- On your computer, browse to the files (assuming that, if your source material is on an audio CD, you have already “ripped” the audio to files on your computer)
- Zip the folder, e.g. using the built-in Windows right-click/context menu option “send to”/ “compressed file” (for more options, install the free 7-zip is more powerful, which is required on Windows XP if your file names contain foreign language diacritics).
In your Moodle course, Step 1 is to upload the files: click at the bottom of the left menu: “File”
- No need to create a folder since this is done automatically (advantage: keep files manageably together, e.g. applying student permissions to an entire folder set of files versus individual files – disadvantage: you may run into our Moodle file size limit (as of 2011-05 64MB for individual files, including the uploaded zip-file; you may ask for an increase or TBA:compress your audio files) .
- Enter the folder and upload, by browsing to the zipped file on your computer
- Wait for the upload to finish (remember you may have a single file size limit, so while it is not as convenient as uploading all files in one batch, you may have to split the files. When using Windows “Send to”, you have to manage this manually. 7-zip offers more assistance),
- Once the file appears in the folder, there will be a link “unzip” to the right of it: Click it.


- Once the initial files appear in the folder, you can and may want to delete the zipped file.


Step 2 is to to make these files accessible to your students, by wrapping them as a resource:
- Button: “Turn editing on.”
- Section / drop-down:“Resources” / “Display a directory”.
- Enter a descriptive Name (your folder name will not carry over).
- You can enter a description of the file if you want into the Summary field. This is optional.
- Under “Display a directory”,’ select the desired folder directory from the pull-down menu.
- Click “Save and Display” to check the results.
Categories: e-learning, learning-materials
files, moodle


Questions? Read the About. Or just ask me a quick Our Databases: Resources with calendars -- Language learning material Moodle Sites, multimedia files -- films


FAQs for LRC student staff or for students or for teachers. To search our FAQs, in the browser addressbar, add after "https://plagwitz.wordpress.com/feed/?tag=faqs+/" "+TAG1" (from tag cloud below) OR "https://plagwitz.wordpress.com/feed/tag=faqs
&category_name=" "CAT1" (from category hierarchy below). OR search both categories and tags, and multiple TAGs/CATs (connect with "," for OR-search, with "+" for AND-search), like so: https://plagwitz.wordpress.com/feed/?tag=TAG1+TAG2+...TAGn&category_name=CAT1
+CAT2+...CATn"
Other ways to find help
If you cannot find it here, look there: 5,500 Language-Learning Links and Programs for learning or teaching 150 languages
Shortcuts:Our Lists, Our Maps, LRC Staff Moodle Site,LRC Project Moodle Site, 49erexpress, UNCC Moodle, Student Recordings: s:claslcslrcsanakostudent
Learning usage samples: Sanako oral exam, Kaltura webcam presentation, Dictation with speech recognition, Sanako written exam, Chinese and Japanese interactive stroke-order practice
Test the Sanako Installer, Webbrowser Popup Konfigurator for XP, or Windows7, faster LRC TeacherPC Log-in Let MS facilitate diacritics writing by installing for you US-International keyboard layout
This is my personal blog (Google+). The views expressed on these pages are mine alone and not those of my employer. The information in this weblog is provided “AS IS” with no warranties, and confers no rights.
