Archive
Archive for the ‘e-learning’ Category
How to get rid of “Questions completed” feedback in Hot Potatoes quizzes
2013/12/20
Leave a comment
- If you dig into the JavaScript in the HTML, looking for the default feedback t4ext (“Questions completed so far”), you see (as I have done here manually; this could be relatively easily done also for an entire batch of course quizzes with a global replacement) that you turn this option off:
- var CompletedSoFar = ‘Questions completed so far: ‘;
- var ShowCompletedSoFar = false;
- But that does not get rid of the #/# being displayed.
- There is an option to get rid of the Feedback text:

- If I read the options correctly, there is no such setting (we tried the obvious suspects here):

-
function CheckQuestionsCompleted(){ // trp: trying to disable showing to student QuestionsCompleted // (entire function even if somebody changes the variable ShowCompletedSoFar) // if i understand correctly, what users really do not want to show // is a misleading completed correctly for completed // (which leads to students not know that they have finished?) - \ // is there no better way? // was: if (ShowCompletedSoFar == false )){return '';} // trp: cannot find a gui to set ShowCompletedSoFar to false var QsCompleted = 0; for (var QNum=0; QNum<State.length; QNum++){ if (State[QNum] != null){ if (State[QNum][0] >= 0){ QsCompleted++; } } } //Fixes for 6.2.2.2 if (QsCompleted >= QArray.length){ return ExerciseCompleted; } else{ return ''; // trp: CompletedSoFar + ' ' + QsCompleted + '/' + QArray.length + '.'; } } - Since you can edit the sourcefiles of a HotPotatoes installation, you can turn it also off for a machine permanently:
- If this variable is there in the underlying code, shouldn’t there be also an option in the GUI (not necessarily, maybe was never implemented – or maybe I just have not found it…).
- For what the output will look like, see here.


Categories: assessments, Authoring-tools, e-learning, sourcecode
hot-potatoes, javascript
How to change your button text in Hot Potatoes activities
2013/12/19
Leave a comment
- In Hot Potatoes, use the “options”/ “configure output”:

- Tab: “Buttons”:

- Save and regenerate the html file:

- Voilà:


Categories: assessments, e-learning
hot-potatoes, quizzes
Another way to upload many files into Moodle 2
2013/12/04
Leave a comment
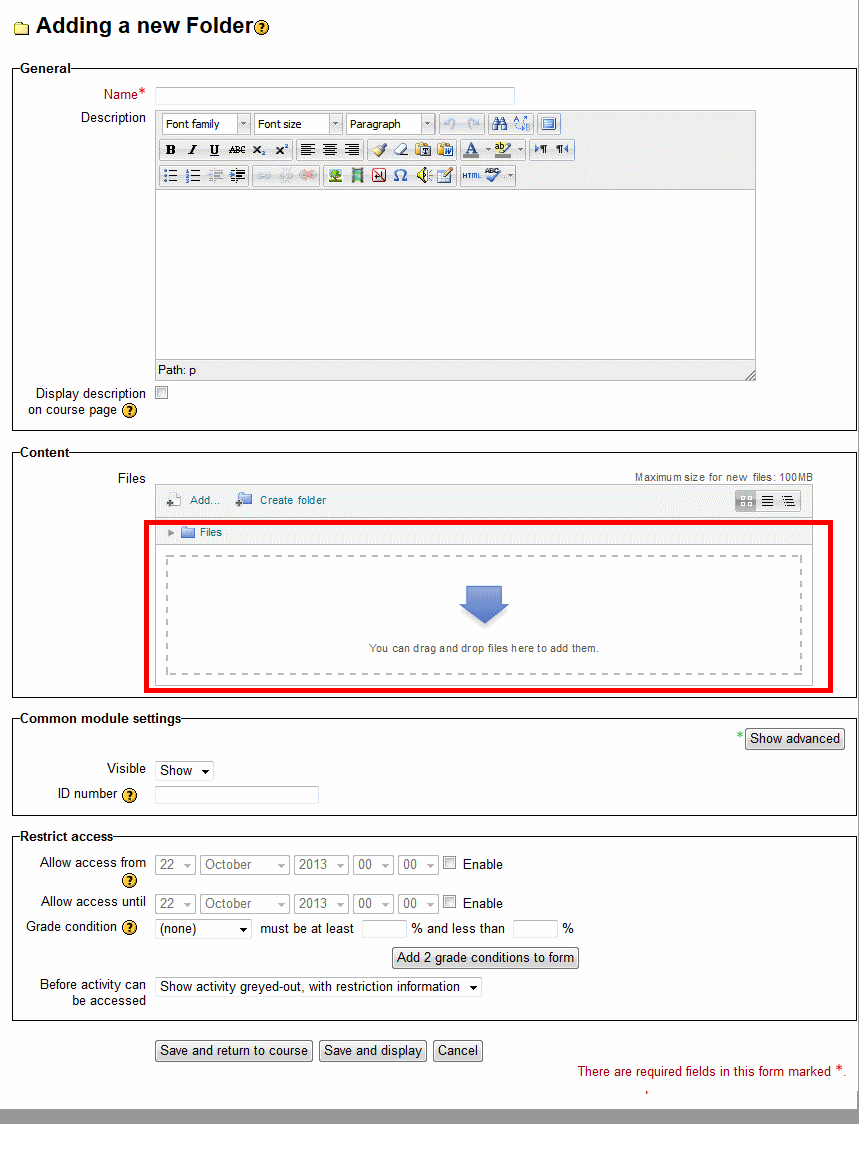
- Last time we started from “Add folder” to get to the handy drag-and-drop file upload control in Moodle 2.
- This time we do not want to create a new folder, but work within an existing folder (better for categorizing lots of files).
- Browse into the folder and click edit

- click create folder

- add name and click create

- click to open folder

- drag/drop files as zip in folder

- oops, check the upper right warning :

- Split your files into smaller segments

- And be patient, there is no visual indicator of progress, or any action, after the drop), or else you get duplicates:

- Just delete duplicates you might have created:


- click on each zip file and choose “unzip”:


- Delete the zip files (not needed anymore)

- Finally, click “save changes”
-

- Note, by working within a folder, you cannot link directly to the new folder you created. It should however be easy enough to navigate to it if you send the link to the root folder, here “Interaction”.


Categories: audience-is-teachers, e-learning, lms, training
files, folders, moodle
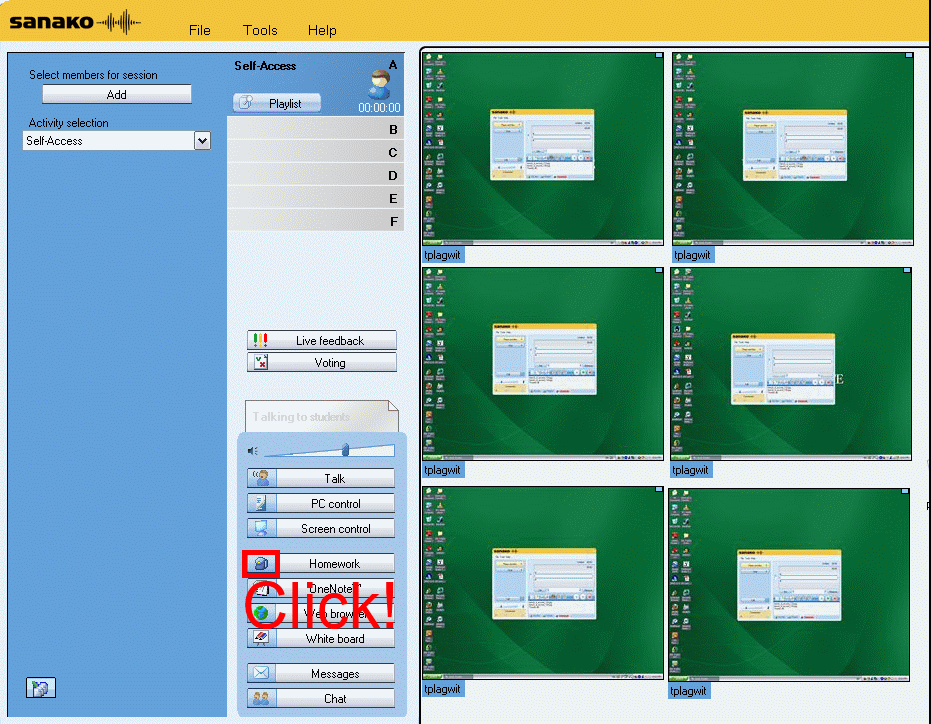
How teachers can collect any file from students’ computers with Sanako Study 1200 homework–the ultimate training…
2013/11/22
Leave a comment
How to control students’ access to internet and local apps with Sanako Study 1200
2013/11/18
Leave a comment


Straight from the documentation, straight under your fingertips in the tutor interface, and most useful during assessments, but also for individual students that won’t stay on task.
How to compare two MS-Word documents for plagiarism detection
2013/11/14
2 comments
- You could start with the document properties
- some students leave even the author and editing time in. However, author does not prove any wrong doing, a student may have borrowed a laptop, including its MS-word installation, to author a document and submit it
- It may actually be more of an indicator of something illicit if document properties are empty.
- Students have likely used the “Document inspector”:
- (1): File / (2) Info, (3) view the properties (this document looks like it had its privacy information removed), you can use (4) to view even more.

- to remove all privacy relevant information, like so: (5) unfold “check for issues”, (6) “inspect document””,
- in the window: “document inspector”, click
 , you will be given the option to “remove all”personal information:
- (1): File / (2) Info, (3) view the properties (this document looks like it had its privacy information removed), you can use (4) to view even more.
- However, removing personal information can be perfectly legitimate, unless something else was assigned. And it does not help plagiarizers cover their tracks anyway, for…
- …there is the more substantial “compare” documents feature which (even though it was developed for the legal profession, as blackline) tracks what really counts: content changes.
- Access it form the ribbon’s “review” tab:

- point the tool to your 2 documents:

- make your life easier by selecting on the “review” tab to view only content changes (formatting comparisons is noise for plagiarism detection):

- You get a handy (here blurred, but still demonstrating the amount of similarity (=black), compared with changes (= blue), between the 2 documents ) overview of (from the left)
- list of changes
- view of changes in a merged document (which you can save)
- original document
- secondary (likely plagiarized) document:

- The feature is nice, but only moderately intelligent (see the first match, I would obviously not count that as substantially different) and best used with discretion, to make it easier for a teacher to decide how likely it is that these similarities are accidental.
- In this instance, even if the teacher questions are not counted, it seems obvious that only minor alterations were made to the original document and many responses, including quite lengthy sentences, are entirely the same.
- While this *is* an instructional use, you can find happier instructional uses of MS-Word’s reviewing/tracking changes feature here.
- Access it form the ribbon’s “review” tab:


Categories: audience-is-teachers, e-learning, office-software, service-is-assessing, Writing
comparing, FAQs, MS-Word, plagiarism, reviewing, track-changes
How to upload a folder with many files in Moodle 2–the ultimate training
2013/10/22
Leave a comment
- …using animated .gifs. Different speed? 0.25sec,0.5sec, 0.75sec, 1sec, , 2sec, 3sec, 4sec, 5sec, 6sec, 7sec, 8sec, 9sec, 10sec. 1.5sec

- And the answer is: You now can simply drag-and-drop a zip file (provided you are using a recent web browser). Start with “Turn editing on”, “Add resource”, “Folder”, and then proceed like so:
- Easy enough, but you can still save time: If your folder is reusable not only between terms, but also teachers (sections etc.), I suggest doing this in our Moodle metacourses (once).
- If you want to use an existing instead of adding a new folder, a slightly different way to manage your multiple files upload in Moodle 2 is described here.
Categories: animated-GIFs, audience-is-teachers, e-learning, lms, training
files, folders, moodle
How teachers can ease their editing pain by turning on "filters" in Moodle
2013/10/17
Leave a comment
- A teacher called my attention to the filters when she reported that the automatic linking of references to chapter/topic activities in the chapter/topic text stopped working for her with the upgrade to Moodle 2. If you change the below setting for "Activity names auto-linking", it will start working again:
-

-
A "filter" in Moodle (if turned on) examines what is being add to your course by you (also by your students: That’s at least what I assume the Word censorship” filters is meant for!) and if it finds a certain pattern/feature, “automagically” enhances or adorns your input. This can save you a lot of manual editing time .
-
You can view and change the filter settings by clicking on "filters" in Activities:
-

-
There is a campus default – which, to judge from my course, seems to be this:
-

-
The teacher of the individual course can override this default (there seems to be no personalization that would allow you to use the same settings for all courses you teach, within and across terms):
-
The documentation linked on the filter settings page explains what these filters do. I only quote the filters which I think are of interest to language and humanities:
-
“Activity names auto-linking – This scans text for activity titles that exist in the same course and creates a link
-
Convert URLs into links – This filter converts URLs in selected formats, such as Moodle auto-format, to click-able links
-
Database auto-linking – As the name suggests, this filter enables automatic linking of Database module entries
-
Display emoticons as images – This converts emoticon (smiley) characters into images
-
Glossary auto-linking – This scans text for glossary entries that exist in the same course and creates a link
-
Multimedia plugins – This finds a link in text that points to a multimedia resource and replaces the link with an appropriate multimedia player code which can play the resource.”
-
[This one we do not seem to have installed, unfortunately:] Multi-language content – This filter enables resources to be created in multiple languages.
-
[These ones are not included in the documentation linked on the filter settings page, since these plugins are specific to our campus installation, but extremely useful for authentic speaking proficiency assignments: ] NanoGong, Kaltura.
-
-
For what it is worth, here are the filter settings that I am testing now in my course:
-


Questions? Read the About. Or just ask me a quick Our Databases: Resources with calendars -- Language learning material Moodle Sites, multimedia files -- films


FAQs for LRC student staff or for students or for teachers. To search our FAQs, in the browser addressbar, add after "https://plagwitz.wordpress.com/feed/?tag=faqs+/" "+TAG1" (from tag cloud below) OR "https://plagwitz.wordpress.com/feed/tag=faqs
&category_name=" "CAT1" (from category hierarchy below). OR search both categories and tags, and multiple TAGs/CATs (connect with "," for OR-search, with "+" for AND-search), like so: https://plagwitz.wordpress.com/feed/?tag=TAG1+TAG2+...TAGn&category_name=CAT1
+CAT2+...CATn"
Other ways to find help
If you cannot find it here, look there: 5,500 Language-Learning Links and Programs for learning or teaching 150 languages
Shortcuts:Our Lists, Our Maps, LRC Staff Moodle Site,LRC Project Moodle Site, 49erexpress, UNCC Moodle, Student Recordings: s:claslcslrcsanakostudent
Learning usage samples: Sanako oral exam, Kaltura webcam presentation, Dictation with speech recognition, Sanako written exam, Chinese and Japanese interactive stroke-order practice
Test the Sanako Installer, Webbrowser Popup Konfigurator for XP, or Windows7, faster LRC TeacherPC Log-in Let MS facilitate diacritics writing by installing for you US-International keyboard layout
This is my personal blog (Google+). The views expressed on these pages are mine alone and not those of my employer. The information in this weblog is provided “AS IS” with no warranties, and confers no rights.
