Archive
Multi-monitor setup on teacher podium in the LRC main classroom
- Like most modern computer workplaces, the LRC main classroom teacher podium needs multiple monitors, if you want to truly take advantage of gathering up to 28 students at 28 multimedia-enabled, networked computers which, thanks to classroom management systems like NetOp School and Sanako Study1200, can be remote controlled by the teacher.
- That’s why we built a simple extension on the teacher podium to connect a 2nd screen and more than double (resolution-wise) your on-screen teaching space.


- Note: MS-Windows is set to “extend my screen onto this monitor”, except “maximized” windows still only maximize across 1 of 2 screens. De-”maximize” a window to be able to drag a window from one screen to the other (e.g. to prepare it on the teacher screen and then display it on the classroom projector) or to span a window across both monitors (note that, while this could be very useful to display larger thumbnails of more students computer screens, the Sanako Study1200 apparently cannot be spanned across two monitors. I yet have to test whether the Mosaic/separate thumbnail window can, but even if, this one lacks the feature of being able to take advantage of the great class overview by jumping to where teacher assistance is needed).
- The left monitor is monitor 1 for Windows and being projected to the classroom. The right monitor, monitor 2 for Windows, is your staging area and control room.
- Note, however, that both NetOp School and Sanako Study 1200, normally housed in the control room, are able to project the right monitor: onto (some or all of) the student’s computer screens. While I prefer not to hog the students computers for extended periods of time (effectively “dumbing down” computers to TV screens), this feature can give you more flexibility:
- E.g. during a recent workshop on the Sanako Study, with the Sanako feature “Teacher screen to students”, I could demonstrate live operation of the Study 1200 software on my right monitor to participants’ computer screens while being able to keep up the PowerPoint overview slide show onto the classroom screen (after setting up my PowerPoint slideshow to display on the secondary screen).
- Note that, even though multicast is being used for projection, only still images, including PowerPoint Slides, and, to some extend, computer screen video can be projected in high resolution over the network at reasonable speeds. The Sanako Study 1200, Version 5 also allows for an extremely low resolution video projection to students. For high resolution video streaming, you need the add-on module Sanako Video Live, which comes with its own streaming server hardware.


Computer Lab Imaging with Ghost Console and Deepfreeze Console
0. As of Winter 2011 Novell – AD and Deepfreeze 7 upgrade, flagged for updating: TBA.
1. DEEPFREEZE console
1.1. Unfreeze the image source client
2. Client PREPARE THE IMAGE
2.1. Login as labadmin,
2.1.1.NAL [tba], labtools, icon Microsoft Update (be sure to use icon in launcher it will disable policies that won’t allow it otherwise use windowsupdate.com
2.1.2 Remove the machine from the domain: My Computer / System Properties / Computer Name / Button: Change / Member of: Workgroup: LRC (if it asks for a user/pwd, leave both blank and click OK), restart as prompted using Ghost Console / Add to workgroup
2.2. Login as ITSadmin (work station only)
2.2.1.Create user testuser (Administrator), will be based on past default user template
2.3. Log in as testuser
2.3.1.Document what you are doing by running c:\temp\labscreencastfullhighaudio.wme / menu button: start encoding / when done, menu button: stop encoding, rename output file to not overwrite existing output,
2.3.2.Make changes ß centre_image_request_list_allda
2.3.2.1 if software installs complain about missing H: (home) drive, plug in a thumbdrive and change its driveletter to H:

2.3.3.Clean before making testuser default user:
2.3.3.1. control / internet options / clean history and temp files
2.3.3.2. recycling bin: empty
2.3.3.3. right-click start button: / menu item:properties / button:customize / tab:general / button:clear list + tab:advanced: clear list
2.3.3.4. C: / properties /disk cleanup, all, except: “Compress old files”, “cached installers”, “Office setup files”
2.3.3.5 Firefox: menu: tools / clear recent history / time range: “everything”/ check everything and click button “clear now:” 
2.4. Log in as itsadmin
2.4.1.Document what you are doing by running c:\temp\labscreencastfullhighaudio.wme / start encoding / rename to not overwrite existing output,
2.4.2.Manage testuser – default user transition
2.4.2.1. USERS
2.4.2.1.1. Make testuser default user:
2.4.2.1.1.1. Unhide: explorer / tools / folder options / tab:view / show hidden files and folder, unhide protected operating system files
2.4.2.1.1.1.1. make a backup of old documents and settings/default user (entire directory, not only ntuser.dat): zip onto thumbdrive with date/version number )
2.4.2.1.1.2. xp copy profile windowskey+pause/break /tab:advanced / section:user profiles / button:settings, select the profile [you cannot copy the active profile, so log in as itsadmin], button: copy to, new window: copy to, section:copy profile to, button:browse, select c:\documents and settings\default user, button:ok
2.4.2.1.1.3. [not even the ntuser.dat seems necessary, since even the ntuser.dat gets updated by copy profile] c:\document and settings\testuser\ntuser.dat [+dolater:subfolders?]: back up ntuser.dat to ntuser.old, then copy into default user
2.4.2.1.1.4.Re-hide: explorer / tools / folder options / tab:view / do not show hidden files and folder, hide protected operating system files
2.4.2.1.2. Remove other accounts:
2.4.2.1.2.1. system / advanced / user profiles / clean profiles: delete all accounts except default user (it if shows) and itsadmin
2.4.2.1.2.2. administrative tools / computer management / treenode:local users and groups management / delete non built-in users and non-administrative users
2.4.3.Uninstall deepfreeze (by re-running the installer from unccapps/installs / df#wks.exe) (this will restart the computer; log in again as itsadmin)
2.4.4.delete c:\nalcache
2.4.5.backup the c:\temp \*.wmv screencasts onto a thumbdrive
2.4.6.do this as last step: run c:\windows\system32\trend\ImgSetup.exe, which gives a message: “this program has been configured to start whenever the system is restarted.”
2.4.7.if sysprep required (deploying to non-uniform hardware, e.g. dell optiplex 760 vs 780), run
2.4.8.Reboot to login screen
3. Ghost console configuration
3.1. Ghost console: upload/backup and download/deploy/clone the image
3.1.1. configuration resources / images / right-click: new / image pointing to a file with the NAME that includes today’s date in the format MMDDYY
3.1.2 task: “CAPTURE IMAGE” (not run): open
3.1.1.1. ISource machine: set to machine you have created the image on
3.1.1.2. Image: set to config resource that you have just created
3.1.1.3. [IF NOT CHECKED]check tab:general /checkbox: Remove machine from Domain before taking an image. You must remove the computer from its domain if you are going to roll out the image file to a number of computers. [except if using sysprep].
3.1.1.4 button: save, button:execute

4. DEEPFREEZE console
4.1. UNFREEZE ALL CLIENTS [LRC must be closed]
5. Ghost console configuration
5.1. Deploy task:
5.1.1.“DEPLOY IMAGE TEST”:
5.1.1.1. [ITEM IS ONLY FYI]tab:general / check: clone, but uncheck: configuration [tba: NOT unchecked now?] , refresh configuration, refresh inventory [tba: why?]
5.1.1.2. [ITEM IS ONLY FYI]tab: clone: check “use Ghost walker to perform a sid change”
5.1.2.configuration task “ADD TO DOMAIN”
5.1.2.1. [ITEM IS ONLY FYI] Alternative individually: ghost console / default configuration / right click computer / properties/ configuration / edit default configuration / tree: workgroup/domain membership
5.1.2.2. [ITEM IS ONLY FYI]alternative via batch configuration template: task “Add to AD group” to add to AD [for lcs? Is this why we do this separately from the domain?]: tab:general, check configuration , target machine group: browse for your default group / coed434, tab;configuration: browse for “add machines to ad” – based on template “add machines to ad”, check allow template settings, tree: workgroup/domain membership / check apply member of , check uncheck computer name which is already set, no description , workgroup/domain: its.uncc.edu, container:unccharlotte / labs / clas / lcs / workstations, uncheck: Move computers that are currently in a container.
6. Ghost console: TEST DEPLOY/ADD AD with 2 computers:
6.1. Test: template task: download/deploy to 2 clients
6.2. Test: on client:
6.2.1.Are clients joined to domain [cannot log in with domain account if not; global test: tba]
6.2.2.logging in (creating profiles based on default user) as staff and labstudent: language & translation apps coming up?
7. Ghost console : PRODUCTION DEPLOY/ADD AD
7.1. checks: are you deploying the right image? Are all computers turned on? Cancelling a Ghost deploy task is a pain, if it does not reboot to the login screen, run a token task like deepfreeze-boot-unfrozen
7.2. Clone/Download, Add to Domain/AD
7.3. Test the clients are joined to domain
7.3.1.For all: ghost console / default configuration / right click computer / properties/ configuration
8. Clients
8.1. Login as labadmin staff account (domain account ß uncheck “workstation only”, to freeze with this default)
8.2. DEEPFREEZE: install from novell-delivered application, from Ghost console: deepfreeze7-install, reboot to frozen install: from Ghost console:deepfreeze7-bootfrozen
9. DEEPFREEZE console
9.1. Test the clients are frozen (exclamation point denotes "not sure")
9.2 Add your scheduled maintenance window, again, to avoid domain trust issues .
Blackboard: Content System: Ancillary digital textbook material reuse (publish to course participants, roll-over between terms)
If you have a well administered language program, your admin should have uploaded all digital (text, audio, textbook and table of contents) materials that come with your textbook for convenient reuse between sections and terms into the Blackboard content system.
As a Blackboard course administrator, you can easily give all course participants access in 1 step (as course administrator, you can also access the audio materials during classes from the Blackboard content system directly).
Here is a video recording of a real-world walkthrough of this process – voice-over is in German, but Blackboard interface is in English: blackboard-content-system-finding-adding-existing-content-item-to-course-access-play.wmv
|
Start Time |
Topic |
|
0,0 |
overview of teaching and learning procedure |
|
0,1 |
course add item / content collection link |
|
1,30 |
how to search for content. Remember: Search is your friend, if you have a consistent metadata system for your content (start with meaningful file names): |
|
3,15 |
hot to add permissions for other users |
|
5,3 |
add to course for for students |
|
5,4 |
listen to an example audio from course |
Once you have given course participants access to the audio materials, and you teach the course again next term, it is even easier to roll over the access: Just use the Copy link in the Blackboard Control Panel.
Language Lab Web Portal, University of Michigan – Dearborn
For lack of even an LMS – which in post-secondary language lab environments in the US in the “noughties” commonly has had to double as CMS and Groupware -, the lab web portal in the post title had to fulfill many functions.
While the technically most advanced features probably was full text search against both database and file system (uploaded documents) – which I could relatively easily implement thanks to MS-SQL-Server and a limited number of database tables –, I liked best the collaborative building of a bank of language learning exercises using authentic materials, i.e. interactive websites from the target culture.
A few sample illustrations of the use in both language lab and affiliated computerized classrooms you can see here:


The list below links to a series screencasts of the Language Lab Web Portal that I made for training and demonstration purposes. They show the language lab web portal software in action:


Video Library: Scheduling for Reserve Desk and Viewings
Lab staff instruction for editing the video-reserves spreadsheet H:\LLC\scheduling\video-reserves&mh441b-showing\video-reserves.xls:
- Lab supervisors build the spreadsheet for the reserve desk and viewing: video-reserves-reservedonthisday-unfold-schedule-viewing.wmv, video-reserves-viewing-selecting-timeslots&venues.wmv
- Lab assistants read the spreadsheet and handle the actual media (i.e. update the reserve desk and show the videos): video-reserves-reservedonthisday-filter-viewing-or-reserve.wmv
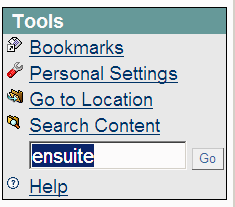
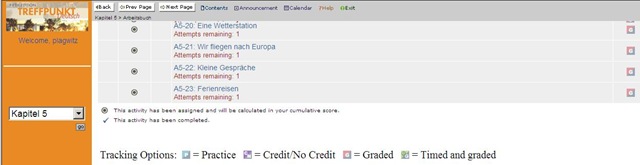
Quia Online Exercises
Here are examples from the Treffpunkt Deutsch Quia Website. Quia Treffpunkt Deutsch is organized in chapters which you can select from the dropdown navigation control on the left. As you see on the following page, each chapter contains 3 different types of exercises, organized in sections.

If you click on a section header, you will see a list of exercises:
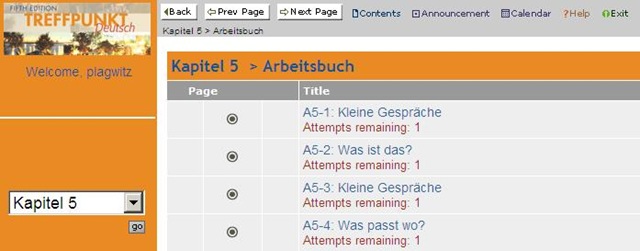
Here is an example of an exercise, assigned as “A[rbeitsbuch=work book], K[apitel=chapter]9: A9[=chapter-number, again]-1[=exercise-number]”.
The letters and numbers from the assignment repeat in the exercise, see this screenshot:
 \
\
You can also hover your mouse over the info button in the upper left corner to get a summary of this information: 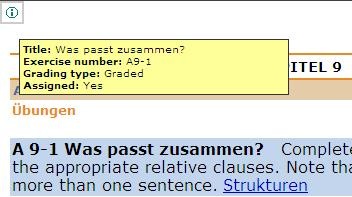
Also note the link to the corresponding preparatory web page which opens in a new window (Problems getting the window to open? the popup-blocker of your web browser may be the root? instead of simply clicking on the link, try CTRL-clicking, on the link as well as the browser information bar, if it comes up). It is crucial to read/review the corresponding preparatory web page first.
It is not necessary to get everything 100% correct. It is not even a good use of your time to redo the exercise until you get everything 100% correct. Especially if you try speeding up this tedious task by doing the first round mechanically to get at the automated feedback answers, then doing the second round mechanically by pasting them in. That is why I have my Quia course “Options” set to “Calculate cumulative scores based on students’ first attempt” and to “Ignore student results after the 1st attempt”.
Therefore, you will see that you have only 1 “Attempt remaining” for each exercise. You will also, unless individually told otherwise, only have to do the exercises that are “Assigned” (consult legend at bottom of page).
Rather use the valuable error feedback to go back to the Structures and try to learn and bring any remaining questions to class – it is highly likely that fellow students have the same problems, especially if they have the same native tongue. That is also the reason why I review your submission before class – not to mark you down, but to see from your problems help what to spend valuable class time one.

Also, the exercises are integrated into the progression of the course (including your ability to do partner work with others during class meetings). That is why you will not be able to submit exercises long after when they were due:

For reviewing, we will use other materials.
Finally, consult the Help which is linked in the top menu:
![]()
Blackboard: Rolling over courses between terms
In your old course, go to CONTROL PANEL > COURSE COPY”.
Choose: “Copy Course Materials into an Existing Course” (assuming your new course shell has been created for you by your IT admin).
Click button:“Browse” and in the opening window, choose your existing current course, by the term identifier:
Check all items you want to copy. What is safest to avoid errors? Everything, except enrollments?
Click “Submit”/“OK” until done.
The course copy operation will be queued up, and you will be notified when the operation is finished.
Then go to your new course. This operation also copied the content items, including the content management system items.


Questions? Read the About. Or just ask me a quick Our Databases: Resources with calendars -- Language learning material Moodle Sites, multimedia files -- films


FAQs for LRC student staff or for students or for teachers. To search our FAQs, in the browser addressbar, add after "https://plagwitz.wordpress.com/feed/?tag=faqs+/" "+TAG1" (from tag cloud below) OR "https://plagwitz.wordpress.com/feed/tag=faqs
&category_name=" "CAT1" (from category hierarchy below). OR search both categories and tags, and multiple TAGs/CATs (connect with "," for OR-search, with "+" for AND-search), like so: https://plagwitz.wordpress.com/feed/?tag=TAG1+TAG2+...TAGn&category_name=CAT1
+CAT2+...CATn"
Other ways to find help
If you cannot find it here, look there: 5,500 Language-Learning Links and Programs for learning or teaching 150 languages
Shortcuts:Our Lists, Our Maps, LRC Staff Moodle Site,LRC Project Moodle Site, 49erexpress, UNCC Moodle, Student Recordings: s:claslcslrcsanakostudent
Learning usage samples: Sanako oral exam, Kaltura webcam presentation, Dictation with speech recognition, Sanako written exam, Chinese and Japanese interactive stroke-order practice
Test the Sanako Installer, Webbrowser Popup Konfigurator for XP, or Windows7, faster LRC TeacherPC Log-in Let MS facilitate diacritics writing by installing for you US-International keyboard layout
This is my personal blog (Google+). The views expressed on these pages are mine alone and not those of my employer. The information in this weblog is provided “AS IS” with no warranties, and confers no rights.
