Archive
eRepository: How to manage multimedia learning materials? Maybe with ShareStream
Target language audio and video materials – as well as other textual, multimedia and/or interactive materials – are crucial assets (and should become “reusable learning objects”) in learning centers – how best to manage them?
I have worked for a number of HE institutions, up to the very recent past, that charge their students between $30.000 and $40.000 per year, while their learning materials handling in the learning center consisted of what DVDs and VCR tapes fit into a shoe carton, for a lab assistant to frantically browse through when faced with a learner or teacher request for materials. Not to mention teachers spending inordinate amounts of time scanning stacks of make-believe VCR and DVD “libraries” in the learning center.
I have blogged here before about various solutions that attempt to remedy this: from home-baked stop-gap measures to the introduction of eRepository offerings for digital asset management.
If you are familiar with these issues, you will understand that I am eagerly looking for better help with managing multimedia learning materials. ShareStream claims to provide a turnkey solution addressing these needs. Its architecture – according to the Tulane pilot – consists of a ShareStream server which serves as eRepository and metadata catalogue, a streaming server, and an encoding server (for lecture-capture: YAT (“yet another tag”)). ShareStream also integrates with the Blackboard LMS.
Have a look at the demo of the pilot at Georgetown University which they gave during MAALLT 2010 and which they now also offer workshops on. One interesting thing I figured out during the question period is that they avoid breaking the Digital Millennium Act when digitizing copy-protected DVD materials by capturing to digital only the analog AV output of a DVD – a reminder that a reform of copyright is sorely needed.
Blackboard: Content System: Ancillary digital textbook material reuse (publish to course participants, roll-over between terms)
If you have a well administered language program, your admin should have uploaded all digital (text, audio, textbook and table of contents) materials that come with your textbook for convenient reuse between sections and terms into the Blackboard content system.
As a Blackboard course administrator, you can easily give all course participants access in 1 step (as course administrator, you can also access the audio materials during classes from the Blackboard content system directly).
Here is a video recording of a real-world walkthrough of this process – voice-over is in German, but Blackboard interface is in English: blackboard-content-system-finding-adding-existing-content-item-to-course-access-play.wmv
|
Start Time |
Topic |
|
0,0 |
overview of teaching and learning procedure |
|
0,1 |
course add item / content collection link |
|
1,30 |
how to search for content. Remember: Search is your friend, if you have a consistent metadata system for your content (start with meaningful file names): |
|
3,15 |
hot to add permissions for other users |
|
5,3 |
add to course for for students |
|
5,4 |
listen to an example audio from course |
Once you have given course participants access to the audio materials, and you teach the course again next term, it is even easier to roll over the access: Just use the Copy link in the Blackboard Control Panel.
Face-to-face and beyond: Smart-board with digitized textbooks and classroom protocols, using MS_Remote Desktop, MS_Zoomit, wireless keyboard, network shares and the Blackboard: Content System
- This post strings together some already supported or freely available technologies for an effortless way to integrate technology into teaching and learning.
- I had lab assistants scan my textbook. I stored the scans on the teacher-only network share.
- In the classroom, I connect to my office computer with mstsc.
- you may have to change screen resolution in mstsc. You can save your connection settings on the teacher network share.
- To save precious class contact time, on my office computer, I have already opened and prepared the class outline and relevant textbook scan pages with the default windows viewer.
- Using zoomit, I can mark on the textbook scan pages for my students, and save the resulting pages, later easily (drag and drop all pages at once) store them in the content system or my students to review my notes.
- you may want to adjust the font size in zoomit options.
- this technique may also help with fading out document cameras which may, among other things, help with finding enough space to put.
How a teacher grades a Blackboard audio recording assignment
- Switch to interactive view, if your vertical scrollbar does not show up, and thus the assignment column is hidden (or reduce the font size in Firefox, e.g. by holding CTRL and rolling the mouse scroll wheel):

- Once you see the assignment column, you can either download all submissions as a zip file, open it with the built-in zip tools in Windows (XP or newer). This is especially practical if you want to then select all recordings and drag and drop them into an audacity window, for doing easy to comparative grading of student submissions, as described earlier.
- To grade,
- you still need to click next to the green exclamation marks which indicate where there is an assignment to be graded,
![clip_image002[5]](https://thomasplagwitz.com/wp-content/uploads/2016/03/clip_image0025_thumb.gif?w=569&h=465 "clip_image002[5]")
- on the arrow keys which unfold a menu.
![clip_image002[7]](https://thomasplagwitz.com/wp-content/uploads/2016/03/clip_image0027_thumb.gif?w=593&h=483 "clip_image002[7]")
- you still need to click next to the green exclamation marks which indicate where there is an assignment to be graded,
- This gets you to the grade details:

- You can also listen to the student recording submission by clicking on the file linked behind “users; file”.
![clip_image002[5]](https://thomasplagwitz.com/wp-content/uploads/2016/03/clip_image0025_thumb.jpg?w=600&h=488 "clip_image002[5]")
- Fill out your grade comments and grade.
- Instead of doing (only) written comments, you could also oral feedback grade the student recording, and re-upload this new recording.
- Finish by clicking button:”submit”.
- Next in series: How the student reviews a grade Blackboard audio recording assignments: TBA
- First in Series: A better way to do student homework audio recordings in the Sanako LAB 300, using Blackboard:Assignment.

![clip_image002[5]](https://thomasplagwitz.com/wp-content/uploads/2016/03/clip_image0025.gif "clip_image002[5]")
![clip_image002[7]](https://thomasplagwitz.com/wp-content/uploads/2016/03/clip_image0027.gif "clip_image002[7]")

![clip_image002[5]](https://thomasplagwitz.com/wp-content/uploads/2016/03/clip_image0025.jpg "clip_image002[5]")
How a student submits a Blackboard model imitation audio recording assignments
- Access the assignment in the location of your Blackboard course that your instructor pointed you to.
- Download the model audio recording attached to the assignment to your desktop (if any).
- Right-click on the downloaded file, choose open with (something else but the Sanako Duo which you will use to record).
- Play and listen to the model.
- Imitate the model, recording yourself using the previous instruction, using pause/play as needed.
- Upload the recording into the Blackboard assignment by clicking “browse to local file” [i.e. where you saved your recording].
- Click “submit”. If you get an error “Not a valid file’, try using another web browser to open the assignment and submit the file.
- Next steps: see How the teacher grades a Blackboard audio recording assignments
- First in series: A better way to do student homework audio recordings in the Sanako LAB 300, using Blackboard:Assignment
LLC Catalogue: Video-Reserves.xlsm, Reserve desk, Schedule, using Blackboard Content System WebDAV
For a LLC video schedule, we came up with the following repurposing of existing infrastructure:
- MS-Excel: still the “Swiss army knife” of choice for the middle manager. Allows for: semi-automatic creation of reserve date sequences (insert series), given a start and end date; data validation during data entry, and, based on that, sorting and filtering and, based on that, finding.
- Blackboard Content management system (WebDAV) to manage reading and writing (editing) permissions.

- Staff can use MS-Excel to request videos – preferably at start of term – to be put on reserve within a start and end date, during which they will be periodically shown, by opening the spreadsheet from MS-Excel and filling in the green cells in the first empty row at the bottom.

- Lab Staff can use MS-Excel to periodically transfer video reserve requests into video showings.
- Lab Assistants can use MS-Excel to daily maintain video reserve desk and video showings.
- Students can use a web browser to preview video showing times during the remainder of the term.
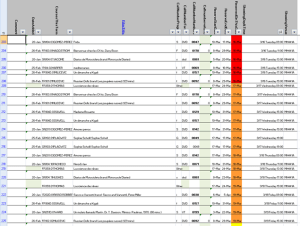
- To open the video schedule for read-only, Loyola students and staff can simply click this link in their browser: https://blackboard.loyola.edu/bbcswebdav/users/trplagwitz/llc-pfiles/video/video-reserves.xslm. Even read-only access includes the capability to search, sort and filter the schedule data, but you cannot save back.
- To open the video schedule for editing, LLC and Modern Languages staff can start MS-Excel, click menu: File / Open, and copy/paste this link: https://blackboard.loyola.edu/bbcswebdav/users/trplagwitz/llc-pfiles/video/video-reserves.xslm, then click open.
- All users will have to authenticate with their institutional account info:


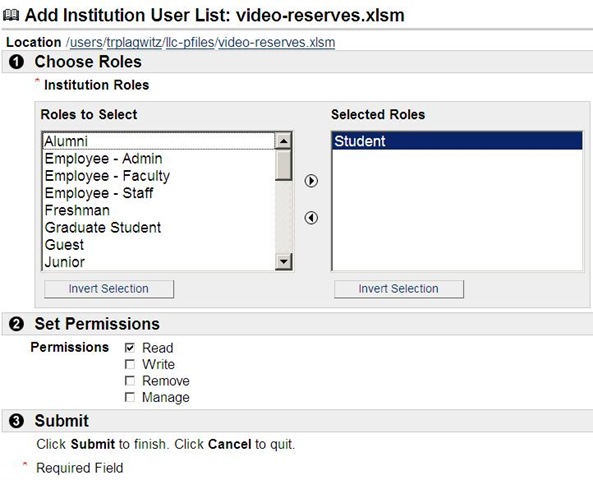
Blackboard: Content System: Permissions, Roles and Gotchas
- The “Course user list“ refers to courses.
- The “Organization user list” refers to departmental groups. The subdivision is meaning list for our department.
- The “Institution user list” adds the most global group level.

- Finally, you can make files available to the “Public”. Note, however, that this seems to effectively bypass the more fine-grained permission checks. E.G. if you give read access to the public, users who open your files will not receive an authentication challenge, so if you try to give some of the users write access to your files, that will not trickle through. Workaround: Do not use “public”.


Questions? Read the About. Or just ask me a quick Our Databases: Resources with calendars -- Language learning material Moodle Sites, multimedia files -- films


FAQs for LRC student staff or for students or for teachers. To search our FAQs, in the browser addressbar, add after "https://plagwitz.wordpress.com/feed/?tag=faqs+/" "+TAG1" (from tag cloud below) OR "https://plagwitz.wordpress.com/feed/tag=faqs
&category_name=" "CAT1" (from category hierarchy below). OR search both categories and tags, and multiple TAGs/CATs (connect with "," for OR-search, with "+" for AND-search), like so: https://plagwitz.wordpress.com/feed/?tag=TAG1+TAG2+...TAGn&category_name=CAT1
+CAT2+...CATn"
Other ways to find help
If you cannot find it here, look there: 5,500 Language-Learning Links and Programs for learning or teaching 150 languages
Shortcuts:Our Lists, Our Maps, LRC Staff Moodle Site,LRC Project Moodle Site, 49erexpress, UNCC Moodle, Student Recordings: s:claslcslrcsanakostudent
Learning usage samples: Sanako oral exam, Kaltura webcam presentation, Dictation with speech recognition, Sanako written exam, Chinese and Japanese interactive stroke-order practice
Test the Sanako Installer, Webbrowser Popup Konfigurator for XP, or Windows7, faster LRC TeacherPC Log-in Let MS facilitate diacritics writing by installing for you US-International keyboard layout
This is my personal blog (Google+). The views expressed on these pages are mine alone and not those of my employer. The information in this weblog is provided “AS IS” with no warranties, and confers no rights.
