Archive
Protected: How to conduct an easy oral exam with Sanako1200 (Model imitation/Question Response) – Part II: Implementation/instruction of examined students
A better way to do student homework audio recordings in the Sanako LAB 300, using Blackboard:Assignment
-
More robust than the more common way using the default network shares of a Sanako Lab 300 – to my knowledge, up to this day Sanako Labs lack any integration with the LMS/VLE regarding the upload of student output – is using the assignment tool of the VLE which provides integration with the Student Information System and an entire infrastructure for assessment purposes (gradebook and beyond).
-
I know that some teachers use Blackboard email with attachments for assignments, others the blackboard drop-box. Some, including me, use the assignment tool which, since it appears to be far superior to the older tools, this post would like to advertise.
-
The assignment tool automatically creates a grade center column.
-
You can batch download student file submission (papers or recordings) and blackboard assignment tool puts the assignment name and the username in the file name for easier management,
-
and you can upload a graded version to return assignments to the student and include comments.
-
You can also create comments for the instructors only to view.
-
Faculty can also use track changes and insert more fine-grained comments and corrections within MS-Word.
-
-
Here are the parts of this series:
-
How the student reviews a grade Blackboard audio recording assignments: TBA.
Sanako Lab300 Oral-exam-question-response-recording-cycle
A 6-minute screen-cast explaining the sanako-lab300-oral-exam-question-response-recording-cycle.wmv
Please consult the transcript for a table of contents:
|
0,00 |
Here we are administering an oral exam. we are going to play pre-recorded teacher-questions to multiple students, we are going to record their responses and, at the end, we are going to collect their recordings in a batch: |
|
0,12 |
for this, we have all seats where a student is present added to group a, and have set the program source for group a to media file |
|
0,22 |
we monitor the situation on the student computers by accessing menu: other / thumbnail of group, |
|
the screen sharing is slow here, has been improved somewhat by installing more memory, the crowded screen situation has also been improved by installing a secondary monitor, use it for viewing the thumbnail window |
|
|
0,59 |
in the group a pane, we use the button: duo launch, and ok the dialogue, to open th estudent recorder on the student computers |
|
1,07 |
in the section:media source, button: file open, we access our pre-recorded question file |
|
1,13 |
in the meantime, the duo has launched on the student computers – as you can see in the classroom layout from the squares on the student seats, as well as on the mosaic thumbnail screens |
|
1,35 |
we double-click on a single thumbnail to demo to the students on the screen projector how to adjust the volume |
|
1,43 |
we click button:transfer to play the volume test file to the students |
|
we have the students record their name at the end of the sound test, to check all recorders, and to be able to identify the speaker in the actual exam file (which will be saved with only the student number in lab 300) |
|
|
we stop the button:transfer and go to menu:test:response recording |
|
|
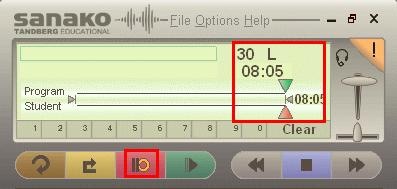
in the pane:”response recording”, in section:”collect”, we click button:”start” |
|
|
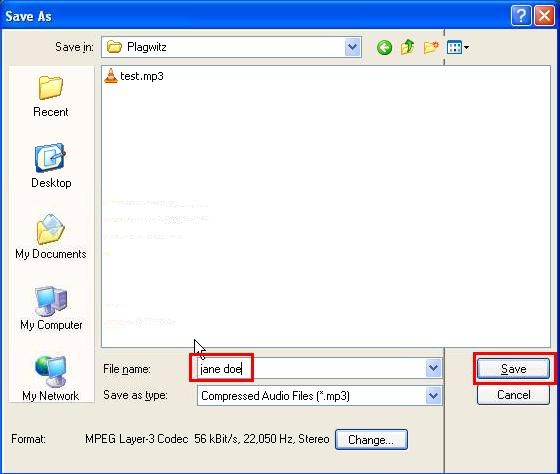
we save the recording in a subdirectory with a meaningful name of our choice |
|
|
we ok the dialogue that informs us of the response recording |
|
|
in the window:mosaic, the encoding activity window briefly flashes on the student screens |
|
|
we browse to the student collect folder, where all subdirectories are saved |
|
|
we check the folder visibly for the right number (use select all), size or duration of audio files – |
|
|
it would be even safer, even though more time consuming, to open all the test recordings with audacity, especially on a slow computer, and check the volume graph – open audacity and drag and drop all files onto it |
|
|
4,07 |
the soundtest is a complete recording cycle. Simply repeat for the actual exam, but |
|
first close the pane:response recording, to go back to your pane:group, |
|
|
in section:program transfer, click button:group control, click icon:file/new, to flush the prior test out of the student recorders, |
|
|
in the dialogue:”save changes”, click no |
|
|
and this time load the actual exam audio file |
|
|
once the sound check is done, we could use button:lock for the students to prevent them from interfering with the computers during the exam |
Create a PowerPoint slide with a timer from template for a timed audio recording exercise
If you require an audio recording exercise, where you allot to students a longer period of time for a free-form response, possibly to a visual cue, here is a demo screencast, based on the teacher.pot powerpoint template collection: powerpoint-timer-slide.wmv.
How Teachers grade Student recordings from the Sanako Lab 300
-
Teacher on their office PC (MAC users talk to OTS at loyola.edu) can press
 windows-key+e, and in the window, that opens,
 -
browse to the student mp3 recordings in the “studentcollect” folder or in “their” folder on S:\[put teacher name here] (no S: drive on office PC? read the “Shortcuts” section on http://plagwitz1.spaces.live.com, right hand side, under my portrait),
-
open the student recording file, either by doubleclicking to, presumably, open it in Windows Media Player, or, preferably, by selecting multiple files, right-clicking and chosing “Open with” to open them for comparative grading in Audacity).

How students make audio recordings using Sanako Lab300 Media Assistant


Conference Interpreting Videos on Intranet
On campus, students can click  , click
  , paste “\\lgu.ac.uk\lgu$\multimedia student\mmedia\mmedia1\language_services\teaching_materials\online_resources.xls”, click
  . Click a cell with a hyperlinked video to play the video in Windows Media Player.
In Windows Media Player, you can access (right-click on top window frame if menus are hidden) the menu: “File”/”Save” to save the video on a flash memory drive and take if off campus. You can play back the videos on MS-Windows and MAC computers (you may first have to install the support for the Windows Media Video format on the MAC from Microsoft). More help.
Interpreting Suite: How to avoid audio feedback
- symptom: loud squealing noise over the classroom speakers
- context: left lectern microphone is turned on; Creston / main room /
[Elmo room] camera is chose (e.g. to display the speaker on the projector; may also be chosen for background recording purposes only)
- resolution: Creston / room controls / speaker: up/own, on/off, to turn the classroom speaker volume down or off entirely
- explanation: the Elmo camera works with the sound from the left lectern microphone (not from the right or DIS microphone); if the Elmo camera is room source, its sound is displayed over the classroom speakers; from where it feeds back into the microphone; etc (infinite loop, feedback).


Questions? Read the About. Or just ask me a quick Our Databases: Resources with calendars -- Language learning material Moodle Sites, multimedia files -- films


FAQs for LRC student staff or for students or for teachers. To search our FAQs, in the browser addressbar, add after "https://plagwitz.wordpress.com/feed/?tag=faqs+/" "+TAG1" (from tag cloud below) OR "https://plagwitz.wordpress.com/feed/tag=faqs
&category_name=" "CAT1" (from category hierarchy below). OR search both categories and tags, and multiple TAGs/CATs (connect with "," for OR-search, with "+" for AND-search), like so: https://plagwitz.wordpress.com/feed/?tag=TAG1+TAG2+...TAGn&category_name=CAT1
+CAT2+...CATn"
Other ways to find help
If you cannot find it here, look there: 5,500 Language-Learning Links and Programs for learning or teaching 150 languages
Shortcuts:Our Lists, Our Maps, LRC Staff Moodle Site,LRC Project Moodle Site, 49erexpress, UNCC Moodle, Student Recordings: s:claslcslrcsanakostudent
Learning usage samples: Sanako oral exam, Kaltura webcam presentation, Dictation with speech recognition, Sanako written exam, Chinese and Japanese interactive stroke-order practice
Test the Sanako Installer, Webbrowser Popup Konfigurator for XP, or Windows7, faster LRC TeacherPC Log-in Let MS facilitate diacritics writing by installing for you US-International keyboard layout
This is my personal blog (Google+). The views expressed on these pages are mine alone and not those of my employer. The information in this weblog is provided “AS IS” with no warranties, and confers no rights.
